
As the digital landscape continues to evolve, businesses across the world strive to keep up with the pace. Leveraging data to understand user behavior has become an essential part of the journey. Traditionally, client-side tracking has dominated the scene, but recent privacy policy changes and improved technology are shifting the focus towards server-side tracking. The ecommerce realm is no different. For ecommerce sites, especially WooCommerce-based ones, server-side tracking offers valuable advantages that go beyond traditional methods.
Before delving into how server-side tracking can be implemented for WooCommerce, let's first understand what server-side tracking is and why it has been gaining so much traction.
For server-side tracking, you will need to set up a standard web container. If you have not done so yet, please check out this article: Learn How To Set Up Google Tag Manager for WooCommerce
What is Server-Side Tracking?
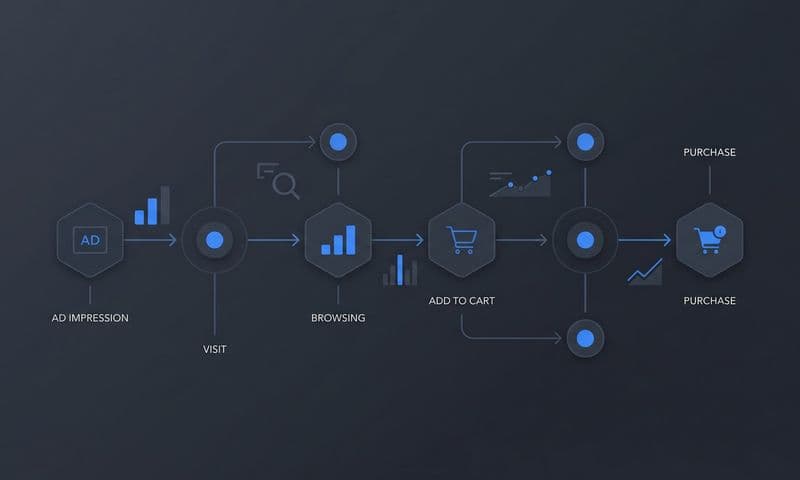
Traditionally, data tracking on the web has been largely client-side, which means it is done in the user's browser. When a user visits a webpage, JavaScript code runs to track user activities and send that information to the respective platforms, such as Google Analytics.
Server-side tracking, as the name suggests, moves this tracking process to the server level. Instead of running JavaScript in the user's browser to collect and send data, the data is sent to your server, which then sends it to the respective platforms. This shift in data processing brings about several advantages over client-side tracking.
Why Server-Side Tracking?
Server-side tracking has been gaining popularity for a variety of reasons. Let's take a look at some of the major ones.
1. Data Privacy: With increasing privacy regulations like GDPR and CCPA, as well as browser-level restrictions on third-party cookies from Google Chrome, Safari, and others, it's becoming harder to accurately track users on the client-side. Server-side tracking mitigates these issues as it does not rely on cookies in the same way.
2. Improved Performance: Server-side tracking can also improve your site’s performance. Since you're removing the tracking logic from the client-side, you are also reducing the amount of JavaScript that needs to run on each page, thus enhancing site speed.
3. Increased Accuracy: Ad blockers can prevent client-side tags from firing, which results in lost tracking data. Since server-side tracking happens after the user's browser has interacted with your server, it's less likely to be blocked by these tools, ensuring more accurate data collection.
4. Data Control: With server-side tracking, you have more control over your data. You can decide what data to forward to third-party services and what data to keep private, thereby reducing data leakage.
Now that we understand the what and why of server-side tracking, let's explore how to set it up for a WooCommerce website.
Setting Up Server-Side Tracking for WooCommerce
To implement server-side tracking for WooCommerce, you can use Google Tag Manager's Server-side tagging, in combination with plugins that integrate your WooCommerce store with it. Here's a step-by-step guide:
Step 1: Set Up Google Tag Manager's Server-side tagging
- Create a new Google Cloud Project. Follow Google's documentation to set up a new project in your Google Cloud account.
- In Google Tag Manager, create a new Server Container. You will receive a container ID that looks like GTM-XXXX.
- Link the Server Container to your Google Cloud Project. Follow the instructions in your Server Container setup screen.
Step 2: Install and Configure the Appropriate WooCommerce Plugin
There are several plugins available that integrate WooCommerce with Google Tag Manager Server-side tagging. One popular option is the "WooCommerce Google Tag Manager Integration" plugin. Here's how to set it up:
- Install the plugin from the WordPress plugin directory and activate it.
- Go to the plugin settings and enter your Google Tag Manager Server Container ID.
- Customize your data layer variables and events based on what data you wish to track.
Step 3: Configure Your Server-side Tags and Triggers
Back in Google Tag Manager, you'll need to set up the tags and triggers for the events you want to track.
- Inside your server container, create a new custom tag for each event you wish to track. The tag will need the appropriate API endpoint and tracking ID from the platform you're sending data to, like Google Analytics.
- Create triggers for your tags based on the variables you set up in your WooCommerce plugin. For example, if you want to track purchases, you could create a trigger that fires whenever the purchase event variable is true.
- Test your setup using Google Tag Manager's preview mode. This allows you to verify that your tags are firing correctly before you publish them live.
Step 4: Test and Deploy
Finally, extensively test your setup to ensure data is being tracked and sent accurately. Make use of Google Analytics Real-Time reports or the respective platform's tools to validate data.
After validating, publish your changes in Google Tag Manager, and your WooCommerce store should now be set up with server-side tracking!
Conclusion
Server-side tracking is a powerful tool in the current era of increasing privacy restrictions and the ongoing quest for accurate data. For WooCommerce store owners, setting it up involves a detailed but manageable process. Given its advantages, the switch to server-side tracking can undoubtedly be a game-changer for better insights and a more optimized ecommerce performance.