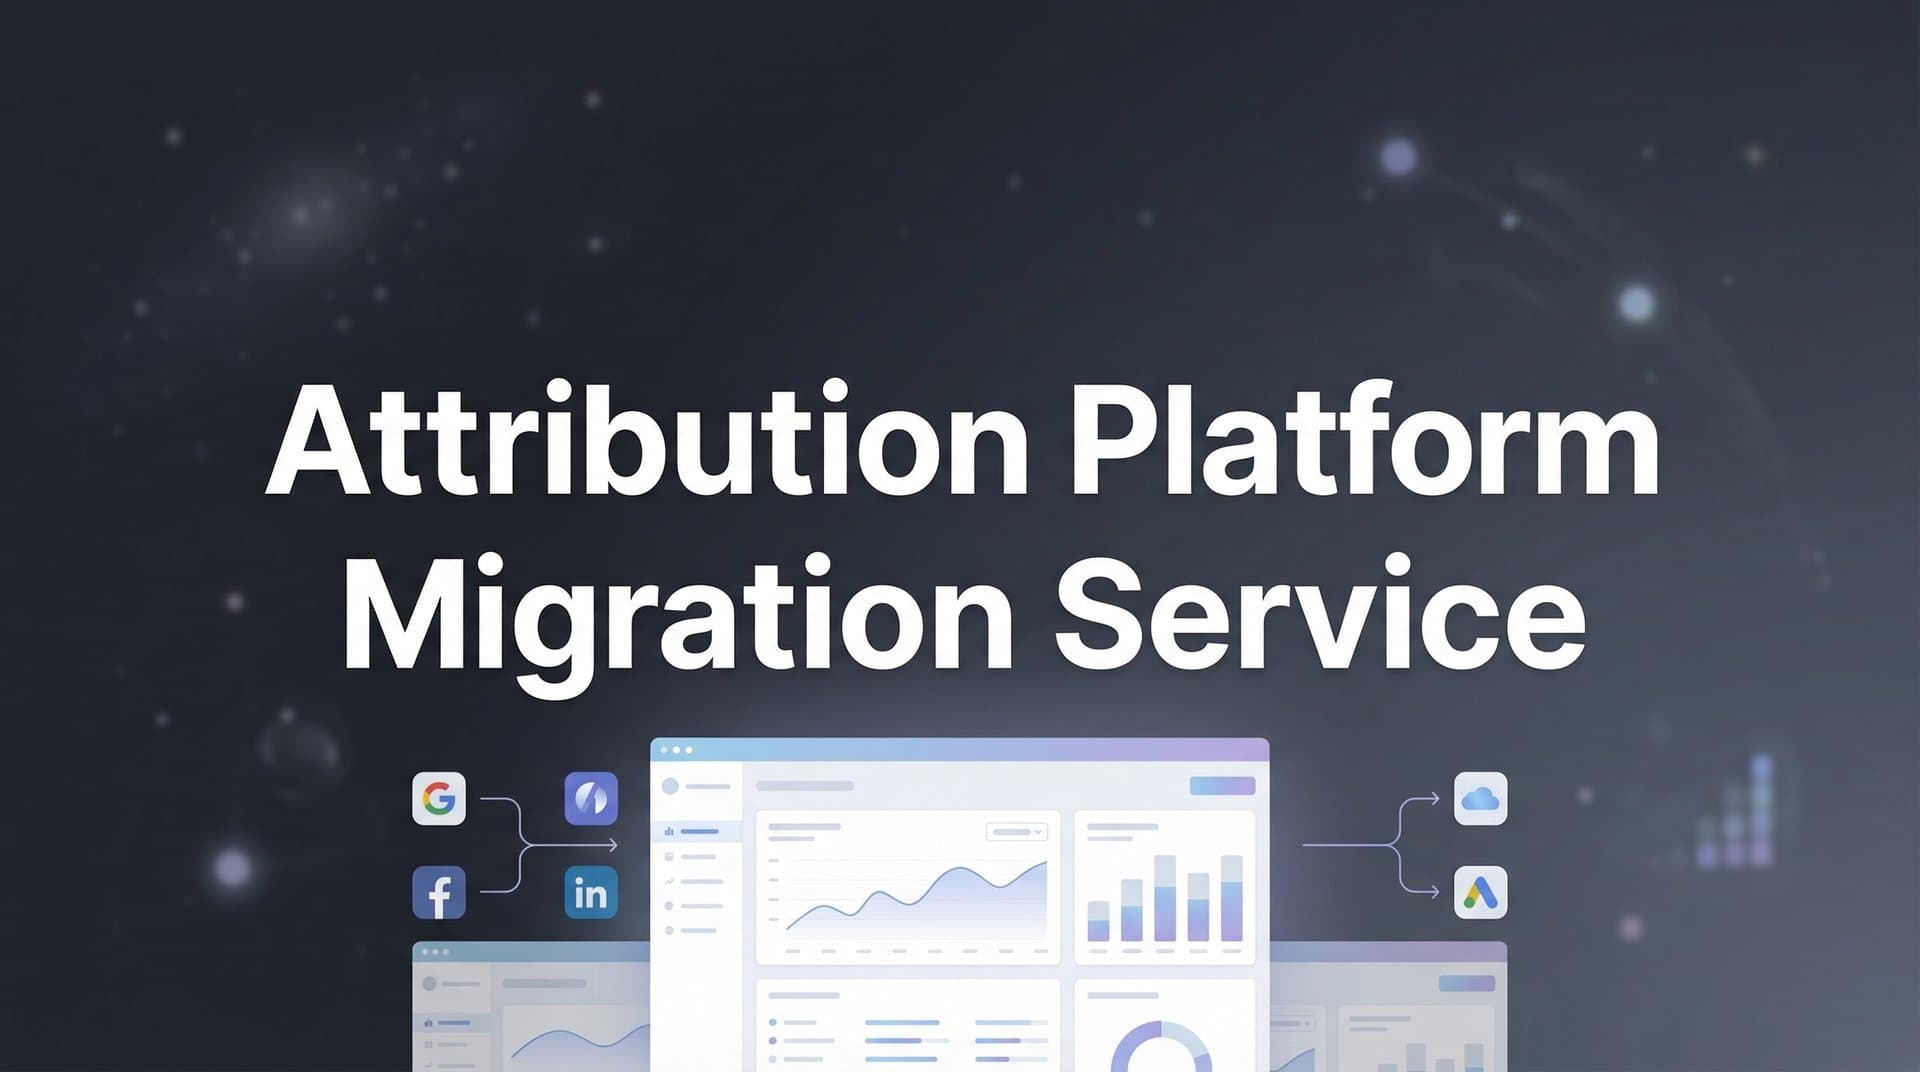
You've finally hit the wall with your current attribution platform. Maybe it's missing conversions, can't track across devices, or leaves you guessing which campaigns actually drive revenue. You know you need to switch, but the thought of migrating your entire tracking infrastructure while campaigns are running feels like changing tires on a moving car.
Here's the reality: switching attribution platforms doesn't have to disrupt your marketing operations or erase your historical insights. With a structured approach, you can transition smoothly while maintaining data continuity and campaign performance throughout the process.
This guide walks you through the complete migration process, from auditing your current setup to validating that your new platform captures every touchpoint accurately. You'll learn how to run platforms in parallel, verify data accuracy, and ensure your ad algorithms keep optimizing without interruption. By the end, you'll have a clear roadmap that protects your data, maintains campaign momentum, and sets you up for better attribution insights moving forward.
Think of this as your migration insurance policy. Follow these steps, and you'll avoid the common pitfalls that cause tracking gaps, data loss, and campaign performance dips during platform transitions.
Step 1: Audit Your Current Attribution Setup and Document Requirements
Before touching any tracking code, you need a complete inventory of what you're working with. Start by listing every conversion event your current platform tracks. This includes purchases, form submissions, email signups, demo requests, and any custom micro-conversions you've set up along the customer journey.
Next, document every integration your current platform maintains. Which ad platforms send data to your attribution system? Meta, Google Ads, TikTok, LinkedIn? List them all. Then identify your CRM connections. Does your attribution platform receive lead status updates, deal values, and closed revenue data? Map out exactly how data flows between systems.
This is also your chance to identify why you're migrating in the first place. Are you missing conversions due to iOS tracking limitations? Does your current platform lack server-side tracking capabilities? Can't see the full customer journey across touchpoints? Write down every gap and frustration. These pain points become your requirements list for the new platform.
Create two columns: must-have features and nice-to-have capabilities. Must-haves might include server-side tracking, multi-touch attribution across all channels, CRM integration for revenue tracking, and conversion sync to feed data back to ad platforms. Nice-to-haves could be AI-powered optimization recommendations, custom attribution models, or advanced reporting features.
Before you change anything, export your historical data. Download conversion records, attribution reports, and campaign performance data from the past 6-12 months. Most platforms don't transfer historical data during migrations, so these exports become your reference point for validating the new system and maintaining year-over-year comparisons.
Document your UTM parameter structure and naming conventions. If your team uses specific campaign naming patterns, source/medium combinations, or custom parameters, write them down. Maintaining consistency during migration prevents broken reports and ensures your new platform organizes data the same way your team expects.
Take screenshots of your current attribution reports and dashboards. These visual references help you recreate the same views in your new platform and ensure you're not losing critical insights during the transition.
Step 2: Map Your Customer Journey Touchpoints and Data Flow
Now that you know what you're tracking, it's time to map how data moves through your marketing ecosystem. Start by diagramming the customer journey from first touchpoint to final conversion. A typical flow might look like this: user sees Meta ad, clicks to landing page, submits form, receives email sequence, clicks email link, returns via Google search, and finally converts.
Identify every touchpoint that needs tracking. This includes paid ad clicks across all platforms, organic social visits, email interactions, landing page views, form submissions, phone calls, chat conversations, and any offline events like trade show leads or sales calls. Each touchpoint represents a potential gap if not properly tracked in your new platform.
Your UTM parameters are the connective tissue that ties touchpoints together. Document your current structure: which parameters track campaign names, ad groups, creative variations, and audience segments? If you use custom parameters for specific tracking needs, note those too. Maintaining this structure in your new platform ensures continuity in reporting and prevents historical data from becoming incomparable.
Pay special attention to custom events and micro-conversions that matter to your business. Maybe you track video view completions, pricing page visits, or specific product page interactions. These events might not be obvious conversions, but they provide crucial context for understanding which campaigns drive engagement before purchase.
Here's where server-side tracking becomes critical. Browser privacy changes and iOS limitations have made client-side pixels increasingly unreliable. Map out which conversion events will benefit from server-side tracking. Form submissions, purchases, and CRM updates are prime candidates because they happen on your server and don't depend on browser cookies or JavaScript execution.
Document your current data flow architecture. How does conversion data reach your ad platforms? Are you relying entirely on pixels, or do you have some server-side connections already? Understanding your current setup helps you plan the server-side infrastructure your new platform will need.
Create a visual diagram showing how data flows from each touchpoint through your cross-platform attribution tracking system and back to your ad platforms. This diagram becomes your blueprint for configuring the new system and helps you spot potential tracking gaps before they become problems.
Step 3: Set Up Your New Attribution Platform in Parallel
This is the most critical step: installing your new platform without removing the old one. Running both systems simultaneously gives you a validation period to confirm accuracy before committing fully to the migration.
Start by installing the tracking code for your new platform. If it uses a JavaScript snippet for client-side tracking, add it to your website alongside your existing tracking code. Don't remove the old code yet. Both platforms should collect data simultaneously during this parallel tracking phase.
Configure server-side tracking connections next. This typically involves setting up webhooks or API integrations that send conversion events from your server directly to the attribution platform. Server-side tracking captures events that client-side pixels might miss due to ad blockers, browser privacy settings, or iOS tracking restrictions.
Connect all your ad platform accounts to the new attribution system. Link Meta Ads Manager, Google Ads, LinkedIn Campaign Manager, TikTok Ads, and any other platforms you run campaigns on. This allows the new platform to pull ad spend, impression, and click data while also preparing for conversion sync capabilities later.
Integrate your CRM system to capture the complete customer journey. Whether you use Salesforce, HubSpot, Pipedrive, or another CRM, connecting it to your attribution platform ensures you can track leads from first touch through closed revenue. This integration is essential for understanding which campaigns drive actual business results, not just website conversions.
Configure conversion events to match the requirements you documented in Step 1. Set up tracking for purchases, form submissions, demo requests, and any custom events specific to your business. Make sure event names and parameters align with your existing structure so reports remain consistent.
Plan to run both platforms in parallel for at least two to four weeks. This validation period gives you enough data to compare conversion counts, identify discrepancies, and troubleshoot any tracking issues before removing your old platform. Rushing this step is the most common migration mistake. Give yourself time to validate thoroughly.
During parallel tracking, monitor both platforms daily. Check that conversion events are firing correctly, ad platform data is syncing, and CRM integrations are capturing lead information as expected. Early detection of issues prevents them from becoming major problems later.
Step 4: Validate Data Accuracy and Compare Attribution Results
With both platforms running, it's time to validate that your new system captures data as accurately as the old one, or ideally, better. Start by comparing total conversion counts between platforms. Pull reports for the same date range and check that major conversion events show similar numbers.
Some discrepancy is normal and often expected. Your new platform might capture conversions that the old one missed due to better server-side tracking or improved cross-device capabilities. The goal isn't perfect alignment, but rather confirming that the new platform is capturing the same events and not missing significant data.
Check each ad platform connection individually. Log into Meta Ads Manager and verify that conversion events from your new attribution platform are appearing correctly. Do the same for Google Ads, LinkedIn, and other platforms. This confirms that conversion sync is working and your ad algorithms are receiving the signals they need for optimization.
Test multi-touch attribution by examining customer journeys in both platforms. Pick several conversions and trace them back through all touchpoints. Does the new platform capture the same journey stages as the old one? Are you seeing the complete path from first click to final conversion, including email touches, retargeting interactions, and organic visits?
Validate server-side events specifically. These are often the most critical conversions for your business, like purchases or demo requests. Confirm that server-side tracking is firing reliably for every conversion. Check server logs if needed to verify events are being sent successfully.
Document any discrepancies you find and investigate the root cause. Is the new platform capturing more conversions because of better tracking? Or is it missing some due to configuration issues? Common culprits include incorrect event parameters, missing UTM tags, or integration delays between systems. Understanding these cross-platform attribution challenges helps you troubleshoot effectively.
Test edge cases that often reveal tracking problems. What happens when users have ad blockers enabled? Does tracking work correctly on mobile devices? Can the platform handle users who convert across multiple devices? These scenarios expose weaknesses before they affect your data quality at scale.
If you discover tracking gaps, fix them immediately. Adjust event configurations, update integration settings, or modify tracking code as needed. Then continue parallel tracking for another week to confirm the fixes work correctly.
Step 5: Configure Conversion Sync and Ad Platform Optimization
Once you've validated data accuracy, it's time to optimize how your new platform feeds conversion data back to your ad platforms. Conversion sync is critical because it tells Meta, Google, and other platforms which ads actually drive results, enabling their algorithms to optimize targeting and bidding more effectively.
Set up conversion sync for each ad platform you run campaigns on. This typically involves configuring API connections that send conversion events from your attribution platform directly to Meta's Conversions API, Google's offline conversion imports, or similar endpoints on other platforms. These server-side connections bypass browser limitations and provide more reliable conversion signals than pixels alone.
Configure which events get synced to each platform. You might send all conversions to some platforms while sending only high-value events to others. For example, sync both leads and purchases to Meta, but only send purchases to LinkedIn if that's your primary conversion goal there.
Ensure your ad platforms receive enriched conversion data, not just basic event notifications. This means including customer value, product details, and other parameters that help algorithms understand which conversions are most valuable. Better data leads to better optimization.
Set attribution windows that align with your actual sales cycle. If your typical customer takes 14 days from first click to purchase, configure your attribution windows accordingly. Using windows that are too short undervalues top-of-funnel campaigns, while windows that are too long might over-credit touchpoints that didn't actually influence the decision.
Configure attribution models that match your business reality. First-click attribution works well for businesses focused on acquisition, while last-click suits direct response campaigns. Multi-touch models like linear or time-decay provide a more complete picture of how different touchpoints contribute throughout the journey. Review a multi-touch attribution platforms comparison to understand your options.
Test that conversion events appear correctly in each ad platform's dashboard. Log into Meta Ads Manager and check the Events Manager to confirm conversions are flowing in with the right parameters and values. Do the same verification for Google Ads conversion tracking and any other platforms you use.
Monitor campaign optimization performance during this phase. Are your ad platforms still improving performance as they receive conversion signals from the new attribution system? If you notice optimization degrading, investigate whether conversion sync is delayed or missing critical data.
Verify that your attribution platform's AI recommendations align with actual campaign performance. If the system suggests scaling certain campaigns or adjusting budgets, cross-reference those recommendations with your ad platform data to ensure they're based on accurate attribution insights. Platforms with AI features can significantly enhance your optimization capabilities.
Step 6: Complete the Migration and Decommission Your Old Platform
You've validated data accuracy, confirmed conversion sync is working, and verified that your ad platforms are optimizing correctly. Now it's time to complete the migration by removing your old tracking system.
Start by removing old tracking pixels and scripts from your website. Go through your tag manager or website code and delete the JavaScript snippets, pixels, and any other tracking elements from your previous platform. Leaving old code in place can slow page load times and create confusion about which platform is the source of truth.
Update team dashboards and reports to pull data from the new platform exclusively. If your team has bookmarked reports or built custom dashboards in the old system, recreate them in the new platform. This ensures everyone is looking at the same data and prevents conflicting insights from different sources.
Train your team on the new platform's interface and capabilities. Schedule sessions to walk through the dashboard, explain how to read attribution reports, and demonstrate AI-powered recommendations if your new platform includes them. The best attribution platform is only valuable if your team knows how to use it effectively.
Set up automated alerts for tracking issues or data anomalies. Configure notifications for when conversion events drop below expected levels, when integrations fail, or when data quality issues arise. Early detection prevents small problems from becoming major tracking gaps.
Archive historical data exports from your old platform for reference during the transition period. You'll want these records available for year-over-year comparisons, historical analysis, and validating that your new platform's data aligns with past performance trends. Understanding implementation costs upfront helps you budget appropriately for the full migration.
Cancel your subscription to the old platform once you're confident the new system is fully operational. Keep access for at least 30 days after removing tracking code, just in case you need to reference historical data or troubleshoot unexpected issues.
Putting It All Together: Your Migration Checklist
A successful attribution platform migration protects your campaign performance while upgrading your tracking capabilities. By following a methodical approach, you maintain data continuity, validate accuracy before committing, and ensure your team can leverage better insights without disruption.
Use this checklist to track your migration progress. First, complete your audit: inventory all tracked events, document integrations, identify gaps, and export historical data. Second, map your customer journey: diagram touchpoints, document UTM structures, and plan server-side tracking implementation. Third, install your new platform in parallel: set up tracking code, connect ad platforms and CRM, and run both systems simultaneously for validation.
Fourth, validate data accuracy: compare conversion counts, verify multi-touch attribution, and troubleshoot any discrepancies. Fifth, configure conversion sync: set up API connections to ad platforms, align attribution windows with your sales cycle, and verify optimization performance. Sixth, complete the migration: remove old tracking code, update team dashboards, train your team, and decommission the old platform.
The parallel tracking phase is your safety net. Running both platforms simultaneously for two to four weeks gives you confidence that the new system captures every touchpoint before you remove the old one. This validation period is where most successful migrations differ from failed ones.
Server-side tracking has become essential for accurate attribution. Browser privacy changes and iOS limitations mean client-side pixels alone can't capture the complete picture. Your new platform should leverage server-side connections to maintain tracking accuracy regardless of browser settings or device restrictions.
Conversion sync capabilities ensure your ad platform algorithms continue optimizing effectively. Feeding enriched conversion data back to Meta, Google, and other platforms helps their AI target better audiences and improve campaign performance based on actual results, not just pixel-tracked events.
With the right attribution platform in place, you'll gain clearer visibility into which campaigns drive revenue, how different touchpoints contribute to conversions, and where to allocate budget for maximum impact. Your new system should capture the complete customer journey, from first ad impression through closed revenue, giving you the insights needed to scale campaigns with confidence.
Ready to elevate your marketing game with precision and confidence? Discover how Cometly's AI-driven recommendations can transform your ad strategy. Get your free demo today and start capturing every touchpoint to maximize your conversions.