You've just signed up for an attribution platform. The dashboard looks promising, the features are impressive, and the sales demo made everything seem straightforward. Then you log in for the first time and reality hits: there are connection settings, tracking codes, API keys, and integration options everywhere. Where do you even start?
Here's what most marketers don't realize until it's too late: how you set up your attribution platform in the first 48 hours determines whether you'll have reliable data or a mess of incomplete information six months from now.
The difference between a successful attribution platform onboarding and a failed one isn't technical expertise—it's following the right sequence. Connect things in the wrong order, skip a verification step, or misconfigure one integration, and you'll spend weeks troubleshooting why your numbers don't match or why conversions aren't showing up.
This guide walks you through the complete attribution platform onboarding process, from auditing your existing setup through final verification. You'll learn exactly what to do at each stage, what mistakes to avoid, and how to confirm everything is working before you start making decisions based on the data.
By the end of this process, you'll have a fully operational attribution system that captures every touchpoint in your customer journey—from the first ad click through final purchase. No data gaps. No guesswork. Just accurate attribution that shows you what's actually driving revenue.
Step 1: Audit Your Current Marketing Stack and Data Sources
Before you connect a single integration, you need to know exactly what you're working with. Think of this like moving into a new house—you need to know what furniture you have before you start arranging rooms.
Start by documenting every active advertising platform you're currently running. This means Meta Ads, Google Ads, TikTok, LinkedIn, Microsoft Ads, Pinterest, YouTube—everything. Don't just list them; note how each one is currently tracked. Are you using native pixels? UTM parameters? Both? Write it down.
Next, identify your website infrastructure. What platform is your site built on? WordPress? Shopify? Custom code? Do you use a tag manager like Google Tag Manager? This matters because it determines how you'll deploy tracking scripts in Step 3.
Now document your CRM and marketing automation tools. Salesforce? HubSpot? ActiveCampaign? Pipedrive? List every system that touches customer data. These integrations will become crucial in Step 4 when you connect revenue data back to marketing touchpoints.
Here's where most teams make their first mistake: they forget about the edge cases. Do you have separate domains for checkout flows? Subdomains for different product lines? Landing pages hosted on third-party platforms like Unbounce or Instapage? Every separate domain needs tracking coverage, or you'll have attribution blind spots.
Take inventory of your current conversion events too. What actions are you tracking today? Form submissions? Purchases? Demo bookings? Phone calls? Write down the exact event names and how they're currently configured. This baseline helps you replicate or improve upon what you already have.
Finally, document your UTM parameter conventions. Do you have a consistent naming structure for campaigns, sources, and mediums? If your team has been inconsistent with UTM tagging, now is the time to establish standards before you start feeding data into your new attribution platform.
Why does this audit matter so much? Because incomplete documentation leads to incomplete setup. You'll connect your major ad accounts, think you're done, and three weeks later realize you forgot about that LinkedIn campaign or that separate checkout domain. Those gaps mean missing attribution data—and missing data means bad decisions.
Spend an hour on this audit. Use a spreadsheet. List everything. It's the foundation for everything that follows.
Step 2: Connect Your Ad Platform Accounts
Now that you know what you're working with, it's time to start connecting your advertising platforms. This is where your attribution platform begins pulling in spend data, impressions, clicks, and campaign details.
Start with your highest-spend platforms first. If you're running $50,000 per month on Meta and $5,000 on Pinterest, connect Meta first. This ensures your most important data sources are flowing correctly before you move to smaller channels.
When connecting each platform, you'll typically need to grant API access permissions. This isn't the same as just logging in—you're giving the attribution platform permission to pull data from the advertising account. Most platforms use OAuth authentication, which means you'll click "Connect," log into the ad platform, and authorize specific permissions.
Pay attention to what permissions you're granting. For accurate attribution, you need read access to campaign data, ad performance metrics, and spend information. Some attribution platforms also request write permissions for features like conversion sync (sending attribution data back to the ad platform to improve its algorithm). Understand what you're authorizing.
Here's a critical setting most people overlook: historical data import. Many attribution platforms let you pull in historical performance data from before your connection date. If you want to analyze trends or compare performance across time periods, configure this during initial setup. Some platforms limit historical imports to 90 or 180 days, so check the options.
Configure spend data syncing carefully. Your attribution platform needs accurate cost data to calculate ROAS (Return on Ad Spend) correctly. Verify that the currency settings match your ad accounts. If you're running campaigns in multiple currencies, confirm the platform handles conversion rates properly.
After connecting each account, don't just assume it worked. Check the connection status in your attribution platform dashboard. You should see "Connected" or "Active" status indicators. More importantly, verify that recent data is actually pulling through—check if yesterday's spend and impressions appear in the platform.
Common connection issues to watch for: expired tokens (if you change your ad platform password, API connections often break), insufficient permissions (you need admin access on most ad accounts to grant API permissions), and account structure mismatches (if you manage multiple ad accounts, make sure you're connecting the right ones).
If a connection fails, the error message usually tells you why. "Insufficient permissions" means you need higher access levels. "Account not found" means you selected the wrong account ID. "Authentication failed" typically means you need to re-authorize.
Your success indicator for this step: all ad accounts show "Connected" status, and you can see spend data from the past 24-48 hours flowing into the platform. If the numbers match what you see in the native ad platforms, you're ready for Step 3.
Step 3: Install Tracking on Your Website and Landing Pages
This is where attribution actually begins—capturing what happens when someone clicks your ad and lands on your website. Without proper tracking installation, everything else is pointless. Your ad platforms are connected, but if you can't track conversions on your site, you have no attribution data.
Most attribution platforms provide a base tracking script (sometimes called a pixel or tag) that needs to be installed on every page of your website. This script typically goes in the header section of your HTML, just before the closing head tag. It fires on every page load, capturing visitor data and tracking their journey.
You have two installation options: direct installation or tag manager deployment. Direct installation means adding the script directly to your website's code—this works if you have developer access and want the simplest setup. Tag manager deployment (using Google Tag Manager or similar) gives you more flexibility to manage multiple tracking scripts without touching code.
If you're using a tag manager, create a new tag for your attribution platform's script, set it to fire on "All Pages," and publish the container. Test it immediately by visiting your website and checking if the tag fires in your tag manager's preview mode.
Here's where most implementations go wrong: incomplete coverage. Your tracking script needs to be on every page where a conversion might happen. That includes your main website, but also checkout pages, thank you pages, landing pages hosted on separate platforms, and any subdomains.
If you use Shopify, Unbounce, Leadpages, or any third-party landing page builder, you'll need to install the tracking script there separately. These platforms have their own script injection areas—find the setting for "Custom Code" or "Tracking Scripts" and add your attribution platform's code there too.
Now comes the critical upgrade: server-side tracking. Browser-based tracking (what we just installed) has become increasingly limited due to iOS privacy changes, ad blockers, and browser restrictions. Many conversions simply don't get tracked when you rely only on client-side pixels.
Server-side tracking works differently. Instead of relying on the user's browser to send conversion data, your server sends it directly to the attribution platform. This bypasses browser limitations and dramatically improves data accuracy. Most modern attribution platforms offer server-side tracking options—configure this now, not later.
Setting up server-side tracking typically involves installing a server-side SDK or configuring webhooks from your website backend. If you're using Shopify, many attribution platforms offer Shopify app integrations that handle server-side tracking automatically. For custom websites, you'll need developer help to implement the server-side component.
Next, configure your conversion events. These are the specific actions you want to track: form submissions, purchases, demo requests, phone calls, file downloads. Each conversion event needs a unique identifier and should fire when the action completes.
For form submissions, the conversion event should trigger when the form successfully submits—not when someone just clicks the submit button. For purchases, it should fire on the order confirmation page with the transaction value included. For demo bookings, it should fire when the calendar booking confirms.
Test each conversion event immediately after setup. Submit a test form. Complete a test purchase. Book a test demo. Then check your attribution platform to confirm the conversion appeared with the correct details. This verification step catches configuration issues before they become data gaps.
One final critical detail: cross-domain tracking. If your checkout flow happens on a different domain (like many Shopify stores), or if you send traffic between multiple domains you own, you need cross-domain tracking configured. Otherwise, the attribution chain breaks when users move between domains, and you lose the connection between the initial ad click and the final conversion.
Step 4: Integrate Your CRM and Revenue Data
You've connected your ad platforms and installed website tracking. That gives you top-of-funnel data—clicks, visits, and initial conversions. But here's what's missing: what happens after someone becomes a lead? Do they become a customer? How much revenue do they generate? Which marketing touchpoints actually drove closed deals?
This is why CRM integration is the most valuable step in attribution platform onboarding. It connects marketing activity to actual revenue, not just lead volume.
Start by connecting your CRM to the attribution platform. The process is similar to connecting ad platforms—you'll authenticate via API and grant permissions. Most attribution platforms integrate directly with major CRMs like Salesforce, HubSpot, Pipedrive, and Close.
During connection, you'll typically be asked which data to sync. At minimum, you need contact records, deal values, and deal stages. Some platforms also sync company records, notes, and custom fields. Think about what information you need for attribution—usually contact source, deal amount, close date, and pipeline stage are essential.
Here's where CRM integration gets powerful: mapping CRM stages to attribution touchpoints. Your CRM tracks lead progression through stages like "New Lead," "Qualified," "Demo Completed," "Proposal Sent," and "Closed Won." Your attribution platform needs to understand these stages to show you which marketing channels drive leads through each phase of the funnel.
Configure stage mapping in your attribution platform settings. Match each CRM stage to its equivalent in the attribution system. This creates full-funnel visibility—you'll see not just which channels generate the most leads, but which channels generate leads that actually close.
Now set up revenue sync. This is the connection between closed deals in your CRM and the marketing touchpoints that generated those deals. When a deal closes in your CRM, the attribution platform should automatically pull in the revenue value and attribute it back to the ads, campaigns, and channels that influenced that customer.
Revenue sync typically works through webhooks or scheduled sync intervals. Webhooks are faster (near real-time updates when deals close), while scheduled syncs happen every few hours. Configure whichever your platform supports, but verify the sync is actually working by closing a test deal and checking if the revenue appears in your attribution dashboard.
Pay attention to deal value accuracy. If your CRM stores deal values in a different currency than your ad spend, make sure currency conversion is handled correctly. If you have recurring revenue, decide whether you're tracking full contract value, first-year value, or monthly recurring revenue—be consistent.
Here's a common pitfall: incomplete contact matching. Your attribution platform needs to match website visitors to CRM contacts to connect the attribution chain. This usually happens through email address matching—when someone submits a form with their email, the platform looks for that email in your CRM and links the records.
If your form submissions don't capture email addresses, or if there's a delay between form submission and CRM record creation, matching breaks down. Verify that form data flows into your CRM quickly and that email addresses are consistently captured.
Another consideration: historical data. Do you want to import historical CRM deals and match them to past marketing touchpoints? Some attribution platforms can retroactively analyze closed deals from before your onboarding date, which helps establish baseline performance. If this matters to you, configure historical import settings now.
Your success indicator for this step: close a test deal in your CRM with a known value, then check your attribution platform to confirm the revenue appears and is correctly attributed to the marketing touchpoints that generated that test lead. If the attribution chain is complete—from ad click through website visit through CRM deal—you've nailed this step.
Step 5: Configure Attribution Models and Reporting Views
Your data is flowing. Ad platforms are connected, website tracking is live, and CRM integration is capturing revenue. Now you need to decide how to analyze it all. This is where attribution models come in.
An attribution model is the rule set that determines how credit for a conversion gets distributed across the marketing touchpoints that influenced it. If someone sees your Facebook ad, clicks a Google search ad three days later, and then converts from an email, which channel gets credit? The answer depends on your attribution model.
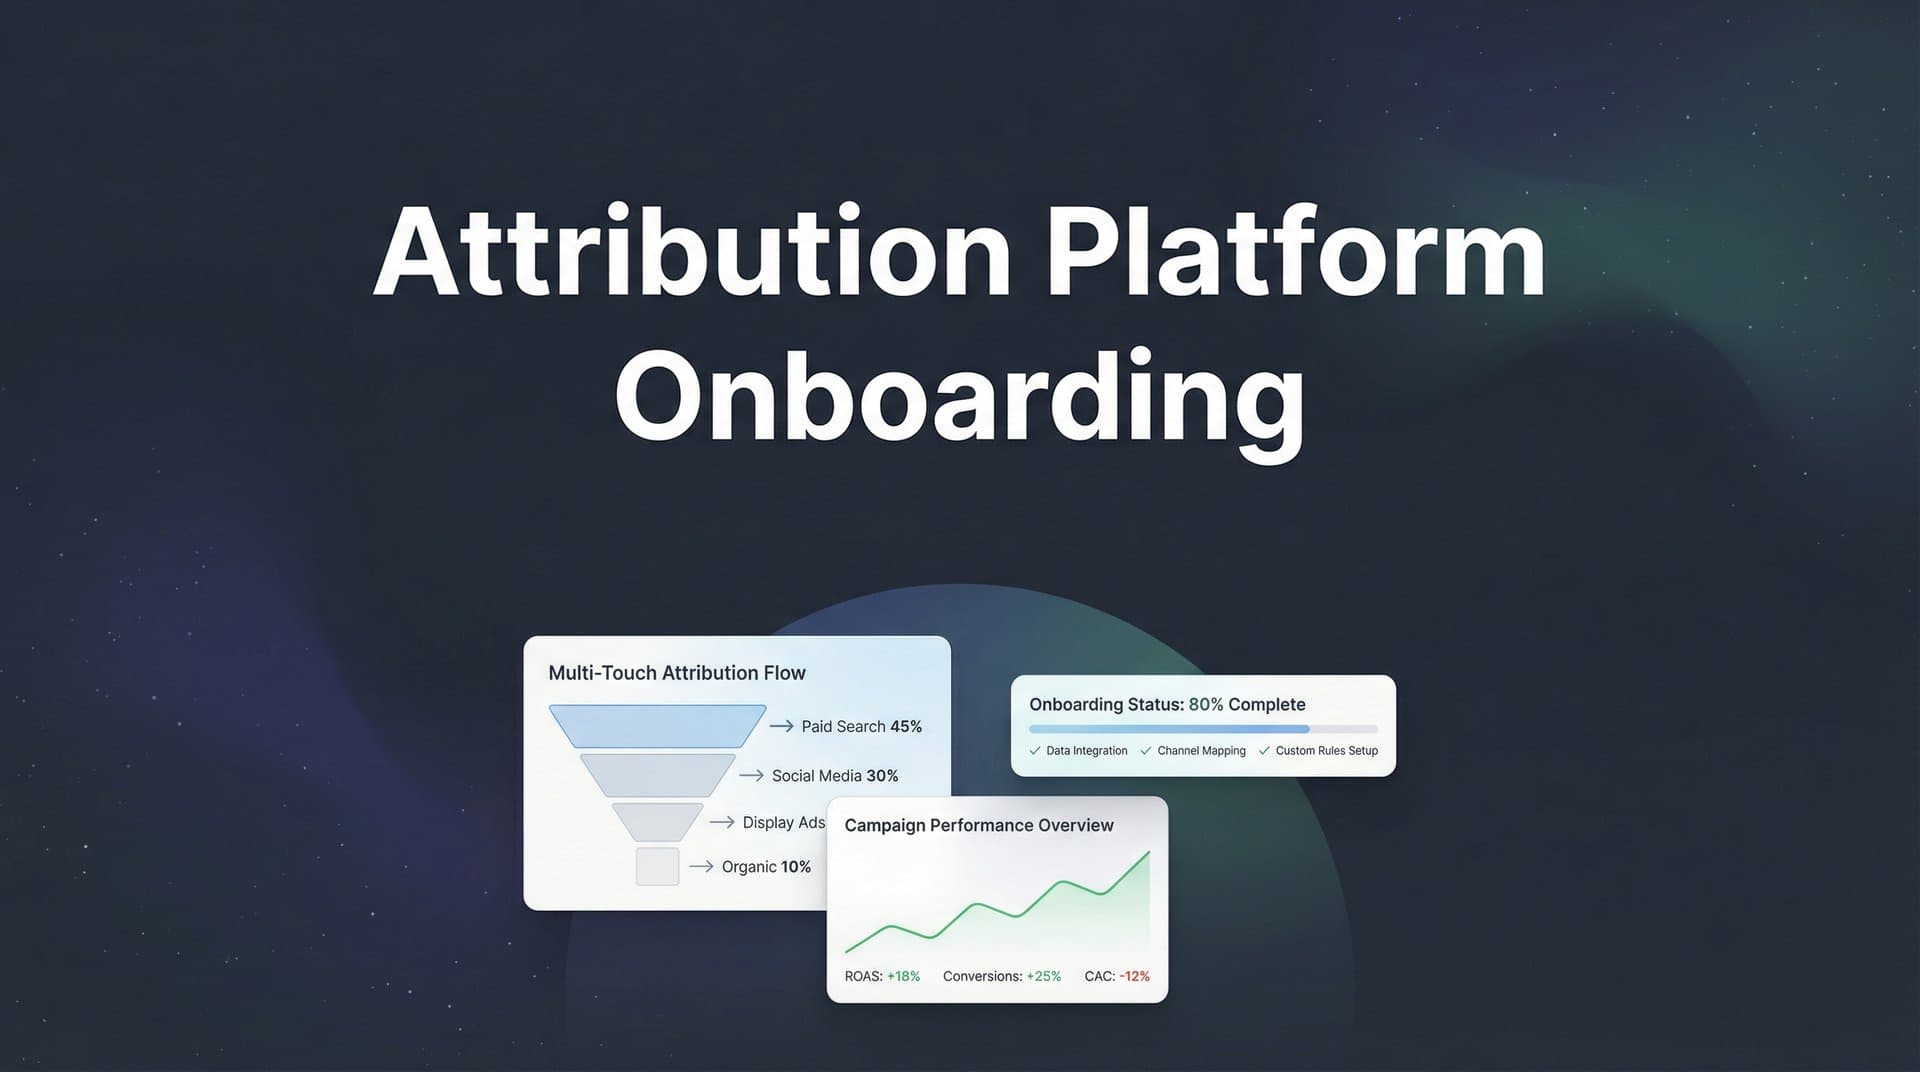
Start by understanding the main attribution models. First-touch attribution gives all credit to the first touchpoint—in our example, the Facebook ad. Last-touch attribution gives all credit to the final touchpoint before conversion—the email. Linear attribution splits credit equally across all touchpoints. Data-driven or multi-touch attribution uses algorithms to weight touchpoints based on their actual influence on conversion.
Here's the reality: there's no single "correct" attribution model. Each one tells you something different about your marketing. First-touch shows you what's driving awareness. Last-touch shows you what's closing deals. Multi-touch gives you a more complete picture of the entire journey.
Most attribution platforms let you select a primary attribution model for your main reporting views. Choose the one that aligns with your business goals. If you're focused on top-of-funnel lead generation, first-touch might be most relevant. If you're optimizing for closed revenue, last-touch or data-driven models often provide better insights.
But here's the best practice: don't pick just one. Set up comparison views that show multiple attribution models side by side. This lets you see how different models credit your channels differently. You might discover that Facebook drives tons of first-touch conversions but rarely gets last-touch credit—that tells you it's strong for awareness but weak at closing, which informs how you use that channel.
Create custom dashboards for different stakeholders next. Your executive team probably wants a high-level view of marketing ROI by channel. Your channel managers need detailed campaign performance with attribution breakdowns. Your agency partners might need specific reports on the campaigns they manage.
Most attribution platforms let you build multiple dashboard views with different metrics, date ranges, and filters. Spend time now creating these views so everyone can access the data they need without constantly requesting custom reports from you.
Configure your key metrics too. What numbers matter most to your business? ROAS? Cost per acquisition? Customer lifetime value? Revenue by channel? Make sure these metrics are prominently displayed in your dashboards and calculated correctly based on your business model.
Set up attribution windows while you're here. An attribution window is the time period after an ad interaction during which conversions get attributed back to that ad. For example, a 7-day click attribution window means conversions that happen within 7 days of clicking an ad get credited to that ad.
Different channels might need different attribution windows. Search ads often convert quickly (1-7 days), while awareness channels like display or podcast ads might have longer conversion cycles (30+ days). Configure windows that reflect your actual customer journey length.
Finally, establish reporting schedules. Do you want daily performance summaries? Weekly channel reports? Monthly ROI analysis? Set up automated reports that deliver key metrics to stakeholders on a regular schedule. This keeps everyone informed without requiring manual report generation.
Your success indicator: you can log into your attribution platform and immediately see which channels are driving conversions, how much they're costing, and what your return on ad spend looks like. If you can answer "What's my best-performing channel?" within 30 seconds of opening the dashboard, your reporting views are configured correctly.
Step 6: Verify Data Accuracy and Troubleshoot Gaps
Everything is connected. Your dashboards look great. The data is flowing. But here's the question that determines whether your attribution platform onboarding actually worked: is the data accurate?
This verification step is where most teams fail. They assume that because connections show "Active" status, everything is working correctly. Then weeks later they discover that conversions from a specific source aren't tracking, or that revenue numbers don't match their CRM, or that half their traffic shows up as "Direct" because UTM parameters are missing.
Start with controlled test conversions. Run a test conversion through each major traffic source you use. Click one of your Facebook ads, complete a form submission, and verify it appears in your attribution platform with correct source attribution. Do the same for Google Ads, email campaigns, and any other significant channels.
These test conversions tell you immediately if tracking is working end-to-end. If you click a Facebook ad and the conversion shows up attributed to "Direct" instead of Facebook, you have a tracking problem. If the conversion doesn't show up at all, you have a bigger tracking problem.
Next, compare attribution data against native platform reporting. Pull yesterday's conversion data from Facebook Ads Manager and compare it to what your attribution platform shows for Facebook conversions. The numbers won't match exactly (attribution platforms often capture conversions that Facebook's pixel misses due to browser limitations), but they should be in the same ballpark.
If your attribution platform shows 50 Facebook conversions but Facebook Ads Manager shows 200, something is wrong with your tracking setup. If your attribution platform shows 250 conversions but Facebook shows 200, that's actually expected—server-side tracking and better attribution often capture more conversions than native pixels.
Check for common data gaps. Look at your traffic sources in the attribution platform. Do you see a high percentage of "Direct" or "Unknown" traffic? That usually means UTM parameters are missing from your campaigns. Go back to your ad platforms and verify that all active campaigns have proper UTM tagging.
Verify that conversion events are firing with complete data. If you're tracking purchases, does each conversion include the transaction value? If you're tracking form submissions, does each conversion include the form name or page URL? Incomplete conversion data limits your ability to analyze performance.
Test cross-domain tracking if applicable. If your checkout happens on a separate domain, start a purchase on your main site, complete it on the checkout domain, and verify the attribution chain stays intact. The conversion should still be attributed to the original traffic source, not show up as a new "Direct" visit.
Check your CRM integration specifically. Create a test lead in your CRM, move it through your pipeline stages, and mark it as closed with a test revenue value. Then check your attribution platform to confirm the revenue appears and is attributed correctly. This verifies the complete loop from marketing touchpoint through CRM to revenue attribution.
Look for blocked scripts or tracking interference. Use your browser's developer console to check if any scripts are being blocked by ad blockers, privacy settings, or content security policies. If your tracking script shows errors in the console, you need to fix those issues or the tracking won't work for visitors with similar configurations.
Review your attribution model settings one more time. Verify that attribution windows are set correctly and that your chosen models are actually running. Some platforms require you to "activate" attribution models before they start calculating.
Set up monitoring for ongoing data quality. Most attribution platforms offer data quality alerts that notify you when connections break, tracking stops firing, or data volumes drop unexpectedly. Configure these alerts now so you catch future issues quickly. Understanding how to fix attribution discrepancies will save you significant troubleshooting time down the road.
Your success indicator for this final step: test conversions appear in your dashboard within the expected timeframe (usually within minutes for real-time platforms, or within a few hours for batch-processing platforms), with correct source attribution, complete conversion data, and accurate revenue values if applicable. When your test conversions work perfectly, your real conversions will too.
Putting It All Together
You've completed the six critical steps of attribution platform onboarding: auditing your marketing stack, connecting ad platforms, installing website tracking, integrating your CRM, configuring attribution models, and verifying data accuracy. Each step builds on the previous one, creating a complete attribution system that captures every touchpoint in your customer journey.
Here's your post-onboarding checklist to confirm everything is working: (1) All ad platform connections show active status with recent data, (2) Website tracking fires on all pages including checkout and thank you pages, (3) Test conversions appear correctly attributed in your dashboard, (4) CRM deals sync with revenue values attached, (5) Attribution models are calculating and dashboards display key metrics, (6) Data quality alerts are configured to catch future issues.
The real value of proper attribution platform onboarding reveals itself in the weeks ahead. You'll start seeing which channels actually drive revenue, not just traffic. You'll discover that some of your highest-spend campaigns generate leads that never close, while other smaller campaigns consistently produce high-value customers. You'll identify attribution patterns that were invisible before—like how customers typically interact with three different channels before converting.
Most teams see actionable insights within the first week of proper setup. That Facebook campaign you thought was underperforming? It might be driving 40% of your first-touch conversions. That expensive Google Ads keyword? It might have terrible first-touch performance but excellent last-touch conversion rates because it captures high-intent searchers ready to buy.
This is the difference between having an attribution platform and actually using attribution data to make better decisions. The setup work you just completed gives you accurate, trustworthy data. What you do with that data determines whether your marketing spend becomes more efficient or stays stuck in guesswork mode.
Start with small optimizations based on what the data shows. If a channel has strong first-touch performance but weak last-touch, use it for awareness campaigns and retargeting, not direct response. If a campaign shows high cost-per-acquisition but the customers it generates have above-average lifetime value, maybe it's actually your most profitable campaign and deserves more budget.
Review your attribution data weekly at first. As patterns emerge and you gain confidence in the data, you can shift to less frequent reviews. But in these early weeks, stay close to the numbers. Catch any data quality issues quickly, and start building your understanding of how different attribution models tell different stories about your marketing performance.
Ready to elevate your marketing game with precision and confidence? Discover how Cometly's AI-driven recommendations can transform your ad strategy—Get your free demo today and start capturing every touchpoint to maximize your conversions.