Your Meta ads dashboard shows 100 conversions. Your Google Analytics reports 75. Your CRM only logged 60 actual sales. Which number do you trust? If you're relying solely on browser-based pixels, the answer is probably "none of them." iOS privacy updates have made tracking unreliable, ad blockers are more aggressive than ever, and cookie restrictions keep tightening. The result? You're making budget decisions based on incomplete data.
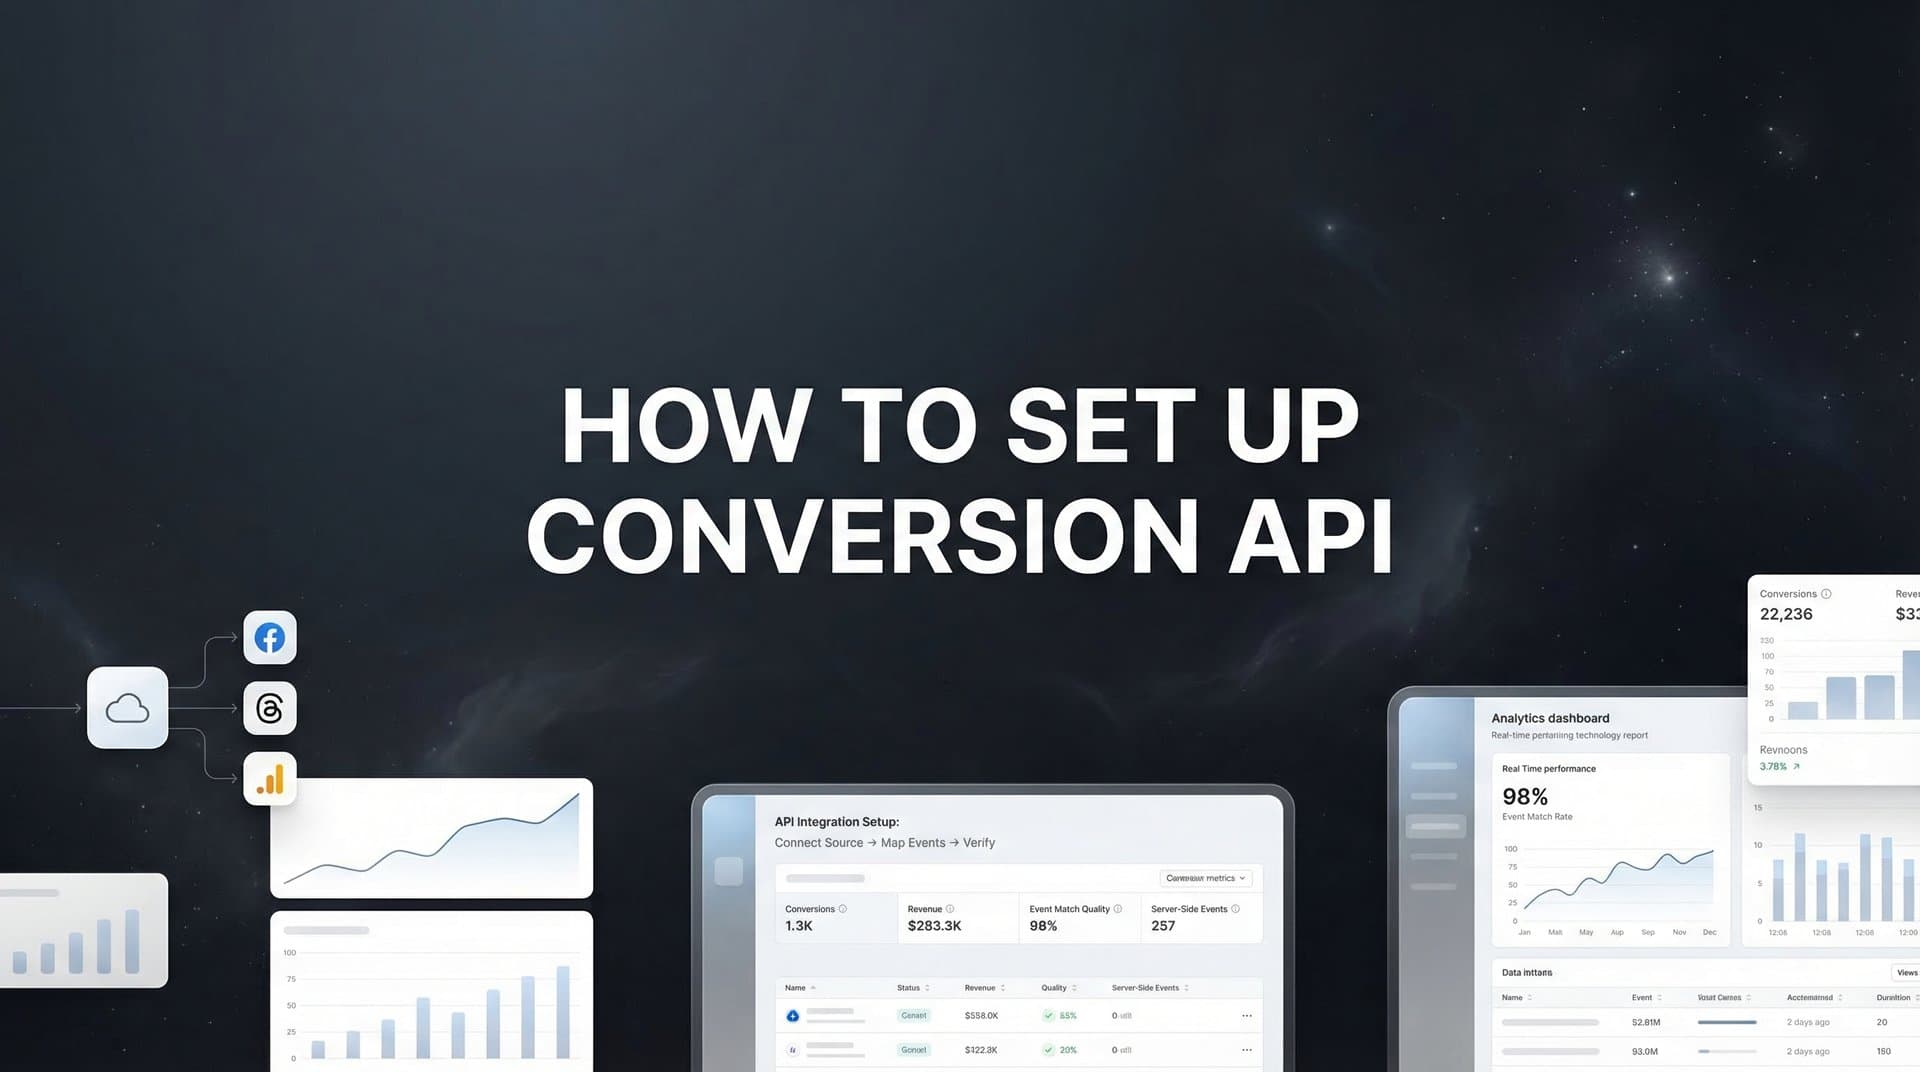
Conversion API changes this entirely. Instead of hoping a browser pixel fires correctly, CAPI sends event data directly from your server to ad platforms like Meta and Google. No browser limitations. No ad blockers. No guesswork about which ads actually drove revenue.
This guide walks you through the complete setup process—from gathering credentials to validating your implementation. Whether you're setting up Meta's Conversion API, Google's server-side tracking, or managing multiple platforms simultaneously, you'll learn exactly what you need and how to configure each component correctly.
By the end, you'll have server-side tracking capturing conversions that browser pixels miss, giving you the accurate data you need to scale with confidence.
Step 1: Gather Your Platform Credentials and Access Requirements
Before you write a single line of code, you need the right access and credentials. Missing even one required element will block your entire implementation.
Start by identifying which ad platforms need Conversion API setup. Meta is the most common, but Google, TikTok, Snapchat, and Pinterest all offer server-side tracking. Each platform has its own requirements, so make a list of everywhere you're currently running ads.
For Meta, you'll need several specific items from your Business Manager account. Log in and navigate to Events Manager to find your Pixel ID—it's a 15-16 digit number that identifies your pixel. You'll also need an access token, which you can generate in Business Settings under System Users. Create a system user with "Ads Management" permission, then generate a token that never expires. Finally, locate your Dataset ID in Events Manager settings—this is where your server events will be sent.
Google's requirements differ slightly. You'll need your Google Ads Conversion ID and Conversion Label from your conversion actions. If you're using Google Tag Manager server-side, you'll also need your GTM Server Container URL and API Secret from the Google Analytics 4 property settings. For detailed instructions on Google conversion setup, ensure you have all credentials documented before proceeding.
Access permissions matter just as much as credentials. You need admin-level access to Business Manager for Meta, editor access to Google Ads, and the ability to modify your website's backend code or tag management system. If you're working with developers or agencies, confirm who has access to what before you begin.
Document your current pixel setup while you're gathering credentials. Open your website, trigger a test conversion, and check Events Manager or Google Analytics to see which events currently fire. Note the event names, parameters, and any custom data you're sending. This baseline helps you ensure your server-side setup matches your existing tracking structure.
One often-overlooked requirement: your server environment must support HTTPS and have the technical capability to make API calls. Most modern hosting environments handle this easily, but verify before you commit to a manual implementation.
Step 2: Choose Your Implementation Method
How you implement Conversion API depends on your technical resources, the number of platforms you're tracking, and how much control you need over the data flow. Three main approaches exist, each with distinct trade-offs.
Manual implementation gives you complete control. Your development team writes server-side code that captures conversion events, formats the data correctly, and sends it to each platform's API endpoint. This approach works well if you have experienced developers, need custom event logic, or want to send highly specific data parameters. The downside? It's time-intensive, requires ongoing maintenance, and gets exponentially more complex when you're tracking across multiple platforms. Each platform has different API requirements, data formats, and authentication methods.
Partner integrations offer a middle ground. If you're running on Shopify, WooCommerce, or similar platforms, you can often install a plugin that handles CAPI automatically. Shopify's native Meta integration, for example, sets up Conversion API with just a few clicks. These solutions work well for straightforward e-commerce setups, but they typically only cover one platform at a time and may not support custom events or advanced data parameters. Check out our Shopify conversion tracking setup guide for platform-specific instructions.
Attribution platforms like Cometly take a different approach entirely. They sit between your website and all your ad platforms, handling Conversion API connections for Meta, Google, TikTok, and other channels from a single unified setup. You install one tracking script, and the platform manages server-side event delivery, deduplication, and data formatting across every channel. This approach makes sense when you're advertising on multiple platforms, want to avoid managing separate CAPI implementations, or need accurate cross-platform attribution alongside your server-side tracking.
Consider your technical resources honestly. If you have a dedicated development team comfortable with API integrations, manual implementation might be viable. If you're a lean marketing team without developer support, a partner integration or attribution platform will get you live faster and with less technical debt.
The number of platforms you advertise on also matters significantly. Managing CAPI for Meta alone is manageable. Adding Google, TikTok, and Snapchat multiplies the complexity. Each requires separate credentials, different event formats, and unique troubleshooting when issues arise. A unified solution starts looking much more appealing when you're coordinating across four or five platforms.
Data accuracy needs should guide your decision too. If you need precise attribution across channels, deduplication between pixel and server events, and the ability to compare different attribution models, an attribution platform provides infrastructure that's difficult to build manually. If you're simply trying to improve Meta's algorithm performance with better data, a simpler approach might suffice.
Step 3: Configure Server-Side Event Tracking
Once you've chosen your implementation method, the next step is configuring the actual event data. This is where accuracy matters most—incorrect formatting or missing parameters will cause events to fail or produce low match quality scores.
Every server-side event requires four core components: event name, event time, event source URL, and user data. Event name must match the standard event names platforms expect: Purchase, Lead, AddToCart, ViewContent, and so on. Custom event names work too, but standard events integrate better with platform optimization algorithms.
Event time should be a Unix timestamp representing when the action actually occurred. Use the moment the conversion happened on your server, not when you send the API call. If someone completes a purchase at 2:15 PM but your server sends the event at 2:16 PM, send the 2:15 PM timestamp. This precision helps platforms understand the actual customer journey timing.
Event source URL tells platforms where the conversion happened. Send the full URL of the page where the action occurred—the checkout confirmation page for purchases, the thank-you page for leads, the product page for add-to-cart events. This data helps platforms optimize for users who are more likely to convert on similar pages.
User data is the most critical component for match quality. Platforms need to match your server event to a specific user profile. The more user parameters you send, the higher your match rate. At minimum, include email address, phone number, IP address, and user agent. Also send the fbp (Facebook browser pixel) and fbc (Facebook click) cookies if they're available—these dramatically improve matching. Understanding Conversion API vs pixel tracking differences helps you optimize both methods together.
All personally identifiable information must be hashed before sending. Use SHA-256 to hash email addresses, phone numbers, first names, last names, and any other personal data. Normalize the data first: convert emails to lowercase, remove spaces from phone numbers, and strip special characters. Then hash the normalized value. Meta and Google require this for privacy compliance, and sending unhashed data will cause your events to be rejected.
Custom data parameters let you send additional context about the conversion. For purchase events, include purchase value, currency, and product details. For lead events, send information about the lead type or source. This data feeds back into platform algorithms, helping them optimize for higher-value conversions.
Map your conversion events to platform-specific formats carefully. What you call "completed_purchase" internally should map to "Purchase" for Meta and "purchase" for Google. Create a standardized event mapping document so everyone on your team knows which internal events correspond to which platform events.
Test your event formatting before going live. Most platforms offer test modes where you can send sample events and see exactly how they're interpreted. Meta's Test Events tool shows you the raw data received, any errors in formatting, and which user parameters were successfully matched. Use this to catch issues before real conversion data starts flowing.
When the API responds successfully, you'll receive a confirmation with an event ID. Log these responses—they're invaluable for troubleshooting if conversions don't appear as expected in your platform dashboards.
Step 4: Implement Event Deduplication
Running both browser pixels and Conversion API simultaneously creates a critical challenge: the same conversion can be reported twice. Someone completes a purchase, your pixel fires, your server sends the same event via CAPI, and suddenly you've counted one sale as two. Deduplication solves this.
The solution is conceptually simple but requires careful implementation. You generate a unique event ID for each conversion, then send that same ID with both your pixel event and your server event. When platforms receive events with matching IDs, they count it as one conversion, not two.
Here's how it works in practice. When a conversion occurs, generate a unique identifier—a UUID or timestamp-based ID works well. Pass this ID to your browser pixel as the event_id parameter. Also send it to your server, which includes the same event_id when making the CAPI call. Platforms compare these IDs and deduplicate automatically. If you're struggling with this process, our how to fix Facebook Conversion API guide addresses common deduplication issues.
Timing matters for deduplication. If your pixel fires but your server event never arrives, platforms will count the pixel event after a short waiting period. If your server event arrives but the pixel was blocked, platforms count the server event. This fallback behavior ensures you don't lose conversions when one method fails.
Implementation varies by platform. For Meta, add the event_id parameter to your fbq('track') calls in your pixel code. In your server-side CAPI payload, include the same event_id in the event data object. Google uses a similar approach with the transaction_id parameter for Google Ads and the event_id for GA4.
Testing deduplication is straightforward but essential. Trigger a test conversion while watching both your browser console and server logs. Verify that the same event_id appears in both places. Then check your platform's Events Manager or reporting interface—you should see one event, not two. If you see duplicates, your event IDs aren't matching correctly.
Common deduplication failures happen when event IDs are generated separately on the client and server, when ID formats don't match exactly, or when one system sends the ID but the other doesn't. Debug by logging the exact event_id values on both sides and comparing them character by character.
For complex funnels with multiple conversion points, maintain event ID consistency across all steps. If someone adds to cart, initiates checkout, and completes purchase, each action should have its own unique event_id, but that ID should be consistent between pixel and server for each specific action.
Step 5: Test and Validate Your Setup
Configuration doesn't mean it works. Thorough testing catches issues before they impact your actual conversion data and ad optimization.
Start with Meta's Test Events tool. Navigate to Events Manager, select your pixel, and open the Test Events tab. This shows real-time event data as it arrives. Trigger a test conversion on your website—make a test purchase, submit a test lead form, whatever your key conversion is. Within seconds, you should see the event appear in Test Events with all the parameters you sent.
Check the Event Match Quality score immediately. Meta grades each event as Poor, OK, Good, or Great based on how many user parameters were included and how well they match to Facebook users. Aim for Good or Great. If you're seeing Poor or OK, you're missing critical user data parameters. Add more: email, phone, fbp cookie, fbc cookie, client IP address, and user agent all improve match quality. Learn more about resolving poor Conversion API data quality issues.
The Test Events interface shows exactly which parameters were received and how they were interpreted. If an email isn't matching, you'll see why—maybe it wasn't hashed, or it was hashed incorrectly. If the event time is off, you'll see the timestamp that was received. Use this detailed feedback to fix formatting issues before going live.
For Google, verification happens through different tools depending on your implementation. If you're using Google Tag Manager server-side, check the Preview mode to see events as they fire. For Google Ads Conversion API, test conversions should appear in the Conversions section within a few hours. Google Analytics 4 server-side events show up in the Realtime report immediately if configured correctly.
Test all your key conversion events, not just purchases. If you're tracking leads, test the lead form. If you're tracking add-to-cart, test that. Each event type might have different parameters or formatting requirements, and you need to verify each one individually.
Troubleshoot common issues systematically. If events aren't appearing at all, check your access token and credentials—authentication failures are the most common cause. If events appear but with low match quality, add more user parameters and verify your hashing implementation. If you see duplicate events, revisit your deduplication setup. If event values are wrong, check your currency formatting and value calculation logic. Our how to fix broken conversion tracking resource covers additional troubleshooting scenarios.
Authentication errors typically show up as 400 or 401 response codes. These mean your access token is invalid, expired, or doesn't have the required permissions. Regenerate your token with the correct permissions and update your server configuration.
Once test events validate successfully, monitor your first few real conversions closely. Check that they appear in Events Manager with good match quality, that the event data looks correct, and that deduplication is working as expected. This early monitoring catches edge cases that test environments might have missed.
Step 6: Optimize Data Quality for Better Ad Performance
Getting Conversion API working is the baseline. Optimizing it unlocks the real value: better ad performance, more accurate attribution, and higher return on ad spend.
Increasing match rates should be your first optimization priority. The more user parameters you send, the more likely platforms can match your server events to actual user profiles. Beyond the basics of email and phone, add the fbp and fbc cookies from your pixel. These cookies contain Facebook-specific identifiers that dramatically improve matching. Also send the client_ip_address and client_user_agent—these help platforms verify that the server event corresponds to the same user who clicked your ad.
External IDs can further improve matching for logged-in users. If someone has an account on your site, send your internal user ID as an external_id parameter. This creates a consistent identifier across sessions and devices, helping platforms understand the complete customer journey. For businesses needing to track conversions across multiple platforms, consistent user identification becomes even more critical.
Conversion value data transforms how platforms optimize your campaigns. Instead of just knowing that a conversion happened, platforms can optimize for conversions that generate more revenue. Always send the purchase value for transaction events, and consider sending predicted lifetime value for lead events. This enables value-based optimization strategies that focus ad delivery on users most likely to become high-value customers.
Offline conversion tracking extends your server-side data beyond website events. If sales happen over the phone, in person, or through other offline channels, you can still send those conversions via API. This gives platforms a complete picture of which ads drive revenue, not just which ads drive website conversions. For businesses with long sales cycles or offline sales teams, learning how to track offline conversions is critical for accurate attribution.
Monitor your Event Match Quality score continuously, not just during initial setup. Match quality can degrade over time if user data parameters stop being sent correctly or if your hashing implementation breaks. Set up weekly checks to ensure your match quality remains Good or Great.
Use enriched data to feed platform algorithms better information. The more context you provide about each conversion—product categories, order size, customer type, lead quality—the better platforms can optimize delivery. This enriched data helps algorithms identify patterns in who converts and how, leading to more efficient ad targeting.
For businesses using attribution platforms like Cometly, data optimization happens at a higher level. These platforms enrich events with attribution data, showing not just that a conversion happened but which touchpoints influenced it. They sync this enriched conversion data back to ad platforms, helping algorithms understand the full customer journey and optimize accordingly. This creates a feedback loop where better data leads to better optimization, which leads to better results.
Your Conversion API Implementation Checklist
You now have everything you need to implement Conversion API correctly. Here's your quick validation checklist to confirm your setup is complete and optimized.
Credentials gathered and admin access confirmed across all platforms. Implementation method selected based on your technical resources and platform needs. Server-side events configured with proper user data parameters and hashing. Deduplication implemented with matching event IDs between pixel and server. Test events validated with Good or Great match quality scores. Ongoing optimization plan in place to monitor and improve data quality.
With Conversion API properly configured, you're now capturing conversion data that browser pixels miss. This means more accurate attribution, better data feeding into ad platform algorithms, and clearer insight into what's actually driving revenue. Your campaigns can optimize more effectively because platforms have complete conversion data, not just the subset that made it through browser limitations.
The difference shows up in your results. Campaigns that seemed to underperform might actually be driving conversions that weren't being tracked. Budget allocation becomes more confident when you trust your data. Scaling decisions get easier when attribution is accurate.
For teams managing multiple ad platforms, the complexity of maintaining separate CAPI implementations can quickly become overwhelming. Tools like Cometly simplify this entire process—handling Conversion API connections, deduplication, and conversion sync across Meta, Google, TikTok, and more from a single dashboard. Instead of managing credentials, API endpoints, and data formatting for each platform separately, you get unified server-side tracking that captures every touchpoint and feeds enriched data back to all your ad platforms.
Ready to elevate your marketing game with precision and confidence? Discover how Cometly's AI-driven recommendations can transform your ad strategy—Get your free demo today and start capturing every touchpoint to maximize your conversions.