If you run a Shopify store and advertise across Meta, Google, TikTok, and email, you have probably stared at your dashboards wondering why the numbers never add up. Meta says it drove 80 conversions. Google claims 45. Your Shopify analytics shows 60 orders. So who is right? The honest answer is that none of them are telling you the complete story.
Shopify's built-in analytics give you a surface-level view of your sales, but they fall short when it comes to connecting specific ad clicks to actual purchases, especially across multiple touchpoints and devices. That gap is where attribution tracking becomes essential.
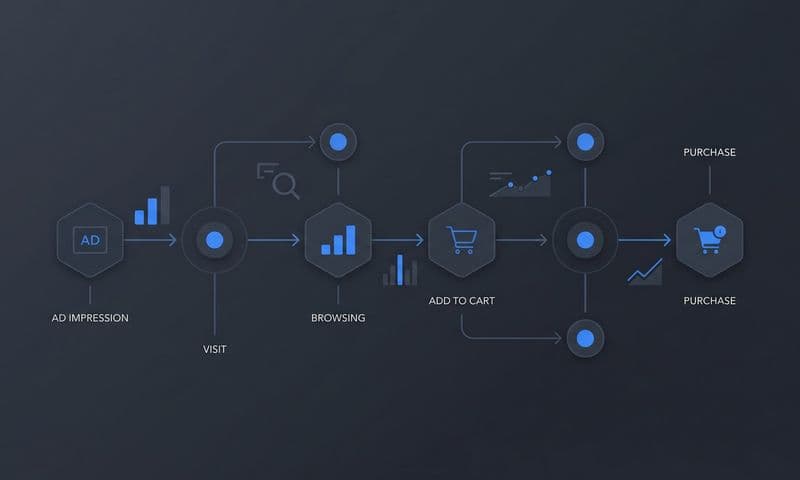
Shopify store attribution tracking lets you map every customer interaction, from the first ad impression to the final checkout, so you can see exactly which campaigns, creatives, and channels deserve credit for your revenue. Without it, you are essentially guessing where to put your ad budget.
With iOS privacy changes, cookie restrictions, and cross-device browsing making platform-reported data less reliable, accurate attribution has shifted from a nice-to-have to a genuine competitive advantage. Merchants who get this right can scale profitably. Those who ignore it keep pouring money into channels that look good on paper but underdeliver in reality.
In this guide, you will learn how to set up end-to-end attribution tracking for your Shopify store in six clear steps. By the end, you will have a system that captures every touchpoint, connects ad spend to real revenue, and gives you the confidence to optimize your campaigns based on trustworthy data rather than inflated platform metrics. Let's get into it.
Step 1: Audit Your Current Tracking Setup and Identify the Gaps
Before you build anything new, you need to understand what is and is not working right now. Skipping this step is like renovating a house without checking the foundation first. You might make things look better on the surface while the real problems stay hidden underneath.
Start by pulling your conversion data from every source you have: Shopify analytics, your Meta Ads Manager, Google Ads, TikTok Ads, and any email platform you use. Line them up side by side and look at the same time period. The discrepancies you see are your first clue about where your tracking is breaking down.
What to look for in Shopify analytics: Check whether Shopify is attributing sessions to the correct source. Look at the "Sessions by traffic source" and "Sales by traffic source" reports. If you see a large percentage of traffic labeled as "direct" or "unknown," that is a red flag. It often means UTM parameters are not being passed correctly, or your pixels are not firing on key pages. Understanding why attribution data doesn't match across platforms is the first step toward fixing these issues.
What to check on each ad platform: For Meta, Google, and TikTok, verify that your pixel or tag is installed and firing on your Shopify store. Use the browser-based developer tools or platform-specific diagnostic tools (Meta Pixel Helper, Google Tag Assistant) to confirm events are triggering correctly. Pay special attention to the checkout and purchase events, as these are the most commonly broken.
Common issues to document: Missing UTM parameters on ad links, duplicate conversion events firing multiple times for a single purchase, pixels that fire on the product page but not the order confirmation page, and conversion APIs that are either not installed or sending incomplete data. For a deeper dive into these issues, review the common pitfalls of Shopify tracking that trip up most merchants.
Identify your data blind spots: Think about what you are not capturing at all. Do you know the first ad a customer clicked before they eventually purchased three days later? Do you have any visibility into customers who converted after seeing an ad but did not click it? Are CRM events or offline interactions connected to your Shopify data?
Write all of this down. A simple spreadsheet works fine. List each ad platform, whether the pixel is installed, whether conversion events are firing correctly, and what data is missing. This document becomes your roadmap for the steps that follow.
Success indicator: You have a clear list of tracking gaps and know exactly what needs to be fixed or added before moving forward.
Step 2: Install Server-Side Tracking on Your Shopify Store
Here is the uncomfortable truth about browser-based pixels in 2026: they are not reliable enough to be your primary tracking method. Ad blockers prevent them from firing. Safari's Intelligent Tracking Prevention limits the data they can store. iOS restrictions mean a significant portion of your mobile traffic is essentially invisible to pixel-based tracking.
The result is that if you rely solely on browser-side pixels, you are systematically undercounting conversions. And when you undercount conversions, your ad platforms think your campaigns are performing worse than they actually are, which leads to poor optimization decisions and wasted spend. To understand the full picture, read about server-side tracking vs pixel tracking and why the distinction matters for your bottom line.
Server-side tracking solves this by sending conversion data directly from your server to the ad platforms, bypassing the browser entirely. The data travels a different route, one that ad blockers and browser privacy settings cannot intercept.
How server-side tracking works for Shopify: When a customer completes a purchase, your Shopify store triggers a server-side event. That event sends enriched data, including the order value, product details, customer identifiers, and the original click ID from the ad that brought them in, directly to Meta's Conversions API, Google's Enhanced Conversions, or TikTok's Events API. The browser is not involved in this handoff, so the data arrives clean and complete.
Key events to track server-side: Do not limit yourself to just the purchase event. Set up server-side tracking for page views, add-to-cart, initiate checkout, and purchase completed. Tracking mid-funnel actions matters because it gives your ad platforms richer signals to optimize against, especially for campaigns targeting users who have not yet purchased.
One of the most common mistakes Shopify merchants make is only tracking the final purchase event server-side. If you skip add-to-cart and initiate checkout, you lose the ability to optimize upper-funnel campaigns effectively. Your ad platform cannot tell the difference between someone who bounced immediately and someone who got all the way to payment before dropping off.
Setting up server-side tracking: You can implement server-side tracking through custom development, but for most Shopify merchants, that route is time-consuming and requires ongoing maintenance. Our detailed guide on server-side tracking for Shopify walks through the key considerations. Tools like Cometly offer server-side tracking that integrates directly with Shopify, so you get reliable event data without needing to write custom code or manage API connections manually. The integration handles the data flow between your store, your ad platforms, and your attribution system automatically.
Deduplication matters: When you run both browser-side pixels and server-side tracking simultaneously (which is recommended for maximum coverage), you need to ensure your ad platforms are not counting the same conversion twice. Proper deduplication using event IDs prevents double-counting and keeps your reported conversion numbers accurate.
Success indicator: Conversion events fire reliably regardless of browser privacy settings or ad blockers. You can verify this by comparing server-side event counts to your actual Shopify order count and seeing them align closely.
Step 3: Connect All Your Ad Platforms to a Central Attribution Hub
Here is where the real clarity starts to emerge. Right now, if you are looking at Meta Ads Manager, Google Ads, and TikTok Ads separately, each platform is showing you its own version of the truth. And every platform's version makes itself look great.
This happens because each platform uses its own attribution window, its own conversion counting logic, and its own view of which touchpoints it gets credit for. Meta might claim a sale because someone saw your ad within a seven-day window. Google might claim the same sale because the customer clicked a branded search ad right before purchasing. Both platforms count it as their conversion. Your Shopify store records one order. The math does not add up, and it never will if you keep looking at each platform in isolation. For a deeper explanation, explore how solving attribution data discrepancies can transform your reporting accuracy.
Why siloed reporting fails you: When every platform claims full credit for the same conversions, you cannot make accurate budget allocation decisions. You might cut a prospecting campaign that was actually driving significant revenue because, from last-click attribution in Google Ads, it looked like it was not converting. Meanwhile, you keep scaling a retargeting campaign that only converts people who were already going to buy anyway.
The solution is a centralized attribution hub: A central attribution platform pulls data from all your ad accounts, your Shopify store, and your CRM into a single system. Instead of each platform telling its own story, you get one unified view of every customer journey, from the first ad click to the final purchase.
What to connect: At minimum, you need your Shopify store, every active ad account (Meta, Google, TikTok, Pinterest, or wherever you are running ads), and your email platform. If you have a CRM, connecting it gives you visibility into post-purchase behavior and customer lifetime value, which is critical for understanding the true return on your acquisition spend. Merchants running ads across many channels should review best practices for tracking for multi-channel ecommerce to ensure nothing slips through the cracks.
Cometly is built specifically for this purpose. It connects your ad platforms, Shopify store, and CRM data to track the entire customer journey in real time. Instead of manually exporting CSVs from each platform and trying to reconcile them in a spreadsheet, all of your spend and conversion data flows into one dashboard automatically. You can see which campaigns are actually driving revenue across all channels, not just which ones each platform claims credit for.
What good centralization looks like: You should be able to open a single dashboard and see total spend across all platforms, total attributed revenue, cost per acquisition by channel, and a breakdown of how customers move through your funnel before purchasing. No manual work, no switching between tabs, no reconciliation headaches.
Success indicator: All ad platforms and your Shopify store feed data into one dashboard with no manual CSV exports needed. You can see cross-channel performance at a glance.
Step 4: Implement UTM Parameters and First-Party Tracking Across All Campaigns
UTM parameters are the backbone of attribution tracking for Shopify stores. They are the labels attached to your ad URLs that tell your analytics system exactly where a visitor came from. Without consistent UTM parameters, your attribution data becomes fragmented and unreliable, regardless of how sophisticated your tracking setup is.
A UTM framework for Shopify merchants: Every ad URL should include five parameters: source, medium, campaign, content, and term. Here is how to think about each one for common channels.
utm_source: The platform driving the traffic. Use "meta" for Meta ads, "google" for Google Ads, "tiktok" for TikTok, and "klaviyo" (or your email tool name) for email campaigns. Be consistent. If you use "facebook" in one campaign and "meta" in another, your reports will split that traffic into two separate sources.
utm_medium: The channel type. Use "paid-social" for Meta and TikTok, "paid-search" for Google Ads, "email" for email campaigns, and "organic-social" for unpaid social posts.
utm_campaign: The campaign name, ideally matching what you have named it in the ad platform. For example: "summer-sale-2026" or "prospecting-lookalike-us."
utm_content: The specific ad creative or ad set. This lets you compare performance between different creatives within the same campaign. For example: "video-testimonial-v1" versus "static-product-image-v2."
utm_term: Primarily used for search campaigns to track which keywords drove the click. For paid social, you can use this field to note the audience segment.
Ensuring UTM data persists through checkout: One of the most frustrating issues Shopify merchants face is UTM parameters disappearing during the checkout process. This can happen when customers are redirected to a third-party payment processor and back. To prevent this, make sure your attribution platform captures and stores the UTM data at the session level the moment the visitor lands on your site, not just when they reach the order confirmation page. Cometly captures click IDs, landing page URLs, and session data tied to each visitor from the first interaction, so even if the checkout flow involves redirects, the original source attribution is preserved. For a detailed comparison of approaches, see our guide on UTM tracking vs attribution software.
First-party data collection: Beyond UTMs, first-party data tracking means capturing identifiers that tie a specific visitor to their eventual purchase. This includes click IDs from ad platforms (like Meta's fbclid or Google's gclid), which carry information about the specific ad that drove the click. When these click IDs are captured server-side and matched to purchase events, your attribution becomes significantly more accurate than relying on cookies alone.
Naming convention discipline: Set a naming convention document and share it with everyone on your team or agency. Inconsistent naming is one of the most common and most damaging attribution problems for growing Shopify stores. "facebook," "Facebook," "FB," and "fb" will all appear as separate sources in your reports, making it impossible to see your true Meta performance at a glance.
Success indicator: Every ad click that reaches your Shopify store carries clean, consistent tracking parameters that persist through to the purchase confirmation page.
Step 5: Choose and Configure Your Attribution Model
Now that you have data flowing in from all your channels, you need to decide how to distribute credit for conversions across the touchpoints that contributed to each sale. This is your attribution model, and choosing the right one has a direct impact on how you evaluate campaign performance and allocate budget.
The main attribution models for Shopify stores:
Last-click attribution: Gives 100% of the credit to the final touchpoint before purchase. Simple to understand, but it systematically undervalues prospecting campaigns that introduce customers to your brand and overvalues retargeting campaigns that close sales with people who were already interested.
First-click attribution: Gives 100% of the credit to the first touchpoint. Better for understanding which channels generate awareness, but it ignores everything that happened between discovery and purchase.
Linear attribution: Distributes credit equally across all touchpoints in the customer journey. More balanced than single-touch models, but it treats every interaction as equally important, which is rarely true in practice.
Time-decay attribution: Gives more credit to touchpoints that happened closer to the conversion. This makes intuitive sense for longer consideration cycles where recent interactions carry more weight, but it still undervalues early-stage awareness efforts.
Data-driven or AI-powered attribution: Uses machine learning to analyze your actual conversion paths and assign credit based on which touchpoints statistically influenced purchases. This is the most accurate model for established stores with sufficient conversion volume, because it reflects the reality of your specific customer journey rather than applying a one-size-fits-all rule.
Choosing the right model for your store: If you sell impulse-buy products with a short consideration cycle, last-click or time-decay might give you a reasonable picture. If you sell higher-consideration products where customers research over days or weeks before buying, a linear or data-driven model will give you a much more accurate view of what is actually driving revenue. The key question is: how many touchpoints does a typical customer have before purchasing? Our article on single source vs multi-touch attribution models breaks down the trade-offs in detail.
Multi-touch attribution in practice: Multi-touch models distribute credit across all meaningful interactions in the customer journey. A customer might click a Meta prospecting ad, then a Google branded search ad, then respond to an email before purchasing. A multi-touch model ensures all three channels receive appropriate credit, rather than the email getting all the glory just because it was last.
Cometly lets you compare attribution models side by side, so you can see how different models value your campaigns and make informed decisions about where to invest. Being able to toggle between models and see how your channel performance changes is one of the most powerful ways to develop a genuine understanding of your customer journey.
Common pitfall: Sticking with last-click attribution by default. Most ad platforms default to last-click, which means your prospecting campaigns almost always look underperforming compared to retargeting. This leads merchants to cut top-of-funnel spend, which eventually starves the retargeting audience and hurts overall performance.
Success indicator: You have an attribution model running that reflects your actual customer journey and distributes credit across the touchpoints that genuinely influenced each sale.
Step 6: Sync Conversion Data Back to Your Ad Platforms
Most marketers think about attribution as a reporting tool. It tells you what happened. But there is a second, equally powerful use case that many Shopify merchants overlook: feeding that accurate conversion data back to the ad platforms to improve their algorithmic optimization.
Every major ad platform, Meta, Google, TikTok, runs on machine learning. Their algorithms decide who to show your ads to, when to show them, and how much to bid. The quality of those decisions depends entirely on the quality of the conversion data they receive. If your ad platform is working with incomplete or inaccurate conversion signals, its optimization will be off, and your results will suffer for it.
What conversion syncing does: Instead of relying only on browser-based pixel events (which, as we covered in Step 2, are increasingly unreliable), conversion syncing sends your server-tracked, verified purchase data back to each ad platform's optimization engine. This means Meta's algorithm receives accurate purchase events, including the correct order values and customer signals, not just the subset of conversions that happened to fire through the browser pixel. If you are running Meta campaigns, our guide on Facebook attribution tracking tools covers platform-specific best practices for maximizing signal quality.
Why this matters for your campaigns: Ad platform algorithms are designed to find more people who look like your best converters. When they receive richer, more complete conversion data, they can identify better audience segments, improve their bidding decisions, and reduce your cost per acquisition over time. Feeding them poor data leads to poor targeting. Feeding them accurate data trains the algorithm to find customers who actually buy.
Setting up conversion sync: For Meta, this means configuring the Conversions API (CAPI) to send purchase events from your server. For Google, it means setting up Enhanced Conversions, which matches conversion data to signed-in Google accounts for more accurate attribution. For TikTok, it is the Events API. Each platform has its own implementation requirements, which is one reason why doing this manually across multiple platforms can become complex quickly.
Cometly's Conversion Sync feature handles this automatically. It takes the enriched, server-tracked conversion events from your Shopify store and sends them back to Meta, Google, TikTok, and other platforms in the format each algorithm expects. The result is that your ad platforms receive accurate, deduplicated conversion data that reflects what actually happened, not what their pixel managed to capture through the browser.
Deduplication is critical here too: When you run both pixel tracking and server-side conversion sync, you must ensure the platforms are not counting the same purchase twice. Properly implemented conversion syncing includes event deduplication logic that prevents double-counting while maximizing the coverage of conversion events reported. For a complete walkthrough of setting up your Shopify conversion tracking setup, including deduplication configuration, check our step-by-step guide.
The compounding effect: Better conversion data leads to better algorithmic optimization, which leads to better targeting, which leads to more efficient spend and higher return on ad spend. It is not an overnight change, but over time, the quality of your conversion signals has a meaningful impact on campaign performance.
Success indicator: Your ad platforms receive accurate, deduplicated conversion data that improves their algorithmic optimization over time. You should see your platform-reported conversion rates become more consistent with your actual Shopify order data.
Putting It All Together: Your Attribution Tracking Checklist
With these six steps complete, your Shopify store now has a robust attribution tracking system that captures every touchpoint, unifies data from all your ad platforms, and feeds accurate conversion signals back to the algorithms driving your campaigns.
Use this checklist to confirm everything is in place before you consider the setup done.
1. Tracking audit completed and all gaps documented by platform
2. Server-side tracking installed and firing reliably for page views, add-to-cart, initiate checkout, and purchase events
3. All ad platforms and your Shopify store connected to a central attribution hub with no manual data exports required
4. UTM parameters consistent across every active campaign with a naming convention document shared across your team
5. Attribution model configured to reflect your actual customer journey, with the ability to compare models side by side
6. Conversion data syncing back to ad platforms with proper deduplication in place
The result of this system is simple but powerful: you can confidently see which ads and channels actually drive your Shopify revenue, then scale what works and cut what does not. No more guessing, no more inflated platform metrics, no more budget decisions made on incomplete data.
If you want to get this entire setup running without stitching together multiple tools and managing separate integrations, Cometly brings server-side tracking, multi-touch attribution, and conversion sync together in one platform built for exactly this purpose. It connects your Shopify store, ad accounts, and CRM into a single real-time view of your customer journey, and its AI surfaces recommendations so you know not just what happened, but what to do next.
Ready to stop guessing and start scaling with confidence? Get your free demo today and start capturing every touchpoint to maximize your conversions.