You're running paid ads, celebrating trial signups, and watching your dashboard fill with new users. But here's the uncomfortable question: how many of those trials actually become paying customers? And more importantly, which ads and channels are driving the ones who do?
Most SaaS marketers operate in the dark between trial signup and paid conversion. They know which campaigns generate trials, but the connection to actual revenue remains fuzzy. This gap leads to a dangerous cycle: you optimize for trial volume, scale campaigns that look successful, and wonder why your CAC keeps climbing while revenue growth stalls.
The reality is that not all trials are created equal. Some channels attract tire-kickers who'll never convert. Others bring in qualified prospects who become your best customers. Without proper tracking, you're flying blind, making budget decisions based on incomplete data.
This guide shows you exactly how to build a tracking system that follows users from their first ad click through trial signup, product activation, and ultimately to paid conversion. You'll learn how to connect your ad platforms, website, product, CRM, and billing systems into a unified view of your customer journey. By the end, you'll know precisely which marketing efforts drive real revenue, not just vanity metrics.
Let's get started with mapping your conversion funnel.
Step 1: Map Your Trial to Paid Conversion Funnel
Before you can track conversions effectively, you need a crystal-clear map of every step a user takes from first contact to becoming a paying customer. This isn't just drawing boxes and arrows. It's about understanding the specific touchpoints, actions, and decision moments that matter in your business.
Start by documenting the complete journey. A typical SaaS funnel includes: ad impression, ad click, landing page visit, trial signup form submission, email verification, first product login, activation events (key actions that indicate real usage), trial expiration reminder, and finally paid conversion. Your funnel might have additional steps like sales calls, onboarding sessions, or specific feature usage milestones.
Next, define what constitutes a qualified trial versus a casual signup. This distinction is crucial. A qualified trial might be someone who completes onboarding, invites team members, or uses core features within the first 48 hours. Casual signups might create an account but never log in again. Understanding this difference helps you identify which marketing sources attract serious prospects.
Document your typical conversion timeline. How many days does it take for users to convert from trial to paid? Look at your historical data. Some SaaS products see conversions within 7 days, others take 30 days or longer. This timeline determines your tracking lookback windows and attribution settings later.
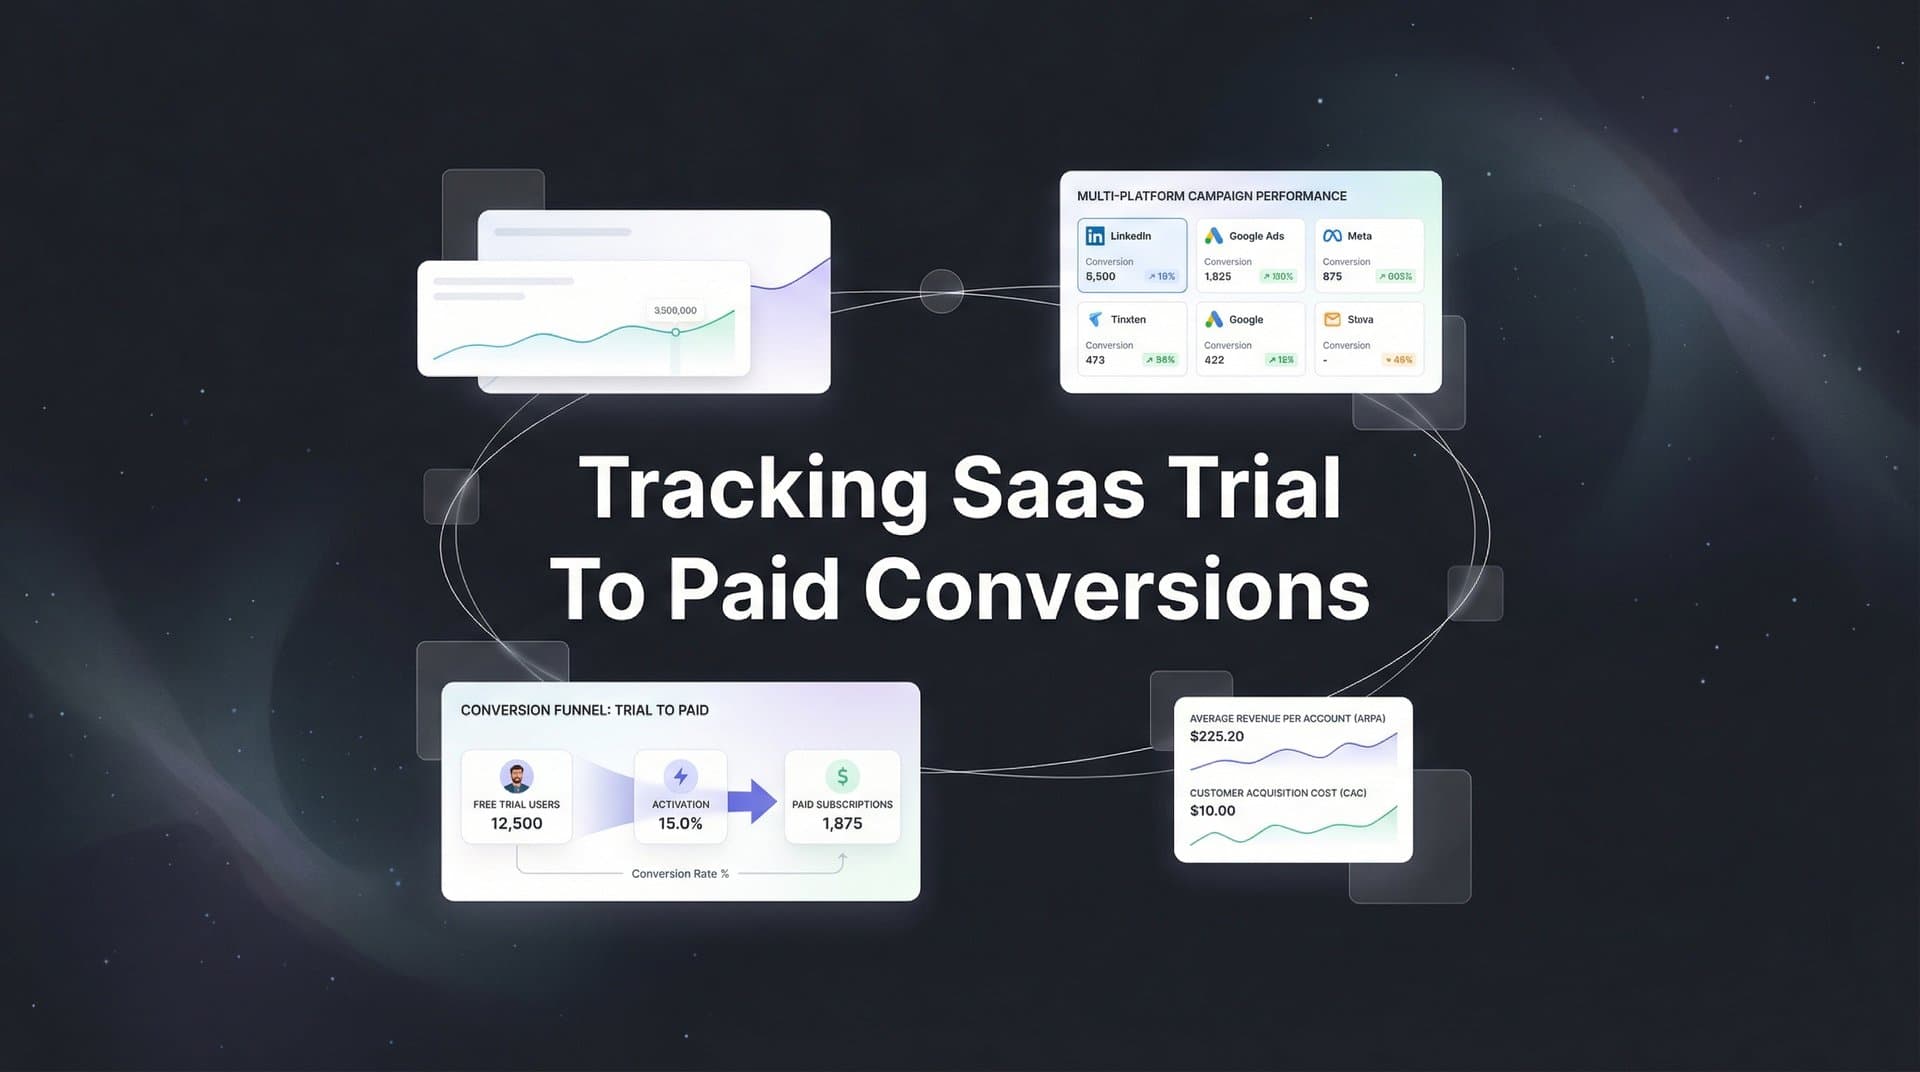
Create a spreadsheet listing every platform involved in your customer journey. Your list probably includes ad channels like Meta, Google, and LinkedIn. It includes your website and any landing page builders. It includes your product application, your CRM (HubSpot, Salesforce, or similar), your email marketing platform, and your billing system (Stripe, Chargebee, Paddle, or others).
For each touchpoint, note what data gets captured. When someone clicks an ad, you capture UTM parameters. When they sign up for a trial, you capture their email, company name, and signup source. When they activate, you capture product usage events. When they convert to paid, you capture subscription tier and revenue amount. Implementing conversion tracking for SaaS at each stage ensures no data falls through the cracks.
This mapping exercise reveals gaps in your current tracking. You might discover that you're capturing trial signups but not tracking which users actually activate your product. Or that your billing system records payments but doesn't connect them back to the original marketing source. Identifying these gaps now saves headaches later.
Step 2: Set Up Server-Side Tracking Infrastructure
Browser-based tracking is dying, and if you're still relying solely on pixels and cookies, you're missing a significant portion of your conversions. iOS privacy changes, ad blockers, and browser restrictions have made client-side tracking increasingly unreliable. For SaaS companies with longer conversion cycles, this is particularly problematic.
Here's why browser-based tracking fails for trial-to-paid conversions. When someone clicks your ad on Monday, their browser stores a cookie. They sign up for a trial on Tuesday. Then they close their browser, clear cookies, or switch devices. Two weeks later, they convert to a paid plan from a different browser or device. Your original tracking cookie is gone. The conversion appears as "direct" or "unknown source" in your analytics, even though it came from your paid ad.
Server-side tracking solves this by capturing events on your server, not in the user's browser. When someone visits your site, your server records their UTM parameters, IP address, and a unique identifier. When they sign up, you associate that identifier with their email address. When they convert to paid weeks later, you can connect that conversion back to the original ad click because the data lives on your server, not in a cookie that might disappear. Learn more about tracking paid ads after iOS update to understand why server-side solutions are essential.
To implement server-side tracking, you need infrastructure that captures and stores user journey data. This typically involves adding tracking code to your website that sends events to a server endpoint, not just to browser-based analytics tools. The server then stores these events in a database, creating a persistent record of each user's journey.
Your tracking implementation should capture several key data points at each stage. When someone first visits from an ad, capture all UTM parameters (source, medium, campaign, content, term), the landing page URL, timestamp, and a unique visitor ID. Store this data server-side immediately.
When that visitor converts to a trial signup, associate their email address with the visitor ID you created earlier. This connection is critical. It allows you to track the user across sessions, devices, and extended time periods. Your trial signup event should include the user's email, company name, signup timestamp, and all the original UTM parameters from their first visit.
Ensure your tracking persists through authentication. When users log into your product, your system should recognize them and continue tracking their journey. This means your product application needs to share user identity data with your tracking infrastructure.
Many SaaS companies implement this through a customer data platform or attribution tool that handles the complexity of server-side tracking, identity resolution, and data storage. These platforms provide APIs to send events from your website, product, and other systems, maintaining a unified view of each user's journey regardless of how they interact with your brand.
Step 3: Connect Your CRM and Billing Systems
Your CRM and billing systems hold the most valuable conversion data, but they often exist as isolated islands. Connecting them to your tracking infrastructure transforms scattered data points into a complete revenue story.
Start with your CRM integration. Your CRM tracks lead status changes, sales interactions, and deal stages. When a trial user becomes a marketing qualified lead, your CRM records it. When a sales rep has a demo call, your CRM logs it. When a deal moves to "closed won," your CRM captures it. All of these events are part of the conversion journey and need to flow into your attribution system.
Most modern CRMs offer webhooks or API integrations that send real-time updates when records change. Set up integrations that push key events to your tracking platform. These events should include lead status changes, opportunity creation, opportunity stage changes, and closed-won deals. Each event should include the contact's email address so you can match it to their original marketing touchpoints.
Map your CRM stages to your defined conversion funnel from Step 1. If your CRM has stages like "Trial User," "Activated User," "SQL," "Demo Completed," and "Customer," map each stage to the corresponding funnel step. This mapping allows you to see conversion rates between stages and identify where prospects drop off. Understanding marketing attribution platforms for revenue tracking helps you connect these systems effectively.
Now connect your billing system. This is where actual revenue data lives. Whether you use Stripe, Chargebee, Paddle, or another billing platform, you need to capture paid conversion events and send them to your tracking infrastructure.
Your billing integration should trigger events when specific actions occur. The most critical event is a successful payment for a new subscription. This event should include the customer's email address, subscription plan, monthly or annual revenue amount, and payment timestamp. These data points allow you to calculate metrics like cost per acquisition and return on ad spend.
Set up your integration to also capture subscription changes. When customers upgrade to a higher tier, downgrade, or cancel, these events provide insights into customer lifetime value by acquisition source. You might discover that customers from certain channels stick around longer or upgrade more frequently than others.
Verify your data flows correctly by creating a test user. Sign up for a trial using a unique email address and known UTM parameters. Progress through your funnel: activate your product, move through CRM stages if applicable, and complete a test payment. Then check your tracking platform to confirm all events appear correctly with the right timestamps and are connected to the original marketing source.
Pay special attention to email matching. Your tracking system needs to match events across platforms using email addresses. If your website captures "john@company.com" but your CRM records "John@Company.com" (different capitalization), your system might fail to connect the events. Implement email normalization that converts all addresses to lowercase before matching.
Step 4: Configure Multi-Touch Attribution for Long Sales Cycles
SaaS prospects rarely convert after a single touchpoint. They see your ad on LinkedIn, visit your website, read blog posts, watch demo videos, and interact with retargeting campaigns before finally signing up for a trial. Then they use your product, receive nurture emails, and maybe talk to sales before converting to paid. Which touchpoint gets credit for the conversion?
This is where attribution models come in. Different models distribute conversion credit across touchpoints in different ways, and choosing the right model significantly impacts how you interpret your marketing performance. Explore our attribution marketing tracking complete guide for a deeper understanding of these concepts.
First-touch attribution gives all credit to the initial touchpoint. If someone first discovered you through a Google ad, that ad gets 100% credit for the eventual paid conversion, even if they interacted with five other campaigns before converting. This model helps you understand which channels are best at generating awareness and bringing new prospects into your funnel.
Last-touch attribution does the opposite, giving all credit to the final touchpoint before conversion. If someone saw your retargeting ad right before signing up for a trial and converting to paid, that retargeting campaign gets 100% credit. This model highlights which channels are effective at closing deals.
Linear attribution distributes credit equally across all touchpoints. If a user interacted with five campaigns before converting, each campaign receives 20% credit. This model acknowledges that multiple touchpoints contribute to conversions, but it treats all touchpoints as equally important, which isn't always accurate.
Time-decay attribution gives more credit to touchpoints closer to the conversion. A touchpoint that happened one day before conversion receives more credit than one that happened 20 days before. This model reflects the reality that recent interactions often have more influence on purchase decisions than older ones.
For SaaS companies with longer sales cycles, linear or time-decay models typically provide more accurate insights than first-touch or last-touch. Your prospects interact with multiple channels over weeks or months, and reducing that journey to a single touchpoint oversimplifies reality. Review the SaaS marketing attribution tools available to find the right fit for your business.
Set your attribution lookback window to match your typical trial-to-paid timeline. If users typically convert within 30 days of their first interaction, set a 30-day lookback window. This ensures you capture all relevant touchpoints without attributing conversions to interactions that happened too far in the past to be meaningful.
Consider using different attribution models for different purposes. Use first-touch attribution to evaluate top-of-funnel channels and understand which sources generate the most new prospects. Use time-decay or linear attribution to evaluate overall channel performance and make budget allocation decisions. Use last-touch attribution to identify which campaigns are most effective at driving immediate conversions.
Advanced attribution platforms offer data-driven attribution models that use machine learning to analyze your actual conversion patterns and assign credit based on which touchpoints statistically correlate with conversions. These models adapt to your specific customer journey and often provide the most accurate representation of channel impact.
Step 5: Feed Conversion Data Back to Ad Platforms
Your ad platforms optimize based on the conversion data they receive. If you only send trial signup events to Meta and Google, their algorithms optimize for trial signups, not paid conversions. This creates a fundamental misalignment: you want paying customers, but your ad platforms are optimizing for trial volume.
Feeding actual paid conversion events back to your ad platforms solves this problem. When you send paid conversion data to Meta, Google, and other platforms, their algorithms can optimize for the outcomes that actually matter to your business.
This process is often called conversion API, server-side conversion tracking, or offline conversion tracking. Instead of relying on browser pixels to report conversions, you send conversion events directly from your server to the ad platform's API. This method is more reliable because it bypasses browser limitations and works even when conversions happen weeks after the initial ad click. Understanding tracking offline to online conversions is essential for this process.
Set up conversion API integrations for each of your major ad platforms. For Meta, this means implementing the Conversions API. For Google, it's the offline conversion import or enhanced conversions. For LinkedIn, it's the Conversions API. Each platform has specific requirements for the data format and matching parameters.
When sending conversion events, include the conversion value. If someone subscribes to your $99/month plan, send $99 as the conversion value. This allows ad platforms to optimize for revenue, not just conversion volume. A campaign that generates ten $49/month subscriptions and a campaign that generates five $199/month subscriptions have very different values, and your ad algorithms should know this.
Include matching parameters that help ad platforms connect the conversion back to the original ad click. This typically includes hashed email addresses, IP addresses, user agent strings, and click IDs. The more matching parameters you provide, the higher your match rate will be.
Pay attention to match rates in each platform's reporting. Meta and Google show what percentage of your offline conversions they successfully matched to ad clicks. If your match rate is below 50%, you have a data quality problem. Check that you're sending the correct matching parameters and that email addresses are properly hashed. If you're experiencing issues, our guide on why conversions are not tracking can help troubleshoot common problems.
Configure your conversion events with appropriate conversion windows. Most ad platforms allow you to set how long after an ad click or view they should attribute conversions. For SaaS with 14-day trials, you might set a 30-day click conversion window and a 7-day view conversion window. This tells the platform to attribute conversions that happen within 30 days of a click or 7 days of viewing an ad.
Verify that conversions appear correctly in each platform's reporting. After setting up conversion sync, monitor your ad platform dashboards to confirm that paid conversion events are being received and attributed properly. You should see conversion counts increase and conversion values appear in your campaign reports.
Step 6: Build Your Conversion Tracking Dashboard
All the tracking infrastructure you've built means nothing if you can't easily access and interpret the data. Your conversion tracking dashboard transforms raw data into actionable insights that guide your marketing decisions.
Create a primary view that shows trial-to-paid conversion rates by channel and campaign. This view should display how many trials each channel generated, how many converted to paid, and the conversion rate. You'll quickly see which channels attract users who actually convert versus those that generate trial volume without revenue.
Add metrics that show cost per trial and cost per paid customer for each channel. These metrics reveal your true customer acquisition cost. A channel might have a low cost per trial but a terrible trial-to-paid conversion rate, resulting in a high cost per paid customer. Another channel might have a higher cost per trial but excellent conversion rates, making it more profitable overall. Explore SaaS marketing analytics platforms to find tools that surface these insights automatically.
Include conversion velocity metrics that show how long it takes users to convert from trial to paid, broken down by acquisition source. Some channels might bring in users who convert quickly, while others attract prospects who need more time to evaluate. Understanding these patterns helps you set appropriate attribution windows and forecast revenue more accurately.
Build campaign-level views that let you drill down into specific campaigns, ad sets, and individual ads. You want to identify not just which channels work, but which specific campaigns and creative approaches drive the best results. This granular view enables you to scale what works and cut what doesn't at a tactical level.
Set up cohort analysis views that group users by signup date and track their conversion behavior over time. This helps you spot trends and seasonal patterns. You might discover that users who sign up in Q4 convert at higher rates than those who sign up in Q1, or that recent cohorts are converting faster than historical ones.
Configure alerts for significant changes in conversion patterns. Set up notifications when trial-to-paid conversion rates drop below a certain threshold, when cost per paid customer exceeds your target, or when a previously high-performing campaign suddenly stops converting. Early detection of problems allows you to investigate and fix issues before they significantly impact your budget.
Include attribution model comparison views that show how different models credit your channels. Display first-touch, last-touch, and linear attribution side by side for the same time period. This comparison reveals which channels are better at generating awareness versus closing conversions, helping you understand each channel's role in your overall strategy.
Putting It All Together
With comprehensive trial-to-paid conversion tracking in place, you've eliminated the blind spot that causes most SaaS companies to waste ad spend. You can now see the complete picture of which marketing efforts drive actual paying customers, not just trial signups that never convert.
Use your conversion tracking dashboard daily to monitor performance and weekly to identify trends. Look for channels and campaigns where trial-to-paid conversion rates are improving or declining. Investigate the causes behind these changes. Did you modify your landing page messaging? Did you adjust targeting? Understanding what drives conversion rate changes helps you replicate successes and avoid repeating mistakes.
Reallocate budget based on cost per paid customer, not cost per trial. It's tempting to pour money into channels that generate cheap trials, but if those trials don't convert, you're burning cash. Shift budget toward channels that might have higher upfront costs but deliver better conversion rates and lower overall customer acquisition costs.
Test new channels and campaigns with confidence, knowing you can accurately measure their impact on paid conversions. The tracking system you've built allows you to run experiments, compare results across attribution models, and make data-driven decisions about where to scale.
Review your attribution model regularly to ensure it still reflects your customer journey. As your product evolves, your sales cycle might shorten or lengthen. As you add new marketing channels, the typical path to conversion might change. Adjust your attribution settings to match these shifts.
Share conversion data with your entire team. Your product team should know which acquisition sources bring in users who activate fastest. Your sales team should understand which marketing channels generate the most qualified leads. Your finance team needs accurate CAC data for forecasting. Make your conversion tracking dashboard accessible to stakeholders across the organization.
The next step is optimization. Now that you know which ads and channels drive paying customers, you can make informed decisions about creative testing, audience targeting, and budget allocation. You can identify your most valuable customer segments and acquire more users who match those profiles. You can spot underperforming campaigns early and fix or cut them before they waste significant budget.
Ready to elevate your marketing game with precision and confidence? Discover how Cometly's AI-driven recommendations can transform your ad strategy. Get your free demo today and start capturing every touchpoint to maximize your conversions.