
The Facebook Pixel alone no longer captures the full picture of your ad performance. With browser restrictions, iOS privacy updates, and ad blockers becoming standard, many marketers report seeing gaps between actual conversions and what shows up in Ads Manager. The Conversion API (CAPI) solves this by sending event data directly from your server to Meta—bypassing browser limitations entirely.
This guide walks you through setting up Facebook Conversion API from scratch, whether you're using a partner integration or going the manual route. By the end, you'll have server-side tracking running alongside your Pixel, giving Meta's algorithm the complete data it needs to optimize your campaigns effectively.
Think of CAPI as your backup quarterback. While the Pixel handles browser-based tracking, CAPI ensures conversion data reaches Meta even when browsers block cookies or users opt out of tracking. Together, they create a complete picture of your customer journey.
Step 1: Verify Your Facebook Pixel and Events Manager Access
Before you dive into Conversion API setup, you need to confirm your foundation is solid. Navigate to your Facebook Events Manager by going to Business Settings and selecting Events Manager from the left menu. This is mission control for all your tracking.
Look for your Pixel in the data sources list. Click on it and check the Overview tab—you should see recent activity with events firing. If your Pixel shows no recent events or displays an error status, pause here and fix that first. CAPI builds on top of your Pixel, not instead of it.
Next, verify your access level. Click on your profile icon in the top right of Business Manager, then check your role for this specific Business Manager account. You need Admin access to generate API tokens and configure server-side tracking. If you only have Analyst or Advertiser access, reach out to your account owner to upgrade your permissions.
Now review which events your Pixel currently tracks. In Events Manager, click on your Pixel and navigate to the Overview tab. Scroll down to see your top events—typically Purchase, AddToCart, Lead, or ViewContent. Make note of these event names exactly as they appear. You'll replicate these same events through CAPI to maintain consistency.
Finally, locate your Pixel ID. You'll find it at the top of your Pixel's Overview page, usually formatted as a string of numbers. Copy this somewhere accessible—you'll need it multiple times during setup. This ID is what connects your server-side events to your existing Pixel data.
Quick success check: Can you see your Pixel firing events in real-time? Do you have Admin access? Do you know which events to replicate? If yes to all three, you're ready to move forward.
Step 2: Generate Your Conversion API Access Token
Your access token is the key that authorizes your server to send events directly to Meta. Without it, your server has no way to communicate with Facebook's systems. This token is sensitive—treat it like a password.
In Events Manager, select your Pixel from the data sources list. Click on the Settings tab in the top navigation. Scroll down until you see the Conversion API section—it's usually about halfway down the page.
Click the "Generate Access Token" button. Meta will display your token immediately in a pop-up window. This is your only chance to copy it—once you close this window, you'll need to generate a new one if you lose it. Copy the entire string and paste it into a secure password manager or encrypted document.
Understanding what this token does matters. It grants your server permission to send events on behalf of your Pixel, essentially acting as your server's credentials with Meta. Anyone with this token can send data to your Pixel, which is why you should never share it publicly or commit it to public code repositories.
The token doesn't expire automatically, but you can revoke it anytime from the same Settings page. If you suspect your token has been compromised, generate a new one immediately and update your server configuration. The old token stops working the moment you generate a replacement.
Store this token in your server's environment variables, not hardcoded in your application files. This keeps it secure and makes it easier to update without touching your codebase. If you're using a partner integration, you'll enter this token in your platform's settings panel—we'll cover that in Step 4.
One common mistake: confusing the access token with your Pixel ID. They're different. Your Pixel ID identifies which Pixel receives the events, while your access token authorizes the transmission. You need both for CAPI to work.
Step 3: Choose Your Implementation Method
How you implement CAPI depends on your technical setup and resources. There's no universally "best" method—just the right fit for your situation. Let's break down your three main options.
Partner integrations are the fastest path for most businesses. If you're running on Shopify, WooCommerce, WordPress, or another major platform, Meta has partnered with these providers to handle the technical heavy lifting. You'll find CAPI settings directly in your platform's admin panel or through an official plugin.
The advantage here is speed and simplicity. Install the integration, enter your access token and Pixel ID, toggle CAPI on, and you're essentially done. The platform automatically formats events, handles deduplication, and sends data to Meta using their tested infrastructure. This works well for standard e-commerce setups where you're tracking common events like Purchase and AddToCart.
The limitation? Less flexibility. Partner integrations send predefined events with standard parameters. If you need to track custom events or include specific customer data points, you might hit walls. But for most businesses, this trade-off is worth the time saved.
Manual implementation gives you complete control. You write the server-side code that captures events and sends them to Meta's Conversion API endpoint. This requires development resources—someone comfortable with server-side programming and API integration.
Choose manual implementation if you're on a custom platform, need to send highly specific event parameters, or want to control exactly when and how data transmits. You'll work directly with Meta's API documentation, formatting JSON payloads and managing HTTP requests to their endpoints. For a deeper dive into this approach, check out our conversion API implementation tutorial.
The Gateway API is Meta's newer option that sits between partner integrations and manual setup. You still write code, but Meta handles more of the infrastructure—hosting, scaling, and some data processing. It's designed to simplify manual implementation while maintaining flexibility.
Consider Gateway API if you have development resources but want to avoid managing the full server infrastructure. It's particularly useful for businesses that fall between "standard e-commerce" and "completely custom"—you get more control than partner integrations without the full complexity of manual implementation.
Most marketers should start with partner integrations if available. Only move to manual or Gateway API if you have specific requirements that partner integrations can't meet. You can always migrate later if your needs evolve.
Step 4: Configure Server-Side Event Tracking
Now you're ready to actually set up event tracking. The process differs significantly based on your chosen implementation method, but the goal remains the same: send conversion events from your server to Meta.
For partner integrations, navigate to your platform's CAPI settings. In Shopify, this is under Settings > Apps > Facebook & Instagram. In WooCommerce, look for Facebook for WooCommerce plugin settings. The exact location varies, but you're looking for a section labeled "Conversion API" or "Server-Side Tracking."
Enter your access token in the designated field. Then enter your Pixel ID. Most platforms will test the connection immediately—you should see a success message confirming your server can communicate with Meta. Enable the CAPI toggle, and the platform begins sending events automatically whenever conversions occur.
For manual implementation, you'll structure API requests to Meta's Conversion API endpoint. Each event requires specific parameters formatted as JSON. The required fields are event_name (like "Purchase" or "Lead"), event_time (Unix timestamp), and user_data (customer information).
Here's what your event structure needs: Set action_source to "website" for web conversions. Include event_id for deduplication—we'll cover this more in Step 5. Add custom_data for event-specific details like purchase value or product IDs. And crucially, populate user_data with customer information.
The user_data object is where attribution happens. Include email, phone, first name, last name, city, state, zip code, and country when available. All personally identifiable information must be hashed using SHA-256 before transmission. Also include client_ip_address, client_user_agent, fbc (Facebook click ID), and fbp (Facebook browser ID) when possible.
Map your conversion events to match your Pixel events exactly. If your Pixel fires "Purchase" when someone completes checkout, your CAPI event must also be named "Purchase" with identical capitalization. Inconsistent naming breaks attribution and creates confusion in your reporting.
For each event type, determine what triggers the server-side event. Purchase events fire after payment confirmation. Lead events fire after form submission. AddToCart events fire when items are added to cart. The timing should mirror your Pixel implementation as closely as possible.
Test your configuration with a single event type first. Get Purchase working correctly before adding Lead, AddToCart, and other events. This makes troubleshooting easier if something goes wrong.
Step 5: Implement Event Deduplication
Without deduplication, you'll count every conversion twice—once from the Pixel and once from CAPI. Meta's algorithm will think you're getting double the conversions, skewing your data and wasting your budget on false signals.
Deduplication works through matching event_id values. When both your Pixel and CAPI send events with identical event_id strings within a 48-hour window, Meta recognizes them as the same conversion and counts it only once.
Generate a unique event_id for each conversion. This should be a random string or UUID that's created when the conversion happens. The key is ensuring both your browser-side Pixel code and your server-side CAPI code can access this same ID for the same conversion.
On the browser side, modify your Pixel event code to include the event_id parameter. If you're using standard Pixel code, add the event_id to your fbq track call. For example, when someone completes a purchase, generate an ID and pass it to both the Pixel and your server.
On the server side, include that same event_id in your CAPI event payload. The timing matters—send the CAPI event as close to the Pixel event as possible. Meta's deduplication window is 48 hours, but tighter timing reduces the chance of issues.
Use consistent naming conventions across your implementation. If your Pixel sends "Purchase" events, your CAPI must send "Purchase" events with matching capitalization. Event names that don't match exactly won't deduplicate, even with matching event_ids.
Verify deduplication is working in Events Manager. Navigate to your Pixel's Overview tab and look at the event breakdown. You should see events listed under both "Pixel" and "Conversions API" columns, but your total event count shouldn't double. If your Purchase events show 100 from Pixel and 100 from CAPI, but total events show 100 (not 200), deduplication is working.
Common deduplication failures happen when event_ids don't match exactly—watch for extra spaces, different encoding, or timing issues where one event fires but the other doesn't. Also check that your event names match precisely across both implementations. If you're experiencing issues where your Facebook Pixel is missing conversions, proper deduplication setup often resolves these discrepancies.
Step 6: Test and Validate Your CAPI Implementation
Testing before going live saves you from broken tracking and lost data. Meta provides specific tools designed to validate your CAPI setup before real conversions flow through.
Start with the Test Events tool in Events Manager. Click on your Pixel, then navigate to the Test Events tab. This tool shows you events as they arrive in real-time, letting you verify your server is successfully sending data to Meta.
Send a test conversion through your system. If you're on an e-commerce platform, place a test order. If you're tracking leads, submit a test form. Watch the Test Events tool—you should see your event appear within seconds, showing all the parameters you sent.
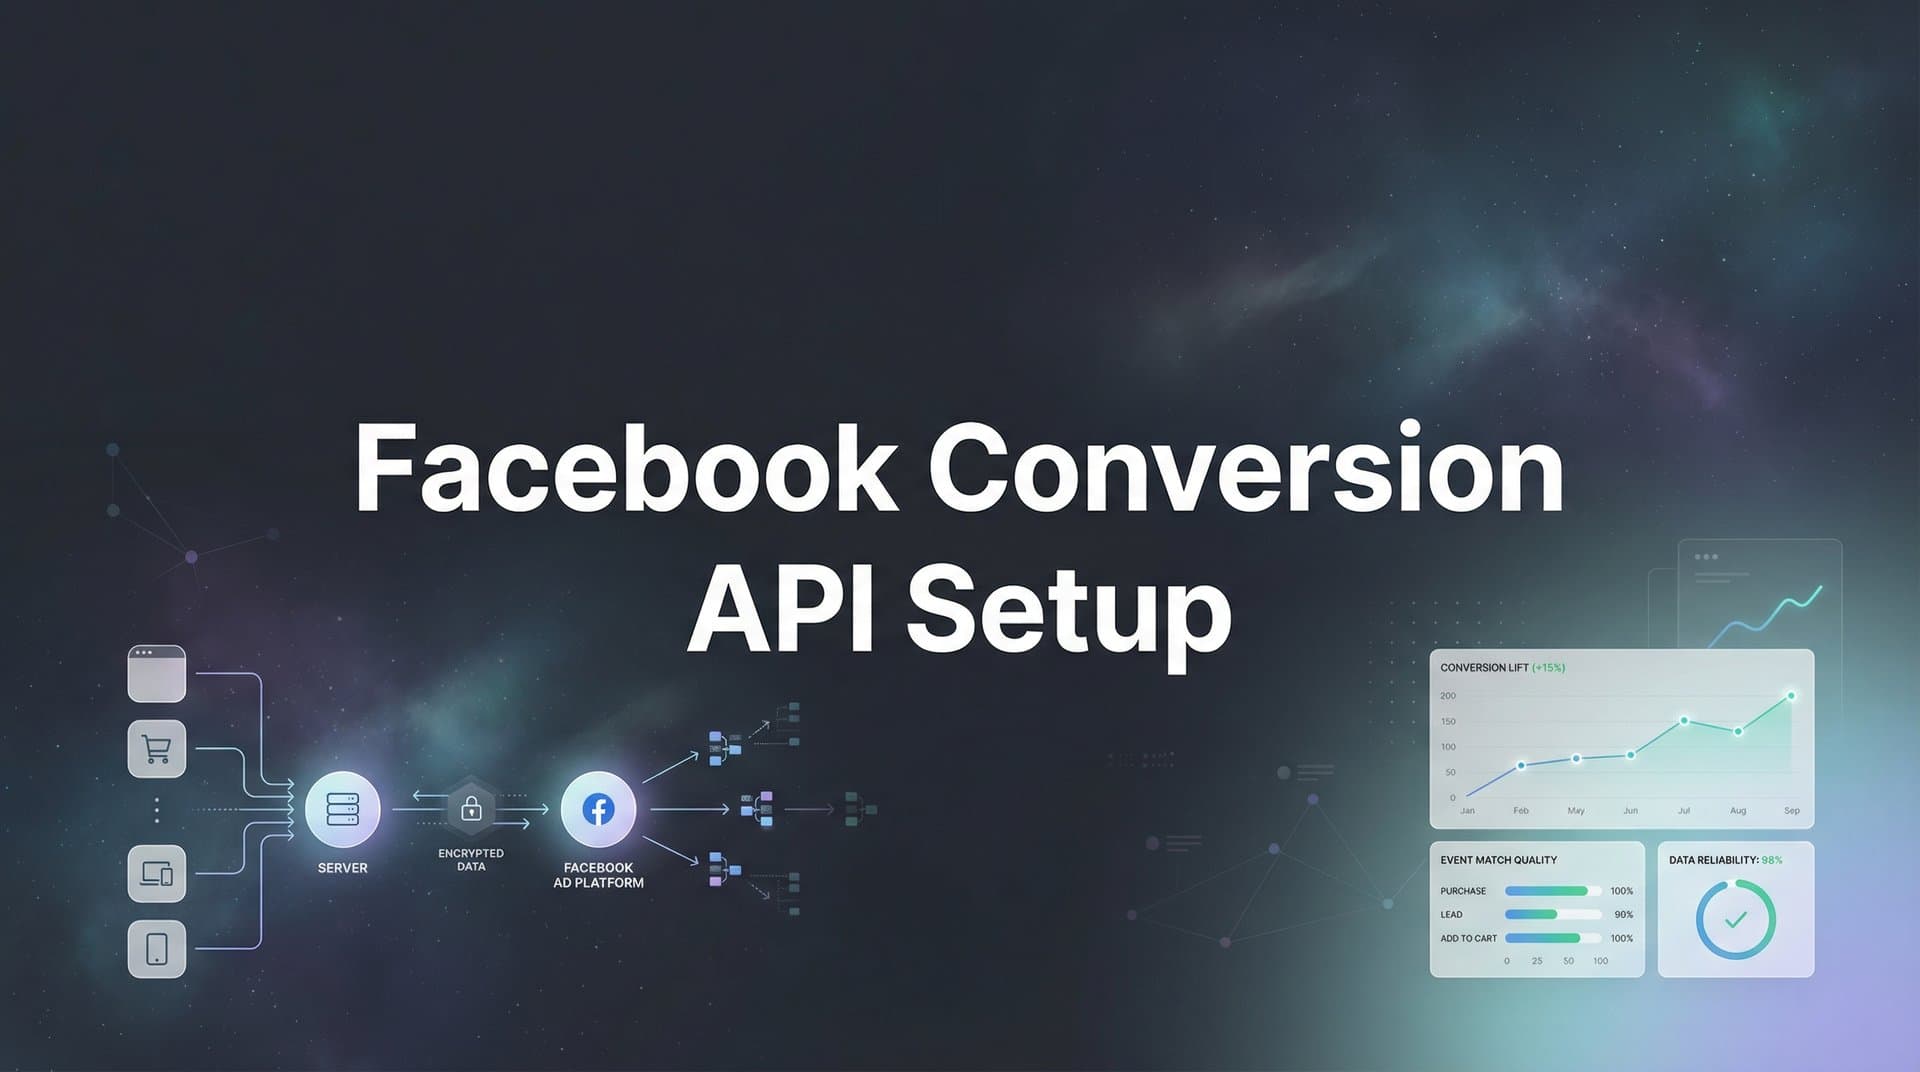
Check the Event Match Quality score for your test event. This appears as a rating from Poor to Great, indicating how well Meta can match your event to a Facebook user. Aim for Good or Great ratings. Poor or Fair ratings mean you're missing key customer parameters that help attribution.
Verify events appear in both the Pixel and Conversion API columns. Click on your Pixel's Overview tab and look at recent events. You should see activity under both tracking methods. If events only show under Pixel or only under CAPI, something's misconfigured.
Troubleshoot timestamp mismatches if events aren't appearing correctly. Your event_time must be a Unix timestamp (seconds since January 1, 1970). If you're sending milliseconds instead of seconds, or if your server clock is significantly off, events may be rejected or attributed incorrectly.
Check for missing user parameters if your Event Match Quality is low. The most impactful parameters are email, phone, and the fbc/fbp cookies. Add these to your user_data object if they're missing. Remember to hash email and phone using SHA-256.
Verify your hashing is correct. Meta provides a hashing tool in Events Manager under Settings > Conversion API. You can input a plain text email or phone number, and Meta shows you what the properly hashed version should look like. Compare this to what your server is sending.
Test deduplication specifically by triggering both Pixel and CAPI events with the same event_id. Check that your total event count doesn't double. If it does, review your event_id implementation—the IDs might not be matching exactly. For more guidance on resolving inaccurate Facebook Pixel tracking, review your parameter configurations carefully.
Step 7: Optimize Event Match Quality for Better Ad Performance
Event Match Quality directly impacts how well Meta's algorithm can optimize your campaigns. Higher match quality means Meta can more accurately attribute conversions to specific users, which improves ad targeting and reduces costs.
Send additional customer parameters beyond the basics. Email and phone are critical, but also include client_ip_address, client_user_agent, fbc (Facebook click ID), and fbp (Facebook browser ID). These parameters significantly improve matching accuracy.
The fbc and fbp cookies are particularly valuable because they directly tie events to specific Facebook users. The fbp cookie is automatically set by the Pixel and identifies the browser. The fbc cookie captures the Facebook click ID from ad clicks. Both should be passed from the browser to your server and included in CAPI events.
Hash all personally identifiable information using SHA-256 before transmission. This includes email, phone, first name, last name, city, state, zip code, and country. Meta requires hashing for privacy compliance. Use lowercase for emails and remove all spaces and special characters from phone numbers before hashing.
Monitor Facebook Event Match Quality weekly in Events Manager. Click on your Pixel, go to Overview, and check the Event Match Quality section. If scores drop from Great to Good or Fair, investigate which parameters might be missing from recent events.
Add parameters incrementally if your match quality is low. Start with email and phone, then add IP address and user agent, then add the Facebook cookies. Test after each addition to see which parameters have the biggest impact on your specific setup.
Attribution platforms like Cometly enhance this process by feeding enriched, conversion-ready events back to Meta automatically. Instead of manually configuring every parameter, Cometly captures the complete customer journey—from first ad click through CRM events—and syncs that enriched data back to Meta with all the parameters needed for optimal matching.
This matters because Meta's algorithm learns faster with better data. When every conversion event includes complete customer information, the algorithm can identify patterns more accurately and target similar users more effectively. Your cost per acquisition drops as the algorithm gets smarter about who to show your ads to. Understanding how to sync conversion data to Facebook Ads properly is essential for maximizing this optimization.
Your CAPI Setup Is Complete—Now Monitor and Optimize
With your Conversion API now running alongside your Pixel, you're capturing conversion data that browser-side tracking alone would miss. Let's verify everything is working correctly.
Quick verification checklist: access token generated and securely stored, events firing from your server and appearing in Events Manager, deduplication configured with matching event_ids, and Event Match Quality showing Good or higher for most events. If all four are true, your setup is solid.
Monitor your Events Manager over the next few days to confirm consistent data flow. You should see steady activity under both Pixel and Conversions API columns. Watch for any sudden drops or errors—these indicate issues that need immediate attention.
Compare your conversion counts before and after CAPI implementation. Many marketers see a 15-30% increase in tracked conversions simply because CAPI captures events that browser restrictions previously blocked. This doesn't mean you're getting more conversions—you're just seeing the ones that were always there. For strategies on leveraging this improved data, explore our guide on Facebook conversion optimization.
For marketers managing campaigns across multiple platforms, tools like Cometly can streamline this process by automatically syncing enriched conversion data back to Meta and other ad platforms. Instead of manually configuring CAPI for each platform, Cometly ensures the algorithms always have accurate data to optimize against—capturing every touchpoint from ad clicks to CRM events and feeding that complete picture back to your ad platforms.
Your next step: review your campaign performance in two weeks to see how improved data quality affects your ad delivery and cost per acquisition. Better data typically leads to more efficient ad spend as Meta's algorithm learns to target users who actually convert. If you're still experiencing Facebook Ads attribution issues, revisit your parameter configuration and deduplication setup.
Ready to elevate your marketing game with precision and confidence? Discover how Cometly's AI-driven recommendations can transform your ad strategy—Get your free demo today and start capturing every touchpoint to maximize your conversions.


