
When your conversion tracking only captures half the story, you're essentially flying blind with your ad spend. Privacy regulations, browser cookie restrictions, and increasingly fragmented cross-device customer journeys have created significant blind spots in conversion attribution—and those gaps drain real dollars from your marketing budget. The consequence is sobering: you're making optimization decisions based on incomplete data, which often means cutting campaigns that are actually performing while doubling down on ones that aren't delivering the results you think they are. Without reliable campaign attribution, every budget decision becomes a gamble rather than a calculated move.
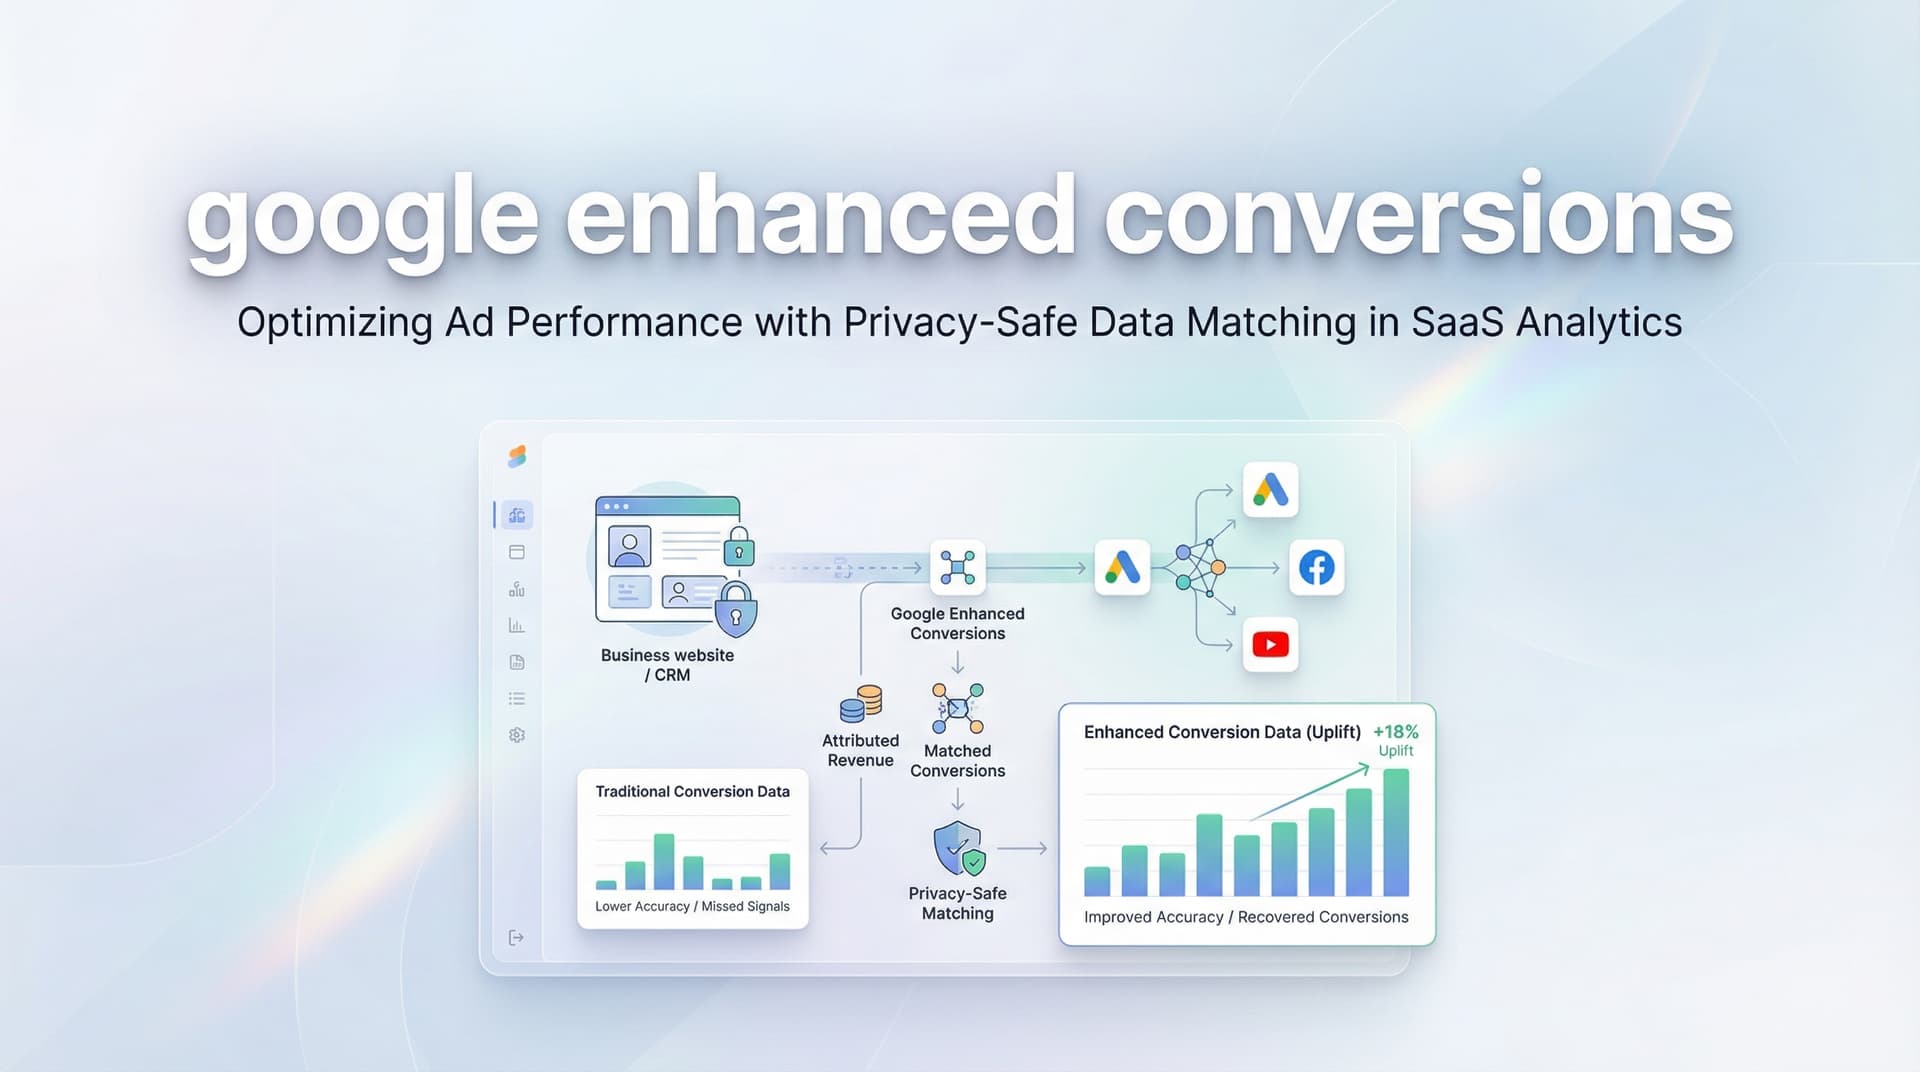
Google Enhanced Conversions tackles this problem directly by harnessing first-party customer data to close those attribution and measurement gaps. Rather than depending entirely on cookies—which browsers increasingly block and users regularly delete—Enhanced Conversions draws on information customers willingly share during their interactions with your business. Email addresses, phone numbers, and other contact details become the connective tissue linking conversions back to the ads that actually drove them.
The privacy mechanics here matter. Google applies SHA-256 hashing to this customer data before it ever leaves your website, transforming recognizable information into encrypted strings that can't be reverse-engineered. These hashed values then get matched against Google's database of signed-in accounts, enabling far more accurate conversion attribution without exposing anyone's personal information. The result is actionable data that reflects what's actually happening in your funnel—not just what cookies managed to capture before getting blocked or expiring.
Here's what makes this powerful: when someone clicks your ad on their phone during their morning commute, browses your site later on their laptop at work, and finally converts days later after clearing their cookies, traditional tracking loses the thread completely. This broken customer journey represents countless conversions that never get attributed back to your campaigns. Enhanced Conversions can still connect those dots because the email address they entered at checkout matches across all these touchpoints—regardless of device switches, browser changes, or cookie deletions. This cross-device attribution capability becomes even more critical when you consider how modern customers actually shop. They might discover your product through a Google Shopping ad on mobile, research competitors on their tablet, read reviews on their work computer, and finally purchase on their home laptop using a different browser entirely. Without Enhanced Conversions, each of these interactions appears disconnected in your reporting—making it nearly impossible to analyze multi-channel ad performance accurately. The email or phone number they provide at conversion becomes the consistent identifier that ties this entire journey together, giving you visibility into the true path to purchase. This guide is specifically designed for marketers running Google Ads who need to recover that lost attribution data and make smarter optimization decisions based on complete information. Whether you're managing high-volume e-commerce campaigns where every conversion counts, sophisticated lead tracking funnels with multiple touchpoints, or SaaS sign-ups with extended consideration periods, you'll walk away with fully configured Enhanced Conversions and verified data flow that captures conversions you're currently missing.
We'll take you through the complete implementation process, starting with checking your prerequisites—like ensuring you have the necessary permissions and understanding which conversion actions qualify. You'll learn how to properly configure the feature whether you're using Google Tag Manager, the global site tag, or Google Ads conversion tracking tag. We'll cover crucial privacy considerations, show you how to test your implementation to ensure data is flowing correctly, and explain how to monitor performance improvements after going live. With this foundation in place, you'll be better positioned to optimize your Google Ads campaign based on complete attribution data rather than the fragmented picture most advertisers work with. By the end, you'll have Enhanced Conversions actively recovering attribution data that would otherwise remain invisible in your campaigns.
The setup process involves five concrete steps that typically take 30-60 minutes to complete. You'll enable the feature in your Google Ads account, configure your website or tag manager to capture customer data, and validate that everything works correctly. By the end, you'll have significantly improved conversion tracking that gives Google's algorithms better data to optimize your campaigns.
Step 1: Verify Your Google Ads and Tag Setup Prerequisites
Before diving into Enhanced Conversions configuration, you need to confirm your foundation is solid. Think of this as checking that you have all the ingredients before starting to cook—missing one key element means you'll need to stop halfway through and backtrack.
Start by logging into your Google Ads account and navigating to Goals > Conversions. You should see at least one active conversion action already configured and tracking. Enhanced Conversions builds on top of your existing Google Ads conversion tracking—it doesn't replace it. If you don't have conversion actions set up yet, you'll need to create those first before proceeding with this guide.
Next, verify that you have either Google Tag (gtag.js) or Google Tag Manager installed on your website. You can check this by viewing your website's source code and searching for "gtag" or "GTM-" followed by your container ID. If you're not sure, use Google Tag Assistant (a free Chrome extension) to scan your site and identify which tracking codes are present.
The tag installation matters because Enhanced Conversions works by adding customer data parameters to your existing conversion tracking tags. If your tags aren't firing correctly in the first place, adding enhanced conversion data won't help—you'll just be sending incomplete information more accurately.
Here's the critical requirement many marketers overlook: your website must actually collect first-party customer data during the conversion process. At minimum, you need to capture email addresses. This typically happens through form submissions, checkout processes, or account creation flows. Enhanced Conversions can also use phone numbers, names, and addresses to improve match rates, but email is the essential starting point.
Check your conversion pages—whether that's a thank-you page after form submission or a purchase confirmation screen—and confirm that customers are providing their email address as part of that process. If you're running a simple "add to cart" conversion that doesn't collect any customer information, Enhanced Conversions won't have data to work with.
You also need appropriate access levels. For Google Ads, you'll need Admin or Standard access to enable Enhanced Conversions. For your website, you'll need the ability to edit code directly or access to your Google Tag Manager container with Publish permissions.
Success indicator: You can see your conversion actions listed in Google Ads with recent conversion data, your Google Tag or GTM fires correctly when you test it, and your conversion flow collects at least an email address from customers. If all three boxes are checked, you're ready to move forward.
Step 2: Enable Enhanced Conversions in Google Ads
Now that your prerequisites are confirmed, it's time to flip the switch in Google Ads. This step is straightforward but requires attention to detail—missing a checkbox or selecting the wrong implementation method can create headaches later.
Log into your Google Ads account and click on Goals in the left navigation menu, then select Conversions. You'll see a list of all your conversion actions. Look for the Settings option—it's typically a small gear icon or a settings link near the top of the conversion list.
In the settings area, scroll down until you find the Enhanced Conversions section. You'll see a toggle switch or button to turn on Enhanced Conversions for web. Click it to begin the setup process.
Here's where many marketers rush through and miss something important: Google will present you with customer data terms and a compliance agreement. Read these carefully. By enabling Enhanced Conversions, you're agreeing to collect, hash, and share customer data with Google for attribution purposes. Your business must have appropriate consent mechanisms and privacy policies in place before proceeding.
This isn't just legal boilerplate—it's a real compliance requirement. Make sure your website's privacy policy discloses that you share customer information with advertising platforms for attribution purposes, and that you're collecting proper consent where required by law (like GDPR in Europe or CCPA in California).
After accepting the terms, you'll need to choose your implementation method. Google offers three options, and picking the right one depends on your technical setup:
Google Tag (gtag.js): Choose this if you have Google's tracking code directly embedded in your website code. This method requires editing your website's HTML or working with your development team to add enhanced conversion parameters to your conversion tracking tag.
Google Tag Manager: Select this option if you manage your tracking through GTM. This is the most popular choice because it doesn't require touching your website code directly—you can configure everything through the GTM interface. If you're new to this platform, our Google Tag Manager tutorial covers the fundamentals you'll need.
Google Ads API: This is for advanced implementations where you're sending conversion data server-side rather than through browser-based tags. Unless you have a dedicated development team handling server-side tracking, you probably won't use this method.
For most marketers, Google Tag Manager is the recommended path. It offers the best balance of flexibility and ease of implementation.
After selecting your implementation method, make sure you click Save or Apply. This is a common pitfall—marketers go through the setup flow, then navigate away without saving, and wonder why Enhanced Conversions isn't working later.
Success indicator: Return to the Goals > Conversions > Settings area and confirm that Enhanced Conversions shows as "Enabled" with your chosen implementation method displayed. You should see a green checkmark or "Active" status. If it shows as "Not set up" or "Disabled," go back and complete the enablement process.
Step 3: Configure Data Collection on Your Website
Enabling Enhanced Conversions in Google Ads is just flipping a switch—the real work happens in configuring your website or tag manager to actually capture and send customer data. This is where implementation diverges based on whether you're using gtag.js or Google Tag Manager.
For Google Tag (gtag.js) implementations: You'll need to modify your conversion tracking code to include an enhanced_conversion_data parameter. This parameter contains the customer information you're sending to Google. The code typically looks something like this, added to your conversion tracking snippet on your confirmation page:
The enhanced_conversion_data object should include the customer's email address (required), and optionally their phone number, first name, last name, street address, city, region, postal code, and country. Google automatically hashes this data using SHA-256 before sending it, so you don't need to pre-hash it yourself—though you can if you prefer to handle the hashing on your server before the data reaches the browser.
The key challenge with gtag.js is capturing the customer data at the right moment. Your conversion tracking code fires on your thank-you or confirmation page, so you need to make that customer information available in the page's JavaScript context when the tag fires. This often means passing the data from your form submission or checkout process into JavaScript variables that your tracking code can access.
For Google Tag Manager implementations: The process is more visual and doesn't require editing code directly. Start by creating a new User-Provided Data variable in GTM. This variable type is specifically designed for Enhanced Conversions and makes data mapping straightforward.
In your GTM container, go to Variables and click New. Choose User-Provided Data as the variable type. You'll see fields for email, phone number, address, and name components. For each field you want to include, you'll need to map it to where that data lives in your website's data layer or form fields.
Most commonly, you'll reference data layer variables that get populated when a customer completes a conversion. For example, if your website pushes customer email to dataLayer.userEmail when someone submits a form, you'd map the email field in your User-Provided Data variable to that data layer variable.
After creating the User-Provided Data variable, you need to connect it to your Google Ads conversion tag. Edit your existing conversion tag in GTM, expand the Advanced Settings section, and look for the Enhanced Conversions option. Enable it and select the User-Provided Data variable you just created.
Here's a critical detail that trips up many implementations: the timing of data capture matters enormously. Your customer data needs to be available in the data layer or form fields before your conversion tag fires. If your conversion tag fires immediately on page load but your form data doesn't populate the data layer until after submission, you'll send empty enhanced conversion data.
The solution is to make sure your conversion tag fires on a trigger that happens after the customer data is available—typically a custom event that fires after form submission or a page view trigger on your confirmation page where the data is already rendered. Understanding event tracking in Google Analytics can help you grasp these timing concepts better.
One common mistake is mapping to form input fields directly using GTM's Form variables. This can work, but it's fragile—if your form structure changes or if customers have already navigated away from the form to a confirmation page, those field values won't be accessible. A more robust approach is having your website push customer data to the data layer as part of the conversion event, then mapping your User-Provided Data variable to those data layer values.
Data field recommendations: While only email is technically required, including additional fields improves your match rates. Phone numbers are particularly valuable because they're unique identifiers that work well for matching. Full names and addresses help when email addresses are shared (like family members using the same email) or when customers have multiple Google accounts.
Format matters too. Phone numbers should include country codes. Addresses should be broken into separate components (street, city, region, postal code, country) rather than sent as a single string. Google's matching algorithms work better with structured, normalized data.
Success indicator: Your conversion tag configuration now includes enhanced conversion data parameters or references your User-Provided Data variable. When you preview your tag in GTM or inspect your gtag.js code, you can see the customer data fields are mapped and populated with the correct variable references.
Step 4: Test and Validate Your Implementation
Configuration is meaningless if the data isn't actually flowing correctly. Testing catches the subtle issues that break Enhanced Conversions—wrong variable names, tags firing in the wrong order, missing data fields—before they cost you weeks of lost attribution data.
Start with Google Tag Assistant, a free Chrome extension that's essential for debugging Google tags. Install it if you haven't already, then navigate to your website and go through a test conversion. Submit a form or complete a purchase using test data (use a real email address you control so you can verify the data format).
After completing the test conversion, open Tag Assistant and look for your Google Ads conversion tag in the list of fired tags. Click on it to expand the details. You should see a section showing the enhanced conversion data that was sent. Verify that the email field is populated and that any additional fields you configured (phone, name, address) are showing up correctly.
Tag Assistant will display warnings or errors if something is wrong. Common issues include "Enhanced conversion data not detected" (meaning the data parameter is missing entirely) or "Invalid format for user data" (meaning the data is present but not structured correctly).
For a more technical validation, open your browser's developer tools (F12 or right-click > Inspect) and go to the Network tab. Filter for requests to "google" or "googleadservices." Complete another test conversion and watch for the network request that fires when your conversion tag triggers.
Click on that request and examine the payload. Look for a parameter called "em" (hashed email) or "user_data" containing your customer information. If you see these parameters with hashed values (long strings of letters and numbers), your enhanced conversion data is being sent. If these parameters are missing or empty, your data capture isn't working.
The hashed values won't be readable—that's expected and correct. Google hashes the data before sending it, so you'll see something like "sha256_email_address" with a long hexadecimal string rather than the actual email address. This is a privacy feature, not a problem.
If you're using Google Tag Manager, use the Preview mode to step through your conversion flow. GTM Preview shows you exactly which tags fire, in what order, and what data they contain at the moment they fire. This is invaluable for catching timing issues where your conversion tag fires before customer data is available in the data layer.
In GTM Preview, complete a test conversion and examine the Variables tab when your conversion tag fires. Check that your User-Provided Data variable shows populated values for email and any other fields you configured. If these variables are empty or undefined, the problem is in your data layer implementation or variable mapping—your website isn't making the customer data available when the tag needs it.
Common issues and fixes: If email is missing, check that you're capturing it in your form and pushing it to the data layer or making it available to your tag. If you see "undefined" for data layer variables, verify the variable names match exactly (they're case-sensitive). If your tag fires but no enhanced conversion data appears, confirm you've actually enabled Enhanced Conversions in your tag configuration and selected the User-Provided Data variable.
After testing in your browser, you'll want to check Google Ads for confirmation that data is flowing. However, there's a delay here—Google's Enhanced Conversions diagnostic report takes 48-72 hours to populate after you first enable the feature. This report shows your match rate and data quality metrics, but you won't see results immediately.
In the meantime, if Tag Assistant shows green checkmarks and your network requests include hashed user data, you can be confident your implementation is working. The diagnostic report will provide the final confirmation once enough data accumulates.
Success indicator: Tag Assistant displays your conversion tag with enhanced conversion data present and no errors. Browser developer tools show network requests containing hashed email parameters. GTM Preview (if applicable) shows your User-Provided Data variable populated with correct values when your conversion tag fires.
Step 5: Monitor Performance and Optimize Data Quality
Implementation isn't a one-and-done task—Enhanced Conversions requires ongoing monitoring to maintain data quality and maximize attribution improvements. The difference between a basic implementation and an optimized one often comes down to the coverage rate and data completeness.
After 48-72 hours, return to Google Ads and navigate to Goals > Conversions > Settings. In the Enhanced Conversions section, you'll now see a diagnostic report. This report is your primary monitoring tool and shows several critical metrics.
The most important metric is your coverage rate—the percentage of conversions that include enhanced conversion data. If your coverage rate is 30%, that means only 30% of your conversions are being enhanced with customer data, while 70% are falling back to standard cookie-based tracking. Higher coverage rates lead to better attribution accuracy because more conversions can be matched even when cookies are blocked or deleted.
Industry benchmarks vary, but aim for a coverage rate above 70%. If you're below 50%, there's likely an implementation issue causing enhanced conversion data to be missing for many conversions. Common causes include conversion tags firing before customer data is available, or conversion flows where customers don't provide email addresses.
The diagnostic report also shows which data fields are being captured. You might see that 80% of conversions include email, but only 40% include phone numbers. This tells you where to focus optimization efforts. Adding phone number capture to your forms or checkout process could significantly improve your match rates.
Match rate is another key metric, though Google doesn't always display it explicitly. Match rate indicates what percentage of the enhanced conversion data you send successfully matches to a Google account. Higher match rates mean better attribution. You can improve match rates by including more data fields—a conversion with email, phone, and name matches more reliably than one with just email.
Set up a regular monitoring schedule—checking your coverage rate weekly at first, then monthly once things stabilize. Watch for sudden drops in coverage, which often indicate technical issues like tags breaking after a website update or data layer changes that weren't communicated to your marketing team. Periodically conducting a Google Analytics audit can help you catch these issues before they impact your data quality.
Compare your conversion reporting before and after Enhanced Conversions implementation. You should see more attributed conversions to your campaigns, particularly for longer customer journeys or audiences that frequently clear cookies. The increase won't be dramatic overnight, but over weeks you'll notice improved attribution completeness.
Look specifically at attribution for mobile-to-desktop conversions and returning visitors. These are the scenarios where cookie-based tracking struggles most, so Enhanced Conversions should show the biggest improvements in these segments.
If your coverage rate is lower than expected, dig into the specific conversion actions. You might find that one conversion type (like newsletter signups) has 90% coverage while another (like demo requests) has only 40%. This points you toward which conversion flows need attention.
Consider expanding the data fields you collect if you have low match rates despite good coverage. Adding optional phone number fields to forms, or capturing customer names during checkout, can boost matching without significantly impacting conversion rates. Test these changes carefully—you don't want to hurt conversion rates in pursuit of better attribution data. Focus on strategies that increase customer conversions while maintaining data quality.
Success indicator: Your Enhanced Conversions coverage rate remains stable above 70%, you're capturing multiple data fields (email plus at least one other), and you can see improved attribution in your Google Ads reporting compared to pre-implementation baselines. You have a monitoring process in place to catch data quality issues quickly.
Putting It All Together
You've now configured Google Enhanced Conversions from start to finish. Here's your implementation checklist to review:
✓ Verified existing conversion tracking and tag setup
✓ Confirmed your site collects customer data during conversions
✓ Enabled Enhanced Conversions in Google Ads settings
✓ Accepted customer data terms and selected implementation method
✓ Configured data capture through gtag.js or Google Tag Manager
✓ Mapped customer data fields (email required, phone and name recommended)
✓ Tested implementation with Tag Assistant and browser developer tools
✓ Verified enhanced conversion data appears in network requests
✓ Set up monitoring for coverage rate and data quality
✓ Established regular check-ins to maintain performance
Enhanced Conversions solves a critical piece of the attribution puzzle by using first-party data to track conversions that would otherwise be lost to cookie restrictions and privacy changes. But it's important to understand what it doesn't do: Enhanced Conversions only improves attribution within Google Ads. It doesn't help you understand how Google Ads works together with Facebook, LinkedIn, email campaigns, or organic channels to drive conversions.
For complete visibility across your entire marketing ecosystem, you need a solution that captures every touchpoint across all platforms and feeds that enriched data back to each ad platform's optimization algorithms. This is where tools like Cometly complement Enhanced Conversions by providing comprehensive multi-touch attribution and AI-powered insights that work across every channel in your marketing stack.
While Google Enhanced Conversions improves matching within Google's ecosystem, Cometly connects the dots across your entire customer journey—from the first ad click on any platform through CRM events and final conversion. The platform's server-side tracking captures data that browser-based solutions miss, and its conversion sync feature feeds better data back to Google, Meta, and other ad platforms to improve their targeting and optimization.
Think of Enhanced Conversions as upgrading the tracking within one room of your house, while comprehensive attribution platforms like Cometly give you visibility into the entire property. Both are valuable, but the combination provides the complete picture you need to make confident marketing decisions and scale what's actually working.
Ready to elevate your marketing game with precision and confidence? Discover how Cometly's AI-driven recommendations can transform your ad strategy—Get your free demo today and start capturing every touchpoint to maximize your conversions.


