Every marketer knows the frustration of seeing leads in Salesforce but having no clear picture of which campaigns actually generated them. You're running ads across Google, Meta, LinkedIn, and maybe a dozen other channels. Leads are flowing in. Your sales team is working them. But when it comes time to decide where to invest next month's budget, you're left staring at incomplete data and making educated guesses.
Without proper attribution integration, you're essentially flying blind. You might know that 200 leads came in last month, but you don't know if they came from that expensive LinkedIn campaign or the scrappy retargeting ads you set up three months ago. You can't confidently scale what's working because you don't actually know what's working.
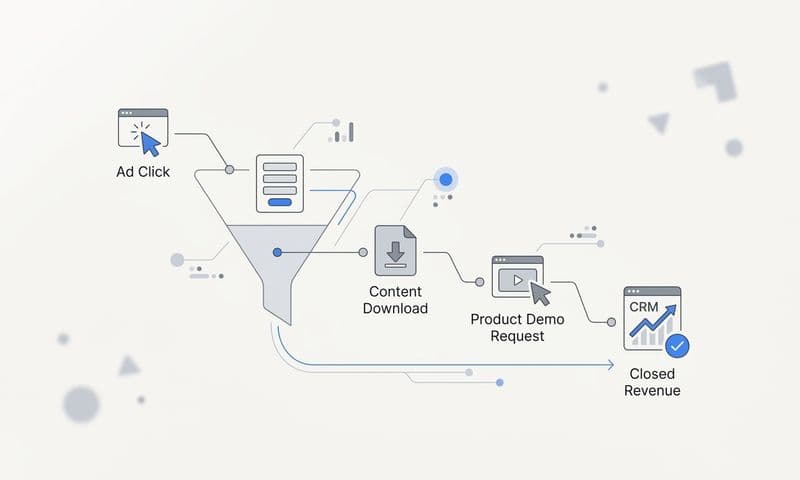
Salesforce marketing attribution integration solves this problem by connecting your CRM data with your advertising efforts. It creates a complete view of the customer journey from first click to closed deal, showing you exactly which touchpoints deserve credit for revenue. This isn't just about tracking where leads come from—it's about understanding the entire path they take before becoming customers.
This guide walks you through the entire setup process, from preparing your Salesforce environment to validating that attribution data flows correctly. Whether you're connecting ad platforms directly or using a dedicated attribution tool like Cometly, you'll learn exactly how to configure each component for accurate, actionable insights.
By the end, you'll have a working integration that shows precisely which marketing touchpoints drive revenue, not just leads. No more guessing. No more spreadsheet gymnastics trying to manually connect the dots. Just clear, reliable data that tells you where to invest.
Step 1: Audit Your Current Salesforce Setup and Data Structure
Before you connect anything, you need to understand what you're working with. Think of this like preparing a house for renovation—you need to know which walls are load-bearing before you start knocking things down.
Start by reviewing your existing lead and opportunity fields. Open up a few recent leads in Salesforce and look at what data you're currently capturing. Do you have fields for lead source? Campaign? UTM parameters? Many Salesforce instances have the basic lead source field, but that's rarely enough for meaningful Salesforce marketing attribution.
Check your web-to-lead forms and landing pages to see if they're capturing UTM parameters. Open the HTML source of your forms and look for hidden fields that pass utm_source, utm_medium, utm_campaign, and other tracking parameters. If these aren't there, you're losing critical attribution data the moment someone submits a form.
Document your current lead source and campaign tracking methodology. How are leads being tagged today? Is it manual? Automated? Consistent? You might discover that your sales team has been manually selecting lead sources from a dropdown, which means the data quality depends entirely on how well they remember where each lead came from. Not ideal.
Identify the custom fields you'll need for attribution data. At minimum, you'll want fields for first touch source, last touch source, and ideally fields for each touchpoint in between. You'll also need fields to store campaign IDs, ad set names, and creative identifiers from your ad platforms. These fields become the foundation of your attribution system.
Verify user permissions and API access requirements. You'll need administrator access to create custom fields and connected apps. If you're using an attribution tool, check that your Salesforce edition supports API access—some lower-tier editions have limitations. Document who has the necessary permissions and whether you need to request any additional access.
This audit reveals the gaps in your current setup. Maybe you're capturing lead source but not campaign data. Maybe your UTM parameters are being captured on some forms but not others. Whatever you find, write it down. These gaps are exactly what you'll fix in the next steps.
Step 2: Configure Salesforce Campaign and Lead Source Architecture
Now that you know what's missing, it's time to build the infrastructure that will house your attribution data. This step is critical—get it wrong, and you'll be troubleshooting data mismatches for months.
Create a standardized campaign hierarchy that mirrors your ad account structure. If you run Google Ads campaigns organized by product line, your Salesforce campaigns should follow the same structure. This makes it exponentially easier to match ad performance data with CRM results. For example, if you have a Google Ads campaign called "Enterprise-SaaS-Search," create a corresponding Salesforce campaign with the exact same name.
Set up custom fields for attribution touchpoints. Navigate to Setup > Object Manager > Lead, and create custom fields for the data you need. You'll want fields like "First Touch Source," "First Touch Campaign," "First Touch Ad Set," and "First Touch Creative." Repeat this for last touch, and if you're implementing multi-touch attribution, consider fields for "All Touchpoints" stored as text or rich text fields.
Don't forget to add these same fields to your Contact and Opportunity objects. Attribution doesn't stop when a lead converts—you need to track touchpoints through the entire customer journey. A robust marketing attribution CRM integration ensures data flows seamlessly across all objects.
Establish naming conventions that allow for accurate data matching. This is where many integrations break down. If your Google Ads campaign is named "Q1_Brand_Search" but your Salesforce campaign is "Q1 Brand Search" (note the spaces vs. underscores), automated matching will fail. Create a naming convention document and enforce it ruthlessly across all platforms.
Configure campaign member statuses to track engagement progression. Go to a campaign in Salesforce and click "Advanced Setup" to customize member statuses. Instead of just "Sent" and "Responded," create statuses that reflect actual engagement: "Clicked Ad," "Visited Landing Page," "Downloaded Resource," "Requested Demo." These statuses become touchpoints in your attribution model.
Build picklist values for lead sources that align with your marketing channels. Edit the Lead Source field and create values that match your actual channels: "Google Ads," "Meta Ads," "LinkedIn Ads," "Organic Search," "Direct Traffic," "Email Campaign." Be specific enough to be useful but not so granular that you end up with 50 different values that nobody uses consistently.
Test your new fields by manually creating a lead and filling in attribution data. Does everything save correctly? Are the fields visible on your lead layout? Can your sales team see this information without scrolling through multiple screens? Adjust your page layouts to make attribution data easily accessible.
Step 3: Connect Your Ad Platforms to the Attribution System
With your Salesforce infrastructure ready, it's time to connect the ad platforms that generate your leads. This is where the magic starts happening—you're building the bridge between ad clicks and CRM records.
Link Google Ads, Meta, LinkedIn, and other platforms to your attribution tool. If you're using a dedicated attribution platform like Cometly, this process is straightforward. Navigate to the integrations section and authenticate each ad account. For Google Ads, you'll grant access to view campaign data and conversions. For Meta, you'll connect your Business Manager account and select the ad accounts you want to track.
Configure API connections with appropriate permissions and data access. When connecting Google Ads, make sure you're granting read access to campaign performance, conversion tracking, and cost data. Without cost data, you can't calculate return on ad spend. For Meta, ensure you're connecting at the Business Manager level, not just individual ad accounts—this gives you access to all current and future ad accounts under that Business Manager.
Set up conversion tracking parameters that pass through to Salesforce. This is crucial. When someone clicks your ad, you need to capture that click ID and pass it all the way through to Salesforce. For Google Ads, this means adding the GCLID parameter to your landing page URLs. For Meta, it's the FBCLID. These click IDs are what allow attribution systems to definitively match a Salesforce lead back to a specific ad click. Proper attribution marketing tracking depends on capturing these identifiers correctly.
Verify that click IDs and UTM parameters are being captured correctly. Run a test by clicking one of your own ads, filling out a form, and checking whether the GCLID or FBCLID appears in your website's URL parameters. Then verify that this data makes it into Salesforce. Many attribution issues stem from click IDs getting lost somewhere in this chain—often because a redirect or form submission strips them from the URL.
Test ad platform connections by running sample conversions. Create a test campaign with a small budget, click your own ad, convert on your website, and watch the data flow. You should see the click recorded in your ad platform, the conversion tracked by your attribution tool, and eventually the lead appear in Salesforce with the correct attribution data attached. If any step in this chain breaks, fix it before proceeding.
Check that your attribution tool is pulling in campaign names, ad set names, and creative names correctly. These details matter when you're trying to understand which specific ads drive results. If your tool is only capturing "Google Ads" as the source without campaign details, you're missing the granularity you need for optimization.
Step 4: Establish the Salesforce API Integration
Now comes the technical heart of the integration—connecting your attribution system to Salesforce via API. This is what enables automatic data synchronization instead of manual CSV uploads.
Create a connected app in Salesforce for secure API authentication. Navigate to Setup > App Manager > New Connected App. Give it a descriptive name like "Marketing Attribution Integration" and enable OAuth settings. This connected app acts as the secure gateway through which your attribution tool communicates with Salesforce.
Configure OAuth settings and generate security tokens. In the connected app settings, enable "Enable OAuth Settings" and set the callback URL to the one provided by your attribution tool. Select the appropriate OAuth scopes—at minimum, you'll need "Manage user data via APIs" and "Perform requests at any time." Generate a security token by going to your personal settings and clicking "Reset My Security Token." This token, combined with your username and password, authenticates API requests.
Map attribution fields from your tracking tool to Salesforce objects. This is where you tell the integration which data goes where. Your attribution tool should have a field mapping interface where you match its fields to your Salesforce fields. For example, map "First Touch Campaign" in your attribution tool to the "First_Touch_Campaign__c" custom field you created in Salesforce. Be precise here—a single mismatched field can cause sync failures.
Set up bidirectional sync for leads, contacts, and opportunities. You don't just want attribution data flowing into Salesforce—you also want conversion data flowing back to your attribution tool. Configure the sync so that when a lead converts to an opportunity, that information updates in your attribution system. When an opportunity closes, the revenue amount should sync back. Choosing the right marketing attribution tool with integrations makes this bidirectional flow much easier to configure.
Define sync frequency and conflict resolution rules. How often should data sync? Real-time is ideal but can be resource-intensive. Many businesses sync every 15-30 minutes, which provides near-real-time data without overwhelming the API. Set conflict resolution rules for when data differs between systems—typically, Salesforce is the source of truth for lead and opportunity data, while your attribution tool is the source of truth for marketing touchpoint data.
Test the API connection thoroughly. Create a test lead in Salesforce with attribution data and verify it appears in your attribution tool. Then create a conversion through your attribution tool and verify it creates a lead in Salesforce with all the correct fields populated. Check that updates in one system sync to the other within your defined sync frequency.
Step 5: Implement Multi-Touch Attribution Tracking
Single-touch attribution tells you where a lead came from, but multi-touch attribution tells you the story of how they became a customer. This is where you move from basic tracking to sophisticated marketing intelligence.
Choose attribution models that match your sales cycle. If you have a short sales cycle (days or weeks), a last-touch or linear model might work well. For longer enterprise sales cycles spanning months, time-decay or position-based models often provide better insights. Linear attribution gives equal credit to every touchpoint. Time-decay gives more credit to recent touchpoints. Position-based (W-shaped) gives extra credit to the first touch, lead conversion touch, and opportunity creation touch.
There's no universally correct model. A B2B SaaS company with a 90-day sales cycle might use time-decay to emphasize the touchpoints that happened closer to the purchase decision. An e-commerce business with impulse purchases might use last-touch because the final ad click often drives the immediate conversion. Understanding multi-touch attribution vs marketing mix modeling helps you select the right approach for your business.
Configure touchpoint capture across the entire customer journey. Your attribution system should track every meaningful interaction: ad clicks, website visits, content downloads, email opens, webinar registrations, demo requests, and sales calls. Each of these becomes a touchpoint in your attribution model. Set up tracking for all of these events, ensuring they're being captured with enough detail to be useful.
Set up tracking for both online and offline conversions. Not every conversion happens through a web form. Phone calls, in-person meetings, and direct sales outreach all matter. If someone calls your sales line after seeing an ad, that needs to be tracked. Use call tracking software that integrates with your attribution system, or create a process for your sales team to log the source of phone inquiries in Salesforce. Learn more about marketing attribution for phone calls to capture these offline touchpoints.
Create custom Salesforce reports that display multi-touch attribution data. Build a report showing all opportunities with their associated touchpoints. Create columns for first touch source, first touch campaign, all touchpoints, and the attribution model's credit distribution. This report becomes your source of truth for which marketing activities drive revenue.
Build dashboards that show revenue attributed to specific campaigns and ads. Create a dashboard with components showing revenue by channel, revenue by campaign, revenue by ad set, and cost per acquisition across all touchpoints. These dashboards should update automatically as new data syncs from your attribution system. Share these dashboards with your marketing team and leadership so everyone has visibility into what's working.
Set up conversion value tracking to measure true ROI. It's not enough to know that a campaign generated 50 leads—you need to know that those leads turned into $250,000 in revenue. Configure your attribution system to pull opportunity amounts from Salesforce and calculate the revenue attributed to each marketing touchpoint based on your chosen attribution model.
Step 6: Validate Data Accuracy and Troubleshoot Common Issues
You've built the system. Now you need to verify it actually works. This validation step prevents you from making budget decisions based on faulty data.
Run test conversions through the entire funnel to verify data flow. Click your own ads from different devices and browsers. Fill out forms. Request demos. Watch each test conversion move through your system from ad click to Salesforce lead. Check that all attribution fields populate correctly and that the data matches what you expect. If you clicked a Google Ads search ad, the lead source should say Google Ads, not "Direct" or "Unknown."
Compare attribution data against ad platform native reporting. Pull a report from Google Ads showing conversions and compare it to your Salesforce data for the same time period. The numbers won't match perfectly—attribution systems often capture conversions that ad platforms miss due to cookie blocking or cross-device behavior—but they should be in the same ballpark. If Google Ads reports 100 conversions but your attribution system only shows 20, something is broken. Understanding marketing attribution vs Google Analytics helps you interpret these discrepancies correctly.
Check for data gaps, duplicates, or misattributed conversions. Look for leads in Salesforce that are missing attribution data—these represent gaps in your tracking. Search for duplicate leads that might be causing double-counting. Review leads where the attribution data doesn't make sense, like a lead attributed to a campaign that wasn't even running when they converted.
Resolve common issues like missing UTM parameters or broken API connections. If UTM parameters aren't making it into Salesforce, check your form configuration and URL structure. If the API connection keeps failing, verify your security token hasn't expired and that your connected app has the correct permissions. Many integration issues come down to authentication problems or field mapping errors. Review common attribution challenges in marketing analytics to troubleshoot effectively.
Establish ongoing data quality monitoring processes. Set up a weekly review where you spot-check recent leads for attribution accuracy. Create Salesforce reports that flag potential data quality issues, like leads without a first touch source or opportunities without any associated touchpoints. Build alerts that notify you when sync errors occur so you can fix them immediately instead of discovering problems weeks later.
Document what you've built and create a playbook for maintaining it. Write down your field mappings, naming conventions, and troubleshooting steps. This documentation becomes invaluable when you need to onboard new team members or troubleshoot issues six months from now when you've forgotten the implementation details.
Putting It All Together
With your Salesforce marketing attribution integration now complete, you have visibility into which campaigns and ads actually drive revenue. No more wondering whether that LinkedIn campaign was worth the investment. No more gut-feel budget decisions. You can see, with data, exactly which marketing touchpoints contribute to closed deals.
Use this data to make confident budget decisions. When you know that your Google Ads brand campaign has a 5:1 return on ad spend while your display retargeting is barely breaking even, the choice becomes obvious. Scale winning campaigns, cut spend on underperformers, and test new channels with clear benchmarks for success.
Quick implementation checklist to ensure everything is working: Salesforce fields configured for attribution data across leads, contacts, and opportunities. Ad platforms connected and passing click IDs through to your website and forms. API integration syncing bidirectionally between your attribution tool and Salesforce. Multi-touch attribution model selected and actively calculating credit across touchpoints. Test conversions validated across the entire funnel from ad click to Salesforce opportunity.
Review your attribution data weekly to identify trends and optimization opportunities. Set aside time every Monday to look at which campaigns drove revenue last week. Which ads are getting more efficient? Which channels are declining? Attribution data is only valuable if you actually use it to make decisions.
As your marketing evolves, revisit your campaign hierarchy and field mappings to ensure they continue capturing the insights you need. When you launch new channels or restructure your campaigns, update your Salesforce setup to match. Attribution is not a set-it-and-forget-it system—it requires ongoing maintenance to stay accurate.
The difference between marketing with attribution and marketing without it is like driving with your eyes open versus closed. You can still move forward without it, but you're going to crash into things. With proper attribution, you can see the road ahead clearly and navigate toward profitable growth.
Ready to elevate your marketing game with precision and confidence? Discover how Cometly's AI-driven recommendations can transform your ad strategy—Get your free demo today and start capturing every touchpoint to maximize your conversions.