Most marketing teams can tell you how many leads they generated last month. Far fewer can tell you exactly which ad click, email, or landing page visit led a prospect from awareness all the way through to a closed deal.
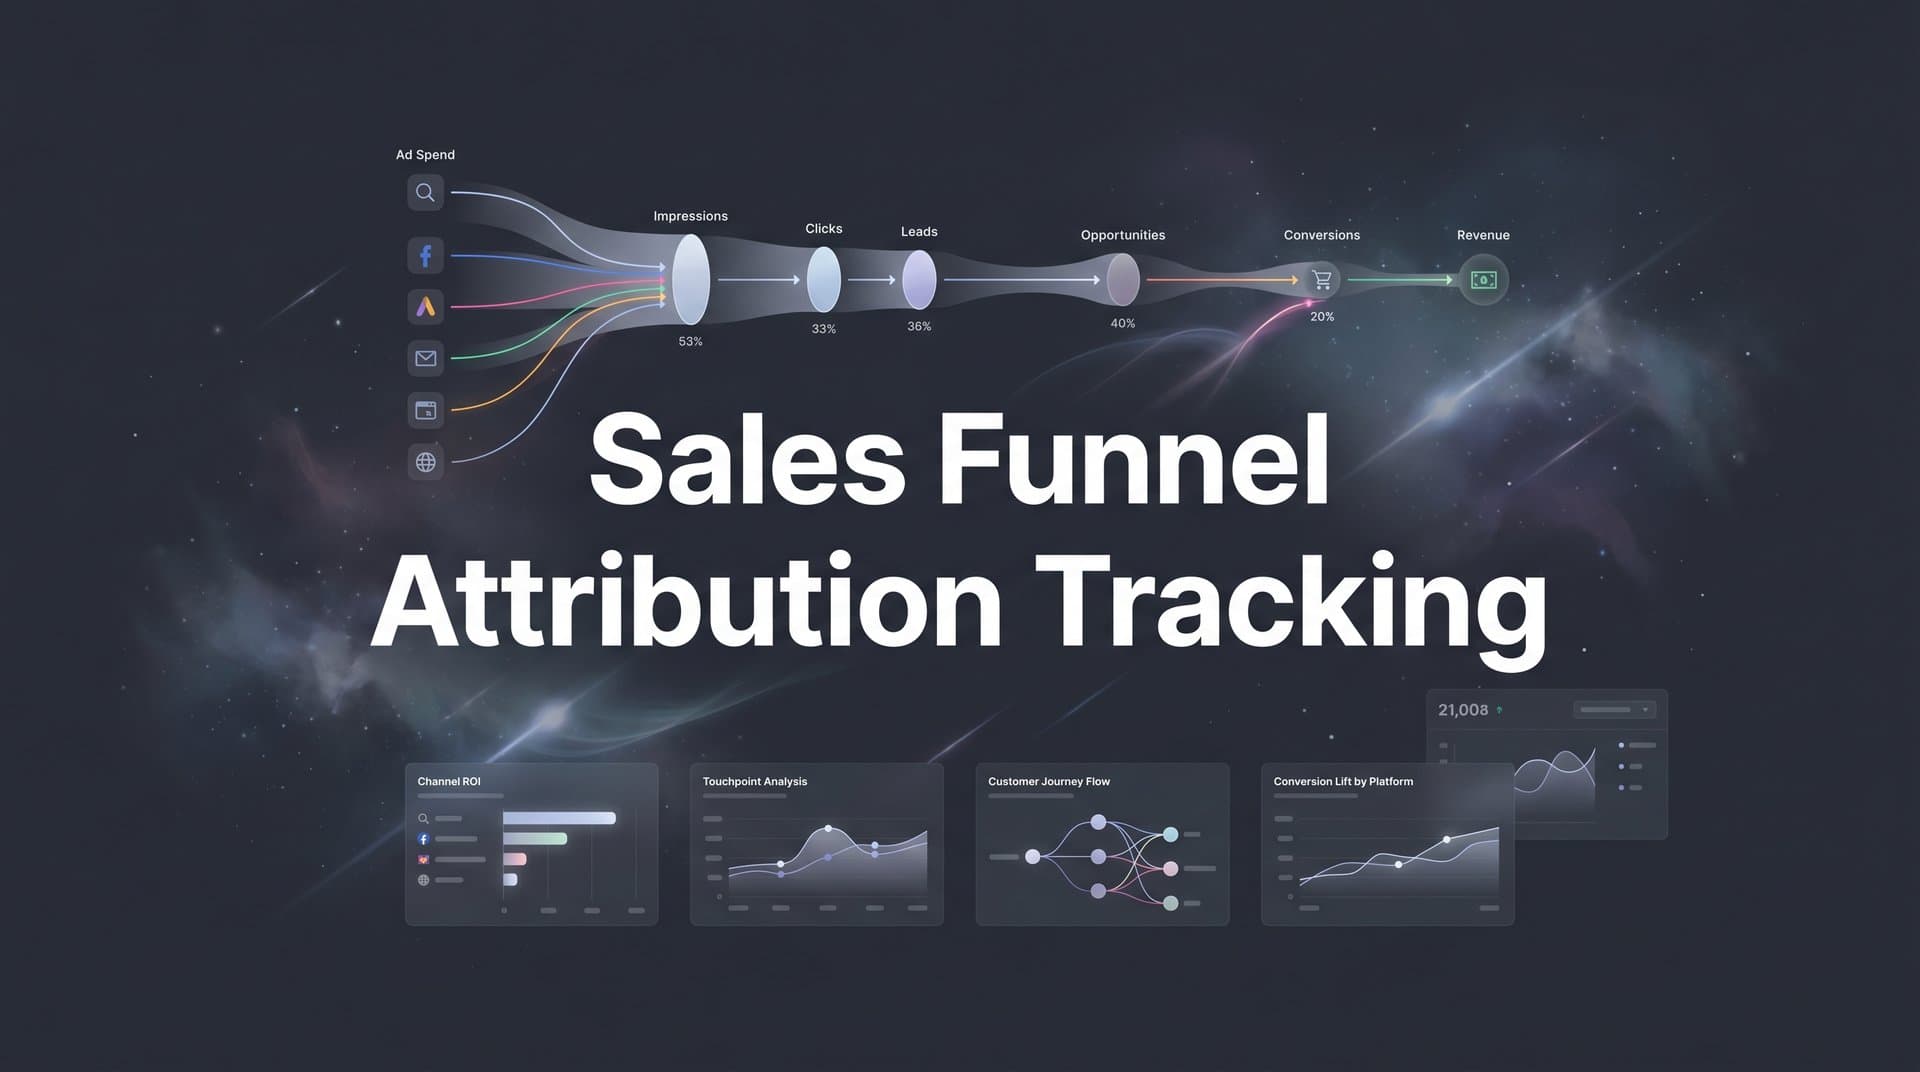
That gap between knowing your lead volume and understanding your full revenue path is where sales funnel attribution tracking becomes essential. It is the process of connecting every marketing touchpoint across your funnel stages so you can see which channels and campaigns actually drive revenue, not just clicks.
Without it, you are making budget decisions based on incomplete data. You might be pouring spend into a campaign that generates plenty of top-of-funnel traffic but never converts, while starving a channel that quietly drives your highest-value customers. The problem is especially pronounced when you are running campaigns across Meta, Google, TikTok, LinkedIn, and email simultaneously. Each platform reports its own conversions in isolation, which leads to double-counted results and misattributed revenue.
Privacy changes have made this harder. Apple's App Tracking Transparency framework significantly reduced the accuracy of pixel-based tracking, and browser-based cookie restrictions from Safari and Firefox have further eroded client-side data reliability. The result is that the traditional approach to attribution, relying on browser cookies and platform pixels, no longer gives you the full picture.
In this guide, you will learn how to build a complete sales funnel attribution tracking system from the ground up. We will walk through mapping your funnel stages, choosing the right attribution model, building your tracking infrastructure, connecting your data sources, validating your data, and using attribution insights to optimize spend.
Whether you are a digital marketer managing paid campaigns, a growth team trying to understand your full customer journey, or an agency reporting on multi-channel performance, this guide gives you a clear, repeatable framework. By the end, you will know exactly how to connect ad spend to actual revenue across every stage of your funnel.
Step 1: Map Your Sales Funnel Stages and Key Conversion Events
Before you can track attribution across your funnel, you need to define what your funnel actually looks like. This sounds obvious, but most teams skip this step and end up tracking the wrong things.
Start by documenting the specific stages a prospect moves through from first contact to closed deal. A typical B2B funnel might look like this: awareness, engagement, lead capture, qualification, opportunity, and closed deal. An e-commerce funnel might be simpler: awareness, product view, add to cart, checkout, purchase. The exact stages depend on your business model and sales cycle.
Once you have your stages mapped, identify the key conversion event at each one. These events become your attribution checkpoints. For example:
Awareness: Ad click or organic landing page visit
Engagement: Blog read, video view, or content download
Lead Capture: Form submission or demo request
Qualification: Discovery call completed or lead scored above threshold
Opportunity: Proposal sent or trial started
Closed Deal: Contract signed or payment received
Each of these events needs to be trackable, meaning it fires a data point that your attribution system can capture and connect to the original marketing touchpoint. For a deeper look at how to instrument these events across complex funnels, see our guide on tracking multi-step sales funnels.
Next, document the typical paths prospects take between stages. B2B funnels often have long, multi-touch paths where a prospect might interact with a LinkedIn ad, read three blog posts, attend a webinar, and receive five emails before booking a demo. E-commerce funnels tend to be shorter and more transactional. Understanding your typical path helps you know which touchpoints to prioritize in your tracking setup.
It also helps to assign weighted importance to each stage. Not all conversions carry equal revenue value. A closed deal is worth more than a form fill, and a booked demo is worth more than a page view. Assigning relative weights lets you measure partial attribution across the funnel, rather than only crediting the final conversion. Teams running premium offerings should explore tracking for high-ticket sales funnels to see how weighting applies to longer, higher-value deal cycles.
One common pitfall here is defining too many micro-stages. If you track every minor interaction as a separate funnel stage, you dilute your data and make analysis harder. Keep it to four to six meaningful stages that represent genuine shifts in buyer intent. More than that and you will struggle to draw clear conclusions from your attribution data.
When you finish this step, you should have a written funnel map with named stages, specific conversion events, and assigned weights. This document becomes the foundation for every other step in your attribution setup.
Step 2: Choose the Right Attribution Model for Your Funnel
Once your funnel is mapped, you need to decide how credit gets assigned to the touchpoints that contribute to a conversion. That decision is your attribution model, and it has a significant impact on how you interpret your data and where you allocate budget.
Here is a quick breakdown of the core models:
First-Touch Attribution: Gives 100% of the credit to the first interaction a prospect had with your brand. Useful for understanding which channels drive initial awareness, but it ignores everything that happened after that first click.
Last-Touch Attribution: Gives 100% of the credit to the final touchpoint before conversion. This is the default for many ad platforms, but it overvalues closing-stage channels and ignores the work done earlier in the funnel.
Linear Attribution: Distributes credit equally across all touchpoints in the journey. It is simple and acknowledges every interaction, but it treats a brand awareness ad the same as a bottom-of-funnel retargeting ad.
Time-Decay Attribution: Gives more credit to touchpoints that occurred closer to the conversion. This model is a reasonable fit for short sales cycles where recent interactions are genuinely more influential.
Position-Based (U-Shaped) Attribution: Gives the most credit to the first and last touchpoints, with the remaining credit distributed across middle interactions. This is a strong default for B2B funnels because it acknowledges both how a prospect found you and what closed the deal.
Data-Driven Attribution: Uses algorithms to assign credit based on actual conversion patterns in your data. This is the most accurate model when you have sufficient data volume, but it requires a meaningful amount of conversion history to produce reliable results. For a thorough comparison of these approaches, our article on single-source versus multi-touch attribution models breaks down the trade-offs in detail.
Matching the model to your goals matters. If you are trying to understand which channels drive brand awareness, first-touch gives you that lens. If you are optimizing for closing-stage performance, last-touch is relevant. But for full-funnel visibility across a multi-touch customer journey, a multi-touch model like position-based or linear is almost always the better starting point.
Most teams should begin with a position-based model. It balances simplicity with nuance, and it avoids the trap of over-crediting either the first ad a prospect ever saw or the last email they clicked before converting.
One of the most valuable practices is comparing multiple models side by side. When you look at the same data through first-touch, last-touch, and linear lenses simultaneously, you quickly spot where channels are getting over- or under-credited. A paid search campaign might look like a top performer under last-touch attribution, but under first-touch it barely registers, suggesting it is closing deals that other channels started. To understand the broader strategic role attribution plays, read our overview of attribution marketing.
You will know this step is complete when you can clearly articulate why your chosen model fits your sales cycle length and channel mix. That reasoning should guide your analysis and help stakeholders understand why the numbers look the way they do.
Step 3: Build Your Tracking Infrastructure with UTMs and Server-Side Tracking
With your funnel mapped and your attribution model selected, it is time to build the technical foundation that makes tracking possible. This step has two parts: UTM parameter setup and server-side tracking implementation.
Start with UTM parameters. UTMs are tags you append to your URLs that tell your analytics system where traffic came from. A complete UTM setup covers five parameters: source (where the traffic originated, such as google or meta), medium (the marketing channel, such as cpc or email), campaign (the specific campaign name), content (the specific ad or creative), and term (the keyword for paid search). For a full walkthrough of how UTMs power your attribution data, check out our guide on UTM tracking and how it helps your marketing.
The most important thing about UTMs is consistency. This is also where most teams fail. When one person tags a campaign as "facebook," another tags it as "Facebook," and a third uses "fb," your attribution system treats these as three separate sources. Your data fragments, and accurate attribution becomes impossible.
Create a shared UTM naming convention document and enforce it across your team and any agencies or contractors running campaigns. Use lowercase throughout. Define standard values for source and medium. Build a UTM builder tool or spreadsheet that generates properly formatted URLs automatically so there is no room for manual error.
Now for the second part: server-side tracking. Client-side tracking, which relies on browser cookies and JavaScript pixels, has become increasingly unreliable. Apple's App Tracking Transparency framework reduced the accuracy of Meta's pixel for iOS users. Ad blockers prevent pixels from firing. Third-party cookie deprecation has further limited what browser-based tracking can capture.
Server-side tracking solves this by sending conversion data directly from your server to your analytics and ad platforms, rather than relying on the browser. When a form is submitted or a purchase is completed, your server fires that event directly. Ad blockers cannot intercept it. iOS restrictions do not apply. Our deep dive into why server-side tracking is more accurate explains the technical advantages in detail.
Alongside server-side tracking, set up first-party data collection on your website. This means implementing event listeners for key actions: form submissions, button clicks, page views on high-intent pages, and any other conversion events you defined in Step 1. Each event should pass the relevant UTM parameters and any available user identifiers (such as email addresses for CRM matching) so that touchpoints can be connected across sessions and devices.
A practical tip: test every tracking event in a staging environment before pushing to production. Verify that UTM parameters are being captured correctly, that form submission events fire reliably, and that your server-side events are reaching their destinations. Catching issues here saves hours of debugging later.
When this step is complete, every meaningful user action on your site should be firing a tracked event, every paid campaign should have consistent UTM tags, and your server-side setup should be capturing conversions independently of browser limitations.
Step 4: Connect Your Ad Platforms, CRM, and Website Data
Tracking infrastructure on its own only captures part of the story. The real power of sales funnel attribution tracking comes from connecting three data layers: your ad platforms, your CRM, and your website. When these three sources talk to each other, you can trace a customer journey from the first ad impression all the way to a closed deal.
Start with your ad platforms. Integrate Meta Ads, Google Ads, TikTok, LinkedIn, and any other paid channels so that click and impression data flows into your attribution system. This typically involves connecting via API so that spend, click, and conversion data is pulled automatically rather than exported manually. Accurate spend data is essential because attribution without cost data cannot tell you which channels are actually efficient.
Next, connect your CRM. This is the step that separates basic click tracking from true revenue attribution. Your CRM, whether that is HubSpot, Salesforce, or another platform, holds the data that tells you whether a lead became a qualified opportunity and whether that opportunity became a closed deal. Without CRM integration, your attribution system can only see the top of the funnel. Teams using Salesforce can follow our step-by-step guide on Salesforce attribution integration to streamline this connection.
The critical technical requirement here is that UTM parameters and click IDs captured on your website need to be passed into your CRM records when a lead is created. When someone fills out a form, the hidden fields on that form should capture the UTM source, medium, campaign, content, and term from the URL, as well as any platform-specific click IDs like Google's GCLID or Meta's FBCLID. These identifiers are what allow your attribution system to match a CRM deal back to the original ad click.
Your website or landing page platform is the bridge between the two. Make sure your forms are configured to capture and pass these parameters. Test this by submitting a test lead from a UTM-tagged URL and confirming that the UTM data appears on the CRM record.
This is where a platform like Cometly simplifies the process significantly. Rather than manually configuring integrations between multiple tools, Cometly connects your ad platforms, CRM, and website tracking in one place, capturing every touchpoint across the customer journey and giving you a unified view of how marketing activity translates into revenue. It eliminates the data silos that make attribution so difficult when you are stitching together separate tools.
Once your integrations are live, run an end-to-end test. Create a test conversion by clicking a UTM-tagged ad link, completing a form, and moving through your CRM pipeline stages. Then verify that the touchpoint data appears correctly at each integration point: on your website analytics, in your CRM record, and in your attribution dashboard. If anything is missing, trace it back to where the data handoff broke down. For a complete walkthrough of this process, our attribution tracking setup guide covers each integration step.
Step 5: Validate Your Data and Fix Attribution Gaps
Setting up tracking is one thing. Trusting your data is another. Before you start making budget decisions based on your attribution reports, you need to validate that the data is accurate and complete.
Start with a data audit. Pull conversion counts from your attribution tool and compare them against the numbers in your ad platforms and CRM. Exact matches are rare, but large discrepancies signal a problem. If your attribution system shows significantly fewer conversions than your CRM, you likely have a gap in your tracking. If it shows more, you may have duplicate event firing or misconfigured integrations. Our article on solving attribution data discrepancies walks through the most common causes and fixes.
Check for these common gaps:
Missing UTM parameters: Look for traffic segments in your analytics labeled as "direct" or "none" that seem unusually high. This often means campaigns are running without UTM tags, so their traffic is not being attributed correctly.
Broken tracking on specific pages: Some landing pages, especially those built in third-party tools or recently updated, may have lost their tracking scripts. Audit your highest-traffic pages to confirm events are firing.
CRM records without source data: Pull a report of recent leads in your CRM and check what percentage have no UTM or source data attached. A high percentage of unattributed leads means your form-to-CRM data passing is incomplete.
Cross-device tracking is another area to check. A prospect might click an ad on their phone during lunch and then convert on their desktop later that evening. Without cross-device tracking, those two sessions appear as separate users, and the ad click never gets credited for the conversion. Server-side tracking combined with first-party data tracking helps bridge this gap.
Also verify that offline or delayed conversions are being captured. For B2B businesses, deals often close over phone calls, in-person meetings, or extended email threads. If those outcomes are not being fed back into your attribution system from your CRM, you are missing a significant portion of your actual revenue attribution.
Set up a recurring data quality check, weekly or bi-weekly, rather than treating validation as a one-time task. Attribution gaps tend to appear when new campaigns launch, landing pages change, or CRM workflows are updated. Regular audits catch these issues before they distort your analysis. You will know this step is working when your attribution data matches CRM revenue within a reasonable margin and no major campaigns are showing up as untracked.
Step 6: Analyze Funnel Performance and Optimize Your Ad Spend
With clean, validated data flowing through your attribution system, you can now do the work that actually moves the needle: understanding which channels drive value at each stage of your funnel and reallocating budget accordingly.
Start by analyzing performance at the stage level, not just overall. A channel that looks mediocre on a total-conversions basis might be exceptional at driving qualified opportunities. Another channel might generate a high volume of top-of-funnel leads that rarely progress past the first stage. Aggregate numbers hide these patterns. Leveraging sales funnel analytics at each stage reveals them clearly.
Look for the patterns that change how you think about your channel mix. A paid social campaign might excel at generating awareness and driving first-touch engagement, but struggle to close deals on its own. Organic search might quietly drive a disproportionate share of high-intent, high-value leads. Retargeting campaigns might have a low cost per click but a strong influence on final conversions. Attribution data makes these dynamics visible.
Once you can see which channels are contributing at which stages, reallocate budget based on attributed revenue rather than vanity metrics. Impressions and click-through rates are useful signals, but they do not tell you whether a campaign is actually driving revenue. Attributed pipeline value and attributed closed revenue are the metrics that should drive your budget decisions. Dedicated revenue attribution tracking tools make it far easier to tie spend directly to closed deals across every channel.
Feeding enriched conversion data back to your ad platforms is one of the highest-leverage actions you can take at this stage. When you send accurate, revenue-level conversion events back to Meta and Google through their Conversion API integrations, their algorithms can optimize for the outcomes that actually matter to your business rather than proxy metrics like form fills or landing page views. This creates a compounding effect: better data leads to better targeting, which leads to better results over time.
Cometly's AI recommendations accelerate this process by identifying high-performing ads and campaigns across every channel in your mix. Its Conversion Sync feature feeds enriched conversion data back to Meta, Google, and other ad platforms automatically, so their algorithms are always working from your most accurate, up-to-date conversion signals. Combined with Cometly's multi-touch attribution dashboard, you get a clear view of what is working and specific recommendations for where to scale.
Make this analysis a monthly practice. Attribution is not a set-and-forget system. As you add new channels, launch new campaigns, or shift your funnel structure, your attribution setup and your optimization decisions need to evolve with it. Build a monthly attribution review into your team's calendar and treat it as a core part of your marketing operations.
Pulling It All Together: Your Sales Funnel Attribution Checklist
Sales funnel attribution tracking is one of the most valuable investments a marketing team can make, and it is also one of the most commonly skipped. The six steps above give you a clear path from zero to a functioning, reliable attribution system.
Here is your quick-reference checklist:
1. Map your funnel stages and define the key conversion event at each one, keeping it to four to six meaningful stages.
2. Select an attribution model that fits your sales cycle and channel mix, and plan to compare multiple models side by side.
3. Build your tracking infrastructure with a consistent UTM naming convention and server-side tracking to capture conversions reliably beyond browser limitations.
4. Connect your ad platforms, CRM, and website so that touchpoint data flows through the entire customer journey from first click to closed deal.
5. Validate your data with a thorough audit, check for common gaps, and set up recurring data quality reviews.
6. Analyze stage-level performance, reallocate budget based on attributed revenue, and feed enriched conversion data back to your ad platforms.
The most important mindset shift is understanding that attribution is an ongoing practice, not a one-time project. Every time you launch a new channel, restructure your funnel, or change your campaign strategy, your attribution setup needs to keep pace. Start with the basics, get clean data flowing, and then layer in more sophisticated analysis as your data matures.
Teams that commit to this process stop guessing about what drives revenue and start making decisions with genuine confidence. That is the real payoff of sales funnel attribution tracking: not just better reporting, but better decisions that compound over time.
If you want to simplify the entire process and get accurate, real-time attribution across every stage of your funnel, Cometly brings your ad platforms, CRM, and website data together in one place so you can see exactly what drives revenue. Get your free demo today and start capturing every touchpoint to maximize your conversions.