
Your Facebook ads are running, your budget is being spent, but something feels off—the numbers in Ads Manager don't match your actual sales. If this sounds familiar, you're likely dealing with Facebook Pixel tracking issues.
Broken or misconfigured pixel tracking is one of the most common problems marketers face, and it directly impacts your ability to optimize campaigns, build accurate audiences, and measure real ROI. When your pixel isn't working correctly, you're essentially flying blind—making budget decisions based on incomplete or inaccurate data.
The good news? Most pixel tracking problems have straightforward fixes once you know where to look.
This guide walks you through a systematic troubleshooting process to identify and resolve the most common Facebook Pixel issues—from basic installation errors to advanced event configuration problems. Whether your pixel isn't firing at all, firing multiple times, or missing conversions entirely, you'll find actionable solutions here.
Let's get your tracking back on track.
Step 1: Verify Your Pixel Installation Status
Before you can fix a tracking problem, you need to confirm exactly what's broken. Start by checking whether your pixel is actually receiving any data at all.
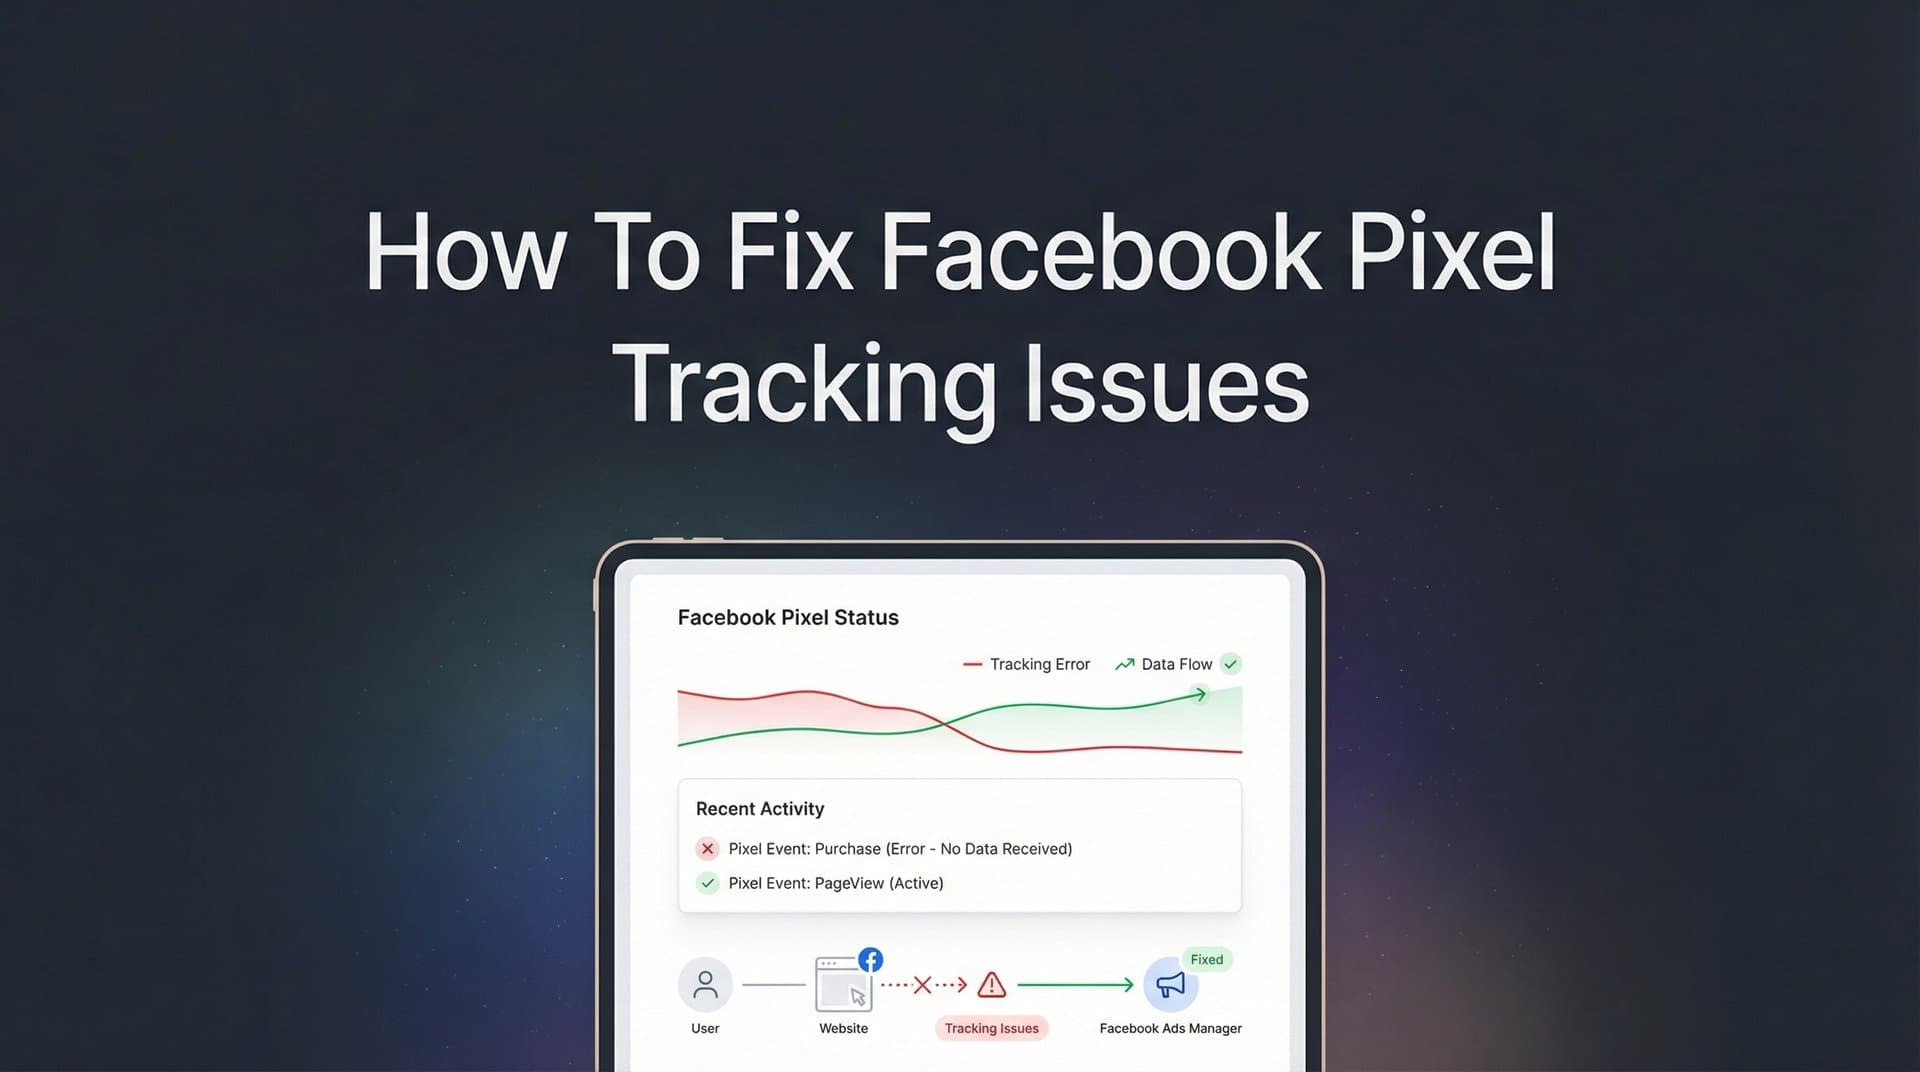
Open Facebook Events Manager and navigate to your pixel. Look at the Activity section to see if any events have been recorded in the last 24 hours. If you see zero activity, your pixel either isn't installed or isn't firing. If you see some activity but it seems incomplete, you're dealing with a configuration issue rather than a complete installation failure.
Next, install the Meta Pixel Helper Chrome extension—it's a free diagnostic tool provided by Meta that shows real-time pixel activity as you browse your website. Once installed, visit your website and click the Pixel Helper icon in your browser toolbar.
The tool will show you one of several scenarios. If it displays "No pixels found," your pixel code isn't on the page at all. If it shows your pixel ID with a green checkmark, the pixel is installed and firing correctly. If you see a yellow warning or red error, there's a configuration problem that needs attention.
Pay close attention to the pixel ID displayed in the helper. A surprisingly common issue occurs when marketers manage multiple ad accounts and accidentally install the wrong pixel ID on their site. Double-check that the pixel ID in the helper matches the pixel ID in your Events Manager.
The Pixel Helper also shows you which specific events are firing on each page. Browse through your key pages—homepage, product pages, checkout—and verify that the appropriate events fire on each. Your homepage should fire PageView, product pages should fire ViewContent, and your checkout confirmation page should fire Purchase.
If the Pixel Helper shows your pixel but Events Manager shows no recent activity, you might be looking at a data processing delay or a more complex server configuration issue. Wait 20-30 minutes and check again—sometimes there's a lag between when events fire and when they appear in Events Manager.
This initial diagnostic step tells you whether you're dealing with a complete installation failure, a partial configuration problem, or something more nuanced. That clarity determines your next troubleshooting steps. For a deeper understanding of how tracking pixels work, it helps to understand the underlying technology before diving into fixes.
Step 2: Diagnose Common Base Code Errors
Once you've confirmed your pixel exists somewhere on your site, it's time to check if the base code is implemented correctly. The pixel base code is the foundation—everything else depends on it being in the right place.
The base code must be placed in the section of your website's HTML, and it needs to appear on every single page. Not just your homepage. Not just your checkout pages. Every page.
Open your website's source code by right-clicking anywhere on your homepage and selecting "View Page Source." Use Ctrl+F (or Cmd+F on Mac) to search for "fbq('init'" and verify the code appears within the tags. If you find it in the section instead, that's your problem—it needs to be moved higher in the page structure.
While you're examining the source code, search for your pixel ID to see how many times it appears. If you find the same pixel installed multiple times, you've discovered why your events are firing twice or showing inflated numbers. This commonly happens when businesses use both a manual code installation and a plugin or tag manager—accidentally creating duplicate installations.
Check your browser's developer console for JavaScript errors that might prevent your pixel from loading. Press F12 to open developer tools, click the Console tab, and refresh your page. Look for any red error messages. If you see errors related to "fbq" or "facebook," those JavaScript problems are blocking your pixel execution.
The order in which scripts load matters more than many marketers realize. Your pixel should load early in the section, before other marketing scripts or analytics tools. If your pixel is buried at the bottom of a long list of scripts, it might not fire before users navigate away from the page—especially on mobile connections.
If you're using a tag management system like Google Tag Manager, verify that your pixel is set to fire on "All Pages" and that the trigger isn't restricted by unnecessary conditions. A common mistake is setting the pixel to fire only on specific page URLs, which creates gaps in your tracking coverage. When tracking pixels aren't firing correctly, tag manager misconfigurations are often the culprit.
For WordPress users, check if you have multiple Facebook pixel plugins installed. Having more than one plugin active simultaneously often causes conflicts and duplicate tracking. Deactivate all but one, or remove plugins entirely and use a manual code installation for more reliable control.
After fixing any base code issues, clear your browser cache completely and test again with the Pixel Helper. Sometimes cached versions of your site can make it appear that changes haven't taken effect when they actually have.
Related reading: our complete guide to AI UGC ads.
Step 3: Troubleshoot Event Tracking Failures
Your pixel base code might be working perfectly, but if specific events aren't firing correctly, you're still missing critical conversion data. This is where many tracking issues hide—in the event implementation layer.
Open Events Manager and navigate to the Test Events tool. This feature lets you monitor incoming events in real-time as you interact with your website. Enter your website URL in the test field and click "Open Website." Now you can browse your site while Events Manager shows exactly which events fire and what data they contain.
Start by testing your most important conversion events. Add a product to your cart—you should see an AddToCart event appear in the test panel within seconds. Proceed to checkout—InitiateCheckout should fire. Complete a test purchase—Purchase should fire with the correct value and currency parameters.
Pay close attention to the event parameters shown in the test results. The Purchase event should include value (the purchase amount), currency (like USD), and ideally content_ids (the products purchased). If these parameters show as "undefined" or contain incorrect values, your event code isn't pulling data from your website correctly.
A common issue occurs when events are configured to fire on page load but should actually fire on button clicks. For example, if your AddToCart event fires when someone lands on a product page rather than when they click "Add to Cart," you're tracking interest instead of action. The opposite problem happens too—events configured as click events that should fire on page load.
Check how dynamic values are being passed to your events. If you're selling products, the value parameter should dynamically pull the actual product price, not a hardcoded placeholder. Look at your event code and verify that variables like {{product_price}} or {{order_total}} are actually being replaced with real numbers from your website's data layer.
For e-commerce sites, the content_ids parameter is particularly important because it enables dynamic product ads and detailed performance analysis. If this parameter isn't populating, your product catalog won't sync properly with your pixel data, limiting your retargeting capabilities. Understanding how to sync conversion data to Facebook Ads properly ensures your catalog and pixel work together seamlessly.
If you're evaluating vendors, our Facebook ads software breakdown can help.
Test your events across different scenarios. Complete a purchase with different products and price points to ensure the value parameter updates correctly. Try different browsers and devices—sometimes events fire perfectly on desktop but fail on mobile due to different page structures or JavaScript implementations.
If events fire inconsistently, the issue often relates to page load timing. Your event code might be trying to fire before the necessary data is available on the page. In these cases, adding a small delay or implementing event listeners that wait for specific page elements to load can resolve the problem.
Document which events work correctly and which don't. This clarity helps you prioritize fixes—a broken Purchase event is obviously more critical than a broken ViewContent event, even though both matter for comprehensive tracking. If your Facebook Pixel is missing conversions, event configuration is typically where you'll find the root cause.
Step 4: Address iOS 14+ and Browser Privacy Gaps
Even if your pixel is technically perfect, you're still missing a significant portion of your conversion data. That's not a failure on your part—it's the reality of modern privacy restrictions.
Apple's iOS 14.5 update introduced App Tracking Transparency, which requires apps to ask users for permission to track their activity. Most users decline. When someone browses Facebook on an iPhone, clicks your ad, and makes a purchase on your website, that conversion often goes unreported back to Facebook because the tracking was blocked at the browser level.
This isn't just an iOS problem. Firefox blocks third-party cookies by default. Safari has Intelligent Tracking Prevention. Chrome is phasing out third-party cookies. Browser-based pixel tracking is becoming less reliable across the board, and there's nothing you can do to "fix" it because it's working as designed—the design just prioritizes privacy over tracking.
What you can control is how you work within these limitations. Facebook's Aggregated Event Measurement (AEM) is their solution for measuring web events from iOS 14.5+ users. It limits you to eight prioritized conversion events per domain, and you need to configure this priority ranking in Events Manager. For a comprehensive guide on how to fix iOS 14 tracking issues, understanding AEM configuration is essential.
Go to Events Manager, select your pixel, and click on "Aggregated Event Measurement." You'll see a list of your domains and the option to configure event priorities. Click "Configure Web Events" and arrange your eight most important events in order of business value.
Think strategically about this ranking. Your Purchase event should almost certainly be first—that's your money event. But what comes next depends on your business model. If you're focused on lead generation, CompleteRegistration or Lead might rank second. If you're optimizing for engagement before conversion, AddToCart or InitiateCheckout might be more important.
The events you prioritize are the ones Facebook can optimize toward when running campaigns targeting iOS users. Events that don't make your top eight still fire and get recorded, but they can't be used as optimization events for iOS traffic, which limits their usefulness for campaign optimization.
Also verify that your domain is claimed and verified in Business Manager. Go to Business Settings, click Brand Safety, then Domains. Add your domain if it's not already there and complete the verification process. This step is required for AEM to work correctly and ensures you maintain control over your event configuration.
Here's the reality: even with perfect AEM configuration, you're still operating with incomplete data. Browser-based tracking is fundamentally limited by privacy controls you can't circumvent. The gap between your actual conversions and your reported conversions will exist as long as you rely solely on client-side pixel tracking. Many advertisers are now exploring pixel tracking alternatives for iOS users to bridge these gaps.
Understanding this limitation is crucial because it sets realistic expectations and points you toward the solution—server-side tracking that bypasses browser restrictions entirely.
Step 5: Implement Server-Side Tracking for Reliable Data
If you want complete, accurate conversion data in 2026, client-side pixel tracking alone won't cut it. You need server-side tracking through Facebook's Conversions API (CAPI).
Here's how it works: instead of relying on a browser-based pixel that can be blocked, your server sends conversion data directly to Facebook's servers. When someone completes a purchase on your website, your server immediately notifies Facebook—no browser involvement required. This means iOS restrictions, ad blockers, and cookie limitations can't interfere with your tracking.
Server-side tracking doesn't replace your pixel—it complements it. You run both simultaneously. The pixel captures what it can from the browser, and the Conversions API fills in the gaps by sending data that the pixel missed. Together, they provide a complete picture of your conversions. Learning how to set up server-side tracking is now a fundamental skill for digital marketers.
The technical implementation traditionally requires developer resources. You need to set up server endpoints, configure API calls, handle user data securely, and ensure compliance with privacy regulations. For many marketing teams, this represents a significant technical barrier.
Event deduplication is critical when running both pixel and CAPI. Without it, you'll count conversions twice—once from the pixel and once from the server. The solution is assigning a unique event_id to each conversion and passing that same ID through both the pixel event and the server event. Facebook uses this ID to recognize that both events represent the same conversion and counts it only once.
The event_id should be generated on your website when the conversion happens—typically using a combination of user ID, timestamp, and event type. For a purchase, it might look like "user_12345_purchase_1645804800." This same ID must be included in both the pixel's fbq('track', 'Purchase') call and the server-side API request. If you're experiencing issues with your implementation, our guide on how to fix Facebook Conversion API covers common problems and solutions.
Platforms like Cometly simplify this entire process by handling the server-side implementation for you. Instead of building custom integrations, you connect your ad accounts and website data sources, and Cometly automatically sends enriched conversion events to Facebook through the Conversions API. The platform manages event deduplication, data enrichment, and ongoing maintenance—eliminating the technical complexity.
What makes server-side tracking particularly valuable isn't just data completeness—it's data quality. When you send events from your server, you can include additional context that the pixel can't access: customer lifetime value, subscription status, product margins, CRM data. This enriched data helps Facebook's algorithm optimize more effectively because it understands which conversions are actually valuable to your business.
The difference in campaign performance can be substantial. When Facebook's algorithm receives complete, accurate conversion data, it learns faster which audiences and creative variations drive real results. Your cost per acquisition often improves because the algorithm isn't optimizing based on incomplete information. This is why accurate Facebook conversion tracking directly impacts your bottom line.
If you're running significant ad spend—generally $5,000+ per month—server-side tracking moves from "nice to have" to "essential." The tracking gaps from browser-based pixels alone create too much uncertainty for data-driven optimization at scale.
Step 6: Validate Your Fix and Monitor Ongoing Accuracy
After implementing your fixes, don't assume everything is working correctly. You need to validate that your changes actually solved the problems and establish monitoring to catch future issues before they impact your campaigns.
Return to the Test Events tool in Events Manager and run through your complete conversion funnel again. Browse your site, add products to cart, complete a test purchase. Watch the events appear in real-time and verify that all parameters are populating correctly with accurate data.
If you're evaluating vendors, our AI product ad generator breakdown can help.
The real validation comes from comparing your pixel data against ground truth—your actual sales and CRM data. Pull a report from your e-commerce platform or CRM showing total conversions for the past week. Then pull the same date range from Facebook Events Manager. The numbers won't match exactly due to attribution windows and processing delays, but they should be reasonably close.
If Events Manager shows 50 purchases but your store processed 100 orders, you're still missing half your conversions. If Events Manager shows 150 purchases but you only had 100 orders, you have a duplicate tracking problem. Significant discrepancies indicate that your fixes weren't complete or that new issues have emerged. Understanding how to fix attribution discrepancies in data helps you reconcile these differences systematically.
Set up a regular monitoring routine—weekly at minimum, daily if you're running large budgets. Check Events Manager for unusual drops in event volume. If you normally see 500 PageView events per day and suddenly you're seeing 50, something broke. Catching these issues within hours instead of weeks prevents wasted ad spend on campaigns optimizing toward bad data.
Create a baseline for expected event volume based on your typical traffic and conversion rates. If your site gets 10,000 visitors per week and converts at 2%, you should expect roughly 200 Purchase events per week in Events Manager (accounting for tracking gaps). When actual numbers deviate significantly from your baseline, investigate immediately.
Use Events Manager's diagnostics section regularly. Facebook automatically flags certain types of tracking issues—missing events, parameter problems, domain verification issues. Check this section weekly to catch problems Facebook identifies before they impact your campaign performance.
Document your tracking setup. Create a simple reference document that lists which events fire on which pages, what parameters each event includes, and where your pixel code is installed. When issues arise in the future, this documentation helps you troubleshoot faster by providing a clear picture of how everything should work.
Consider setting up automated alerts if your platform supports them. Some ad tracking tools can notify you when event volume drops below a threshold or when key metrics deviate from expected ranges. These alerts let you respond to tracking problems proactively rather than discovering them days later when reviewing campaign performance.
Moving Forward with Confidence
Fixing Facebook Pixel tracking issues isn't just about technical troubleshooting—it's about ensuring every dollar you spend on ads is backed by accurate data. When your tracking works correctly, you can optimize campaigns with confidence, build audiences based on real behavior, and measure true ROI instead of guessing.
Start with the basics: verify installation, check for code errors, and test your events. These foundational fixes resolve the majority of tracking problems and take less than an hour to complete. Then address the bigger picture by accounting for privacy-driven data loss through server-side tracking solutions.
Here's your quick validation checklist:
✓ Pixel Helper shows active pixel with correct ID
✓ Base code in section, no duplicates
✓ All conversion events firing with correct parameters
✓ Domain verified and events prioritized for iOS 14+
✓ Server-side tracking implemented for complete data capture
✓ Regular monitoring process established
The reality is that tracking has become more complex as privacy restrictions have increased. Browser-based pixels alone can't provide the complete picture you need to optimize effectively. Server-side tracking through Conversions API is no longer optional for serious advertisers—it's the foundation of accurate attribution in the current landscape.
If you're tired of manually troubleshooting tracking gaps and want a solution that automatically captures every touchpoint across your customer journey, Cometly's server-side tracking and attribution platform can help you get accurate data flowing to your ad platforms—improving both your reporting and your campaign optimization.
Ready to elevate your marketing game with precision and confidence? Discover how Cometly's AI-driven recommendations can transform your ad strategy—Get your free demo today and start capturing every touchpoint to maximize your conversions.


