Most B2B SaaS marketing teams can name their top channels. Far fewer can tell you which specific touchpoints actually move prospects toward a closed deal. That gap is where budget gets wasted and growth stalls.
A customer touchpoint map solves this by giving you a structured, visual record of every interaction a prospect has with your brand, from the first ad impression to the moment they become a paying customer. When built correctly, it stops being a static diagram and becomes a living framework for attribution, budget allocation, and campaign optimization.
The challenge is that most teams build touchpoint maps as theoretical exercises. They sketch out a funnel, label some channels, and move on. The map never gets connected to real CRM data, real revenue, or real tracking events. So it never actually changes how budget gets spent.
This guide walks you through exactly how to build one that does. You will learn how to identify every meaningful touchpoint across your funnel, categorize them by stage and channel, assign tracking logic, and then use attribution data to validate which touchpoints actually drive conversions.
B2B SaaS sales cycles are longer and more complex than most. Prospects interact with your brand across paid ads, organic content, sales outreach, product trials, and review sites before they ever sign a contract. A single-touch attribution model cannot capture that reality. A well-built customer touchpoint map can.
By the end of this guide, you will have a working touchpoint map you can use to make smarter decisions about where to invest your ad spend and how to optimize your customer journey for measurable growth. Let's get into it.
Step 1: Define Your Customer Journey Stages Before Mapping Touchpoints
Before you map a single touchpoint, you need a clear structure to map them onto. Skipping this step is the most common reason touchpoint maps become disorganized lists rather than useful frameworks.
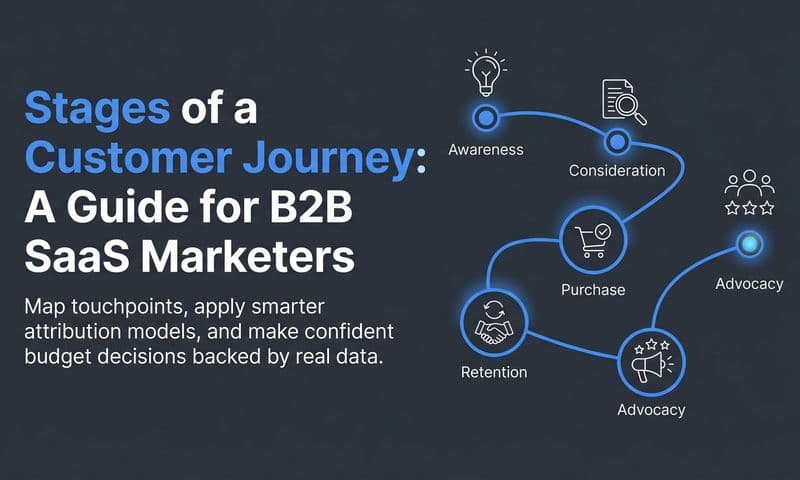
Start by establishing the core funnel stages relevant to your B2B SaaS business. A standard starting point looks like this: Awareness, Consideration, Evaluation, Decision, and Post-Sale. These stages represent how a prospect moves from not knowing you exist to becoming a retained customer.
The critical next step is aligning these stages with your actual CRM pipeline. If your CRM uses stages like "MQL," "SQL," "Demo Scheduled," "Proposal Sent," and "Closed Won," your touchpoint map should reflect that language, not a generic marketing framework. The goal is a map that your sales and marketing teams can both read and act on.
Why this matters: When your journey stages match your CRM pipeline, you can trace a touchpoint directly to a pipeline movement. That connection is what transforms a touchpoint map from a diagram into an attribution tool.
Next, identify the key buyer personas moving through each stage. Enterprise buyers and self-serve users often follow very different paths. An enterprise prospect might spend weeks in evaluation, involving a buying committee, legal review, and multiple demo calls. A self-serve user might move from first ad click to trial signup in a single session. If you serve both segments, you may need two versions of your map.
Common pitfall: Teams often map touchpoints before defining stages, which produces a long list of interactions with no clear structure. Without stages, you cannot tell whether a touchpoint is doing awareness work, nurturing intent, or closing deals. You end up with data but no insight.
To complete this step, open your CRM and review your actual pipeline stages. Write them down in order. Then layer your marketing funnel language on top, matching each marketing stage to the corresponding CRM stage. This becomes the backbone of your entire touchpoint map.
Success indicator: You can draw a clear line from a prospect's first interaction to a closed-won deal across your defined stages of the customer journey, and every stage name matches something that exists in your CRM.
Step 2: Inventory Every Channel and Interaction Point Your Brand Uses
Now that your stages are defined, it is time to take stock of every place your brand touches a prospect. This is your touchpoint inventory, and it needs to be exhaustive. Missing touchpoints here means missing data later.
Start with your paid channels. List every active ad platform: Google Ads, Meta, LinkedIn, TikTok, and any others you are running. Within each platform, note the specific ad formats and campaign types you use. A LinkedIn Sponsored Content ad and a LinkedIn Message Ad are different touchpoints even though they live on the same platform.
Next, document your organic and owned channels. This includes your website pages (homepage, pricing page, feature pages, landing pages), blog content, email sequences, webinars, and social profiles. Each of these is a touchpoint where a prospect can engage with your brand independently of a paid click.
Sales-assisted touchpoints are often underrepresented in marketing maps. Include sales calls, demo requests, direct outreach from your SDR team, and any events or conferences where your team interacts with prospects. These touchpoints are real and they influence buying decisions, even if they are harder to track automatically.
Product touchpoints matter especially for product-led growth models. Free trials, onboarding flows, in-app notifications, and usage-triggered emails are all touchpoints that can move a prospect closer to conversion or cause them to disengage. Do not leave these off your map.
Use two primary sources to build this inventory: your CRM activity log and your ad platform dashboards. The CRM will surface sales-assisted and mid-funnel interactions. The ad platforms will show you which campaigns and formats are active. Cross-referencing both gives you a more complete picture than either source alone.
Common pitfall: Teams consistently forget mid-funnel touchpoints. Retargeting ads, comparison review sites like G2 or Capterra, and nurture email sequences are often left off initial inventories because they feel less prominent than top-of-funnel campaigns. But these are frequently the touchpoints that tip a prospect from consideration to decision.
A practical approach is to walk through your own funnel as if you were a prospect. Google your product category, click an ad, visit your website, read a blog post, sign up for a trial, and see what emails you receive. That experience will surface touchpoints your inventory might have missed.
Success indicator: Your inventory covers customer journey touchpoints across every stage you defined in Step 1 with no obvious gaps. If you look at a stage and see only one or two touchpoints, that is usually a sign something is missing.
Step 3: Assign Each Touchpoint to a Funnel Stage and Buyer Action
With your inventory complete, the next step is to organize it. You are going to take every touchpoint you listed and place it into a structured matrix that connects it to a funnel stage and a specific buyer action.
A simple matrix format works well here. Create columns for: Touchpoint Name, Channel Type, Funnel Stage, and Buyer Action Triggered. Fill in one row per touchpoint. This structure makes it easy to spot gaps, overlaps, and imbalances across your funnel.
Tagging each touchpoint with the buyer action it triggers is where this step gets valuable. The buyer action answers the question: what does a prospect do as a result of this touchpoint? Examples include: becomes aware of the brand, clicks through to the website, fills out a form, books a demo, starts a trial, or completes a purchase. Each touchpoint should have one primary action associated with it.
You also want to identify each touchpoint's role in the conversion path. Is it a first-touch point that introduces a prospect to your brand? Is it a mid-funnel assist that builds intent over multiple sessions? Or is it a last-touch conversion driver that appears just before a form fill or purchase? This classification becomes the foundation for choosing the right attribution model in Step 5.
Channel type tagging is the final layer. Label each touchpoint as paid, organic, direct, referral, or sales-assisted. This categorization helps you understand the cost structure behind each touchpoint and makes budget allocation decisions easier later.
Common pitfall: Assigning touchpoints to stages based on assumption rather than actual behavioral data. It is tempting to assume that a blog post is always an awareness touchpoint and a pricing page visit is always a decision-stage touchpoint. But behavioral data often tells a different story. Some prospects read blog content deep into evaluation. Others land directly on the pricing page as their first interaction. Let your analytics data inform these assignments where possible, rather than relying purely on intuition.
If you have access to session-level data or path analysis in your analytics tool, use it here. Look at where specific pages and touchpoints appear in actual customer path to purchase journeys, not just where you expect them to appear.
Success indicator: Every touchpoint in your map has a stage label, a buyer action, and a channel type. No touchpoint is left uncategorized. If you cannot assign a stage or action to a touchpoint, it may be a signal that the touchpoint is unclear in its purpose and worth reconsidering.
Step 4: Set Up Tracking and Event Logic for Each Touchpoint
A touchpoint map without tracking is just a document. To make it actionable, every touchpoint on your map needs a corresponding tracking event so you can measure it in your attribution platform. This step is where your map becomes a data infrastructure decision.
Start by defining your key conversion events. For most B2B SaaS teams, these include: form submissions, demo bookings, trial signups, and purchase completions. Each of these should fire a tracked event that your attribution tool can capture and associate with the upstream touchpoints that preceded it.
For B2B SaaS specifically, server-side tracking and Conversion API integration are increasingly important. Browser-based pixels miss a meaningful portion of events due to ad blockers, iOS privacy changes, and cross-device behavior. When a prospect sees your LinkedIn ad on their phone, visits your website on their laptop, and books a demo from their work computer, browser-based tracking often fails to stitch that journey together. Server-side tracking captures events at the server level before they can be blocked, giving you a more complete and accurate event trail.
UTM parameters are the connective tissue of your paid tracking. Every paid campaign, ad set, and ad should carry consistent UTM parameters that identify the source, medium, campaign, and content. Without consistent UTMs, your attribution tool cannot reliably assign credit to the right touchpoints. Build a UTM naming convention and enforce it across every team member who launches campaigns.
CRM integration is the piece that connects marketing touchpoints to revenue outcomes. Your CRM needs to pass pipeline stage changes and closed-won deal data back to your attribution platform. When a deal moves from "Demo Scheduled" to "Closed Won," that event should be tied back to the original touchpoint data so you can see which interactions preceded that outcome.
Common pitfall: Relying solely on last-click data from ad platforms. Google Ads and Meta both default to reporting conversions based on the last click before a conversion event. This ignores all the assist touchpoints that built intent across a long B2B sales cycle. If you only look at last-click data, you will systematically undervalue awareness and mid-funnel channels and over-invest in bottom-of-funnel tactics.
To validate your tracking setup, run a test. Create a test lead and walk through your own funnel from first ad click to a CRM stage change. Then check your customer attribution tracking platform to confirm you can see the complete event trail for that test journey. If any step is missing, investigate before moving forward.
Success indicator: You can see a complete event trail for a test lead from first ad click through to a CRM stage change, with every intermediate touchpoint captured and attributed correctly.
Step 5: Choose an Attribution Model That Reflects Your Actual Sales Motion
Your touchpoint map is now populated and tracked. The next question is: how do you assign credit across all those touchpoints? That is the role of your attribution model, and choosing the right one has a direct impact on how you allocate budget.
The main attribution models available are: first-touch, last-touch, linear, time-decay, and data-driven. Each distributes conversion credit differently across the touchpoints in a customer journey.
First-touch gives all credit to the first interaction a prospect had with your brand. It is useful for understanding which channels generate initial awareness, but it ignores everything that happened between awareness and conversion.
Last-touch gives all credit to the final touchpoint before a conversion. It is simple but deeply misleading for B2B SaaS, where prospects interact with your brand many times before making a decision.
Linear distributes credit equally across all touchpoints in the journey. It is more balanced and tends to surface the value of mid-funnel channels that single-touch models ignore.
Time-decay gives more credit to touchpoints that occurred closer to the conversion event. This reflects the intuition that later interactions carry more influence over the final decision, while still acknowledging earlier touchpoints.
Data-driven attribution uses machine learning to assign credit based on actual conversion patterns in your data. It is the most accurate model when you have sufficient conversion volume to train it.
For B2B SaaS with long sales cycles, linear or time-decay models typically reflect reality better than last-touch. Your touchpoint map is the reference point for evaluating this. Look at the touchpoints you have mapped across a typical customer journey and ask: does last-touch credit accurately represent the role each touchpoint played? In most cases, the answer is no.
The most useful exercise is running multiple attribution models side by side. Compare how credit shifts across your mapped touchpoints when you switch from last-touch to linear or time-decay. Channels that look underperforming under last-touch often reveal significant influence under multi-touch attribution models.
Common pitfall: Choosing an attribution model without reference to your actual touchpoint map. The model should fit the journey, not the other way around. If your map shows that prospects typically interact with six or more touchpoints before converting, a single-touch model is a poor fit regardless of how easy it is to implement.
Success indicator: You can see how budget allocation would shift if you applied a different attribution model to your current campaign spend, and you have a clear rationale for why your chosen model best reflects your actual sales motion.
Step 6: Validate Your Map Against Real Pipeline and Revenue Data
This is the step that separates a useful touchpoint map from a theoretical one. Validation means taking your map out of the spreadsheet and testing it against what actually happened with real customers.
Start by pulling closed-won deal data from your CRM. Select a sample of recent customers, ideally representing a mix of deal sizes and acquisition channels. For each customer, trace their touchpoint history: what was their first interaction, what mid-funnel touchpoints did they hit, and what was the last touchpoint before they converted?
Compare those actual paths to what your map predicted. Note where reality diverges from your model. You might find that a channel you assumed was purely top-of-funnel actually appears frequently as a late-stage touchpoint. Or that a touchpoint you categorized as a conversion driver rarely appears in winning journeys at all.
Next, look for patterns across your highest-value customers. Which touchpoints appear most frequently in the journeys of customers with the highest contract values or lowest churn rates? Which touchpoints are common in journeys that ended in churn or non-renewal? These patterns tell you which touchpoints are genuinely predictive of customer quality, not just conversion volume.
Connecting ad spend data to revenue outcomes is where this validation becomes directly actionable. When you can see that a specific campaign or touchpoint sequence correlates with higher average contract value or faster time to close, you have a clear signal for where to invest more. Conversely, touchpoints that drive high lead volume but low revenue correlation are candidates for budget reduction.
Treat your touchpoint map as a living document. Update it based on what the validation data reveals. Add touchpoints that appear in real journeys but were missing from your map. Reassign stage labels where the data shows you were wrong. Remove touchpoints that show no meaningful correlation with pipeline or revenue.
Common pitfall: Building a touchpoint map and never validating it against real data. A map that has never been tested against actual customer journey tracking data is a hypothesis, not a framework. It may feel complete, but without validation it cannot reliably guide budget decisions.
Success indicator: You can identify at least two or three touchpoints that consistently appear in your highest-value customer journeys, and you have updated your map to reflect what the data revealed.
Step 7: Use Your Touchpoint Map to Optimize Spend and Scale What Works
You have built the map, set up tracking, chosen an attribution model, and validated it against real revenue data. Now you use it. This is where the work pays off in actual business outcomes.
Start by identifying underinvested touchpoints. Look for touchpoints that appear consistently in winning customer journeys but receive relatively low budget or attention. These are your highest-leverage opportunities. They are already contributing to revenue without significant investment, which means scaling them is likely to produce strong returns.
On the other side, look for touchpoints that show high volume but low correlation with pipeline and revenue. These are candidates for budget reduction. High click volume or impression share is not the same as revenue contribution. Your validated touchpoint map gives you the data to make this distinction confidently rather than defensively.
Audience segmentation becomes more precise when it is built on touchpoint behavior. Prospects who have hit three or more mid-funnel touchpoints are demonstrably more engaged than those who have had a single interaction. Build retargeting audiences based on touchpoint depth, not just page visits. Target prospects who have visited your pricing page, read a case study, and attended a webinar differently from those who only clicked a top-of-funnel ad.
Feeding enriched conversion event data back to ad platforms is one of the highest-leverage technical moves you can make. When you send server-side conversion events to Meta and Google that include downstream revenue data, not just form fills, their algorithms can optimize toward the conversions that actually matter. This improves targeting quality over time and tends to increase return on ad spend across your paid campaigns.
Set a regular cadence for reviewing and updating your touchpoint map. Monthly reviews work well for teams running active campaigns with significant spend. Quarterly reviews are appropriate for smaller teams or more stable programs. Buyer behavior and channel performance shift over time, and a map that was accurate six months ago may not reflect current reality.
Common pitfall: Treating the touchpoint map as a one-time project. The value of the map compounds over time as you refine it with more data. Teams that review and update their maps regularly develop a progressively clearer picture of what drives revenue, which makes every subsequent customer journey optimization decision more confident and more accurate.
Success indicator: You have shifted budget toward at least one touchpoint based on attribution data and can measure the resulting impact on pipeline. That single data-driven decision is proof that your touchpoint map is working as intended.
Putting It All Together
Building a customer touchpoint map is one of the highest-leverage activities a B2B SaaS marketing team can undertake. It transforms vague channel reporting into a clear picture of how prospects actually move toward revenue.
Here is a quick checklist to confirm you have completed each step:
Funnel stages defined: Journey stages are established and aligned with your actual CRM pipeline stages.
Full channel inventory completed: All paid, organic, sales-assisted, and product touchpoints are documented with no obvious gaps.
Touchpoints categorized: Every touchpoint is assigned to a funnel stage, a buyer action, and a channel type.
Tracking and Conversion API configured: Every touchpoint has a corresponding tracking event, UTM parameters are consistent, and server-side tracking is in place.
Attribution model selected: You have compared multiple models and chosen one that reflects your actual sales motion, with a clear rationale for the decision.
Map validated against revenue data: You have traced real closed-won journeys and updated your map to reflect what the data revealed.
Optimization decisions made: Budget has been adjusted based on touchpoint-to-revenue correlation, and you have a process for regular map reviews.
Platforms like Cometly are built specifically to support this workflow for B2B SaaS teams. By connecting your ad platforms, CRM, and website into a single attribution view, Cometly gives you the real-time data you need to validate your touchpoint map, compare attribution models side by side, and scale the campaigns that actually drive revenue. Its AI-driven recommendations surface which ads and channels are performing, so you can act on your map rather than just maintain it.
Start with your highest-volume channel, map its touchpoints first, and build from there. The clarity you gain from even a partial map will change how you think about your marketing budget. Ready to see it in action? Get your free demo and start capturing every touchpoint to maximize your conversions.