If you run a WooCommerce store and rely on paid ads to drive growth, flying blind on attribution is expensive. You might know your revenue numbers, but do you know which campaigns, channels, or touchpoints actually generated that revenue? That gap between ad spend and closed orders is where marketing budgets get wasted.
WooCommerce marketing analytics gives you the visibility to close that gap. When set up correctly, it connects your ad platforms, website behavior, and order data into a single, coherent picture of what is working and what is not.
This guide walks you through the exact steps to build a WooCommerce analytics stack that tracks every touchpoint, attributes revenue accurately, and feeds better data back to your ad platforms. Whether you are running Google Ads, Meta campaigns, or a mix of paid channels, these steps will help you make confident, data-driven decisions instead of guessing.
By the end, you will have a functioning analytics setup that captures customer journeys from first ad click to completed purchase, identifies your highest-performing campaigns, and gives your ad platform algorithms the conversion signals they need to optimize effectively.
Step 1: Define the Metrics and Events That Actually Matter
Before you install a single tracking tag, you need to know what you are actually trying to measure. Skipping this step is the most common reason WooCommerce analytics setups become cluttered, confusing, and ultimately ignored.
Start by identifying the specific conversion events your business cares about. For most WooCommerce stores running paid traffic, these core events form the foundation of your tracking plan:
Add to Cart: Signals purchase intent and helps you measure funnel entry rates by campaign.
Initiate Checkout: Identifies how many visitors move from browsing to active buying mode. This is a critical drop-off point worth monitoring closely.
Purchase: Your primary conversion event. Every ad platform integration, attribution model, and ROAS calculation flows from this event.
Order Value: Not just whether a purchase happened, but how much revenue it generated. This distinction matters enormously when comparing campaign performance.
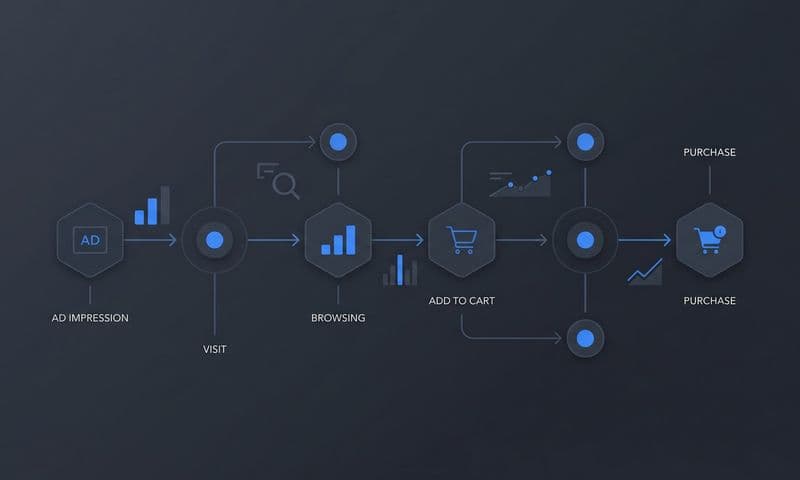
Next, map your customer journey stages. Think about how a typical buyer finds your store, what they do before purchasing, and how many sessions it usually takes. A buyer who clicks a Google Shopping ad, leaves, sees a Meta retargeting ad three days later, and then purchases has touched at least two paid channels before converting. If your tracking only captures the final session, you are missing the full picture.
This is also the moment to decide which attribution model fits your sales cycle. Shorter, impulse-driven purchase cycles often work reasonably well with last-click attribution. Longer journeys with multiple touchpoints benefit significantly from multi-touch or data-driven attribution models that distribute credit across the full path.
Finally, list every ad channel you are currently running. Google Ads, Meta, Pinterest, TikTok, email campaigns, and any other paid sources should be documented now. This list determines which platform integrations you need to build in later steps, and planning for them upfront saves you from retrofitting your setup later.
The common pitfall here is tracking everything without a clear purpose. More data is not better data. Focused event planning creates a setup you can actually use to make decisions, rather than a sprawling tag library that nobody fully understands.
Step 2: Install and Configure Your Core Tracking Foundation
With your events and goals defined, it is time to build the technical foundation. This layer connects your WooCommerce store to your analytics tools and creates the data pipeline everything else depends on.
Start with Google Tag Manager. GTM acts as a container for all your tracking tags, meaning you can deploy and manage tracking code without editing your site's PHP files every time. For WooCommerce specifically, this is a significant advantage because it keeps your setup clean, auditable, and easy to update as your needs evolve.
Create a dedicated GTM container for your WooCommerce store rather than mixing it with other site tags. This makes troubleshooting and auditing much faster when something breaks or a new platform integration needs to be added.
Once GTM is installed, configure the WooCommerce data layer. This is the technical bridge that pushes structured ecommerce event data (product details, order values, transaction IDs) into GTM automatically as customers move through your store. Several plugins can handle this configuration, and getting it right is essential because every downstream integration depends on this data being accurate and consistently formatted.
With the data layer in place, set up Google Analytics 4 with enhanced ecommerce tracking enabled. GA4 gives you a baseline view of on-site behavior, funnel drop-off points, and purchase patterns. Enhanced ecommerce specifically surfaces which products are being viewed, added to cart, and purchased, along with where customers abandon the checkout flow.
Before moving on to ad platform integrations, verify that everything is firing correctly. Use GTM Preview mode to confirm your tags are triggering on the right events. Then use GA4 DebugView to confirm that purchase events are arriving with the correct order value and transaction ID attached.
This verification step is non-negotiable. Building ad platform integrations on top of a broken data layer means every downstream report will contain errors that are difficult to trace back to their source. Understanding the core goals of marketing analytics can help you prioritize which data points matter most during this setup phase.
Success indicator: GA4 is recording purchase events with accurate order value and transaction ID within 24 hours of completing this setup. If you see purchase events firing without revenue data, your data layer configuration needs attention before you proceed.
Step 3: Connect Your Ad Platforms With Server-Side Conversion Tracking
Here is a reality that many WooCommerce marketers discover too late: browser-based pixel tracking alone is no longer reliable enough to build a business on.
Ad blockers prevent pixels from firing. iOS privacy changes limit cross-site tracking. Browser cookie restrictions reduce the window in which conversions can be attributed back to an ad click. The result is that a meaningful portion of your actual conversions never get reported back to your ad platforms, causing their algorithms to optimize on an incomplete signal.
Server-side conversion tracking solves this by sending event data directly from your server to the ad platform, completely bypassing browser-side limitations. This is not optional for serious WooCommerce marketers. It is the foundation of accurate attribution.
Meta Conversion API (CAPI): Set up CAPI to send WooCommerce purchase events directly from your server to Meta. When a customer completes an order, your server fires the event to Meta immediately, regardless of what the customer's browser does or does not allow. This significantly improves data completeness and helps Meta's algorithm optimize toward your actual buyers.
Google Enhanced Conversions: Configure Enhanced Conversions in Google Ads to pass hashed customer data (email address, phone number) alongside your conversion events. Google uses this information to match conversions back to logged-in Google accounts, improving attribution accuracy even when cookies are unavailable.
For each integration, map the correct WooCommerce order parameters to the platform's event schema. This means passing the order ID, revenue amount, currency, and customer email in the exact format each platform expects. Sloppy parameter mapping leads to events that platforms cannot process or attribute correctly.
One critical technical requirement: implement event deduplication. When you run both a browser pixel and a server-side API simultaneously, the same purchase can be reported twice. Without deduplication logic, a single order fires once from the browser pixel and again from the server, inflating your reported conversions and causing ad platform algorithms to optimize on inaccurate signals. Every major platform supports deduplication via event ID matching, and it must be configured correctly from day one. Choosing the right marketing data analytics software can simplify this deduplication process significantly.
Success indicator: Your Meta Event Match Quality score improves after CAPI is configured, and Google Ads conversion data aligns closely with your actual WooCommerce order records. If you see significant discrepancies, check your deduplication setup and parameter mapping before proceeding.
Step 4: Build Multi-Touch Attribution Across Your Full Customer Journey
Single-channel attribution tells you a story, but it is rarely the full story. Last-click attribution, in particular, systematically undervalues the channels that introduce customers to your brand and warm them up before the final purchase decision.
Think about how your customers actually behave. They might discover your store through a Google Shopping ad, spend time on your site, leave, see a Meta retargeting ad a few days later, and then return directly to complete their purchase. Last-click attribution gives all the credit to the direct visit. The Google ad and the Meta retargeting campaign get nothing, even though both played a clear role in driving that revenue.
Multi-touch attribution distributes credit across the touchpoints that actually influenced the purchase. Here is how to build it for your WooCommerce store.
Start with UTM parameters. Consistent UTM tagging across every paid campaign is the foundation of source attribution. Without it, traffic arrives in your analytics as untagged or miscategorized, making it impossible to accurately connect revenue to specific campaigns. Every ad, every email, every paid link should carry properly structured UTM parameters covering source, medium, campaign, and content where relevant.
Use a dedicated attribution platform. GA4 provides some multi-touch reporting, but connecting WooCommerce order data to a full customer journey view across paid search, paid social, organic, email, and direct visits typically requires a platform built specifically for attribution. These tools stitch together touchpoints across multiple sessions and devices, giving you a unified view of how customers actually move through your funnel.
Compare attribution models side by side. First-touch attribution shows you where customers originally discovered your brand. Last-touch shows what closes them. Linear attribution distributes credit evenly across all touchpoints. Time-decay gives more weight to recent interactions. Running these models in parallel reveals which channels are undervalued in your current reporting and which ones are getting more credit than they deserve.
Pay close attention to assisted conversions. Channels that rarely earn last-click credit often play a significant role in warming up buyers. Upper-funnel awareness campaigns, for example, frequently look like budget drains in last-click reports but show strong assisted conversion value in multi-touch models.
Success indicator: You can identify which campaigns contribute to revenue across multiple touchpoints, not just the final click. If your attribution data shows the same channels dominating regardless of model, your UTM tagging or journey stitching may need review.
Step 5: Set Up Your Marketing Analytics Dashboard for Ongoing Decisions
Raw data scattered across Google Ads, Meta Ads Manager, GA4, and your WooCommerce order history is not actionable. The goal of this step is to consolidate that data into a single dashboard your team can use to make decisions quickly and confidently.
The first principle: anchor your dashboard around revenue and acquisition cost, not vanity metrics. Impressions, clicks, and click-through rates have their place in diagnostic reporting, but they should never be your headline numbers. The metrics that drive decisions are:
Cost Per Acquisition (CPA) by channel: How much are you spending to acquire each customer through each traffic source?
Return on Ad Spend (ROAS) by campaign: For every dollar spent on a specific campaign, how much revenue did it generate based on your own order data, not the platform's reported numbers?
Revenue by traffic source: Which channels are actually driving orders, and in what proportion to their spend?
Customer Lifetime Value by acquisition channel: Are customers acquired through certain channels worth more over time? This metric can completely change how you evaluate channel performance.
Connect your WooCommerce revenue data directly to your ad platform spend data. This connection is what makes ROAS calculations meaningful. Platform-reported ROAS uses the platform's own attribution logic, which tends to over-report their contribution. Using your actual WooCommerce order data as the revenue source gives you a more honest picture of what each channel is truly delivering.
Set up automated alerts for significant changes in performance. A sudden drop in conversion rate or a spike in CPA should trigger a notification so you can investigate immediately, rather than discovering the problem during a weekly review days later. A cross-platform marketing analytics dashboard with threshold-based alerting makes this process far more manageable across multiple ad channels.
Segment your dashboard by campaign type, audience, and channel so you can compare performance at the level that actually drives optimization decisions. A blended ROAS number across all campaigns tells you very little. Campaign-level and audience-level breakdowns tell you where to move budget.
Success indicator: Your team can answer "which campaign drove the most revenue this week" in under two minutes using the dashboard. If it takes longer, your data consolidation or segmentation needs refinement.
Step 6: Use Attribution Data to Optimize Ad Spend and Scale What Works
Attribution data is only valuable if it changes how you allocate budget. Everything you have built in the previous steps exists to support this final step: turning insights into growth.
Start by identifying your highest-ROAS campaigns and channels using your multi-touch attribution data. This is a different exercise than looking at platform-reported performance. Your attribution data accounts for the full customer journey and uses your actual WooCommerce revenue as the source of truth. Campaigns that look average in platform dashboards sometimes look excellent in independent attribution data, and vice versa.
Once you know which campaigns are genuinely performing, reallocate budget from underperformers toward proven winners. This sounds obvious, but many marketing teams continue funding campaigns based on platform-reported metrics that do not reflect true revenue impact. Your attribution setup removes that guesswork. Learning how to boost sales with marketing analytics can provide additional frameworks for making these reallocation decisions with confidence.
Feed enriched conversion data back to your ad platforms. Meta and Google's machine learning algorithms optimize based on the conversion signals they receive. When you send enriched, accurate first-party conversion data including hashed customer information, you are giving these algorithms a more complete picture of who your actual buyers are. This improves targeting quality and helps the platforms find more customers who match your converting audience, rather than optimizing toward clicks or shallow engagement signals.
Use customer journey data to identify where prospects drop out of your funnel. If a significant portion of customers who click a specific campaign type reach the product page but never add to cart, that is a targeting or creative problem worth addressing. If customers add to cart but abandon checkout at high rates from a particular traffic source, that might indicate a mismatch between the ad promise and the checkout experience.
Build retargeting campaigns specifically for high-intent abandonment points. Customers who initiated checkout but did not complete their purchase are among your highest-value remarketing audiences. Your attribution data helps you understand which campaigns originally drove those visitors so you can create contextually relevant retargeting messages.
Test attribution model changes deliberately. Switching from last-click to data-driven attribution often reveals that certain channels are significantly undervalued in your current budget allocation. Make these model changes intentionally and observe how your performance data shifts before making large budget moves.
Establish a consistent review cadence. Weekly reviews work well for tactical adjustments like pausing underperforming ad sets or shifting daily budgets. Monthly reviews are better suited for strategic decisions like channel mix changes or major budget reallocation. Building this rhythm into your team's workflow is what transforms your analytics setup from a reporting tool into a genuine growth lever.
Common pitfall: Making budget decisions based on platform-reported ROAS rather than your own attribution data. Platforms have a natural tendency to attribute conversions to their own ads. Using independent attribution data alongside platform data gives you a significantly more accurate view of true channel performance.
Success indicator: Budget reallocation decisions are consistently backed by multi-touch attribution data, and ROAS improves over successive campaign cycles as you concentrate spend on proven performers.
Putting It All Together
Setting up WooCommerce marketing analytics is not a one-time task. It is an ongoing system that gets more valuable as you accumulate data and refine your approach. Use this checklist to confirm your setup is complete and functioning:
Conversion events defined: Add to cart, initiate checkout, purchase, and order value are all mapped to your customer journey stages.
Core tracking foundation active: Google Tag Manager and GA4 are installed with enhanced ecommerce tracking enabled, and purchase events are recording accurately with order value and transaction ID.
Server-side tracking configured: Meta Conversion API and Google Enhanced Conversions are both active with proper event deduplication in place.
UTM parameters applied consistently: Every paid campaign across every channel carries properly structured UTM tags.
Multi-touch attribution connected: An attribution platform is stitching together touchpoints from all channels and connecting them to WooCommerce order data.
Centralized dashboard built: ROAS and CPA by channel and campaign are your primary headline metrics, with automated alerts configured for significant performance changes.
Enriched conversion data flowing back to platforms: Ad platform algorithms are receiving accurate, first-party conversion signals to improve targeting and optimization.
When all of these pieces are in place, you have a marketing analytics foundation that shows you exactly which ads drive revenue, where customers drop off, and where to invest next. Platforms like Cometly are built specifically to connect ad spend, customer journey data, and revenue into a single source of truth, giving WooCommerce marketers the attribution clarity they need to scale with confidence.
The goal is simple: spend less on what does not work and more on what does, backed by data you can trust. If you are ready to build that foundation, Get your free demo and see how Cometly connects every touchpoint from first ad click to completed purchase in one clear view.