If you cannot attribute sales to marketing, you are not alone. This is one of the most frustrating challenges facing modern marketing teams, and it shows up in a very specific way: the revenue arrives, but the story behind it is murky at best.
You are spending budget across Google, Meta, LinkedIn, and other channels. Leads are coming in. Deals are closing. But when leadership asks what marketing actually contributed to revenue this quarter, the answer is uncomfortably vague. Which campaigns drove those conversions? Which channels deserve more budget next month? Nobody can say for certain.
The result is guesswork. Budget gets allocated based on gut feel rather than data. High-performing campaigns get cut because their contribution is invisible, while underperforming ones continue to drain spend because they look active on the surface. It is a costly problem that compounds over time.
The root cause is almost always a broken or incomplete attribution setup. Tracking gaps, disconnected data sources, and reliance on platform-reported numbers that do not communicate with each other all contribute to the problem. Ad platforms report their own conversions in isolation. Your CRM holds the actual revenue data. And somewhere between the two, the connection is missing.
The good news is that this is a solvable problem. It is not a strategy problem. It is a data infrastructure problem. Once the infrastructure is in place, the strategic decisions become clear almost immediately.
This guide walks you through a practical, six-step process to go from zero attribution visibility to a reliable system that connects every ad click to actual revenue. Whether you are running paid campaigns for a B2B SaaS company, an e-commerce brand, or an agency managing multiple clients, these steps give you a clear path forward. By the end, you will know exactly how to diagnose your attribution gaps, build accurate tracking, choose the right model, and use your data to make confident budget decisions.
Step 1: Diagnose Why Your Attribution Is Broken
Before you can fix your attribution, you need to understand exactly where it is failing. Jumping straight to a new tool or rebuilding your tracking setup without a proper diagnosis often means solving the wrong problem.
There are three common attribution failure points that affect most marketing teams. The first is disconnected ad platforms and CRM. Your ad platforms track clicks and platform-reported conversions. Your CRM records leads, opportunities, and closed deals. If those two systems are not connected, you have no way to trace a sale back to the campaign that started the journey.
The second failure point is missing or inconsistent UTM parameters. UTMs are the foundation of attribution. When paid traffic arrives without proper UTM tags, it gets classified as direct or unattributed in your analytics, making it invisible in your reporting.
The third failure point is over-reliance on cookie-based tracking. Browser privacy updates, Apple's App Tracking Transparency framework, and Safari's Intelligent Tracking Prevention have significantly degraded the accuracy of client-side pixel tracking. Conversions that used to be captured are now going unrecorded.
To audit your current data flow, ask yourself three questions. Where does a lead enter your system? Where does a sale get recorded? And do those two systems actually talk to each other? If you cannot answer all three with confidence, you have found your first gap.
Next, run a quick data comparison. Pull your ad platform conversion events for the last 30 days and compare them against the leads or sales recorded in your CRM for the same period. Significant discrepancies between those two numbers are a clear signal that your tracking is incomplete.
A common pitfall at this stage is assuming the problem is a tool issue when it is almost always a data connection issue between tools. You likely already have the right platforms in place. What is missing is the plumbing that connects them.
Recognizing the impact of privacy changes is also critical here. Server-side tracking, which sends event data directly from your server rather than the visitor's browser, is now considered a best practice for accurate attribution. It captures conversions that browser-based pixels miss entirely. If your current setup relies exclusively on client-side pixels, that is a gap you will address in the steps ahead.
Complete your diagnosis before moving forward. Document every system involved in your marketing and sales process, note where the handoffs happen, and flag every point where data could be lost. That map becomes your repair guide.
Step 2: Build a Consistent UTM Tagging System Across All Channels
UTM parameters are the backbone of marketing attribution. Without them, your analytics tool has no reliable way to know which campaign, channel, or ad drove a specific visit or conversion. This step is unglamorous but absolutely foundational.
The five standard UTM parameters you need to use consistently are utm_source, utm_medium, utm_campaign, utm_content, and utm_term. Think of them as labels that travel with every click from your ad to your website.
utm_source: Identifies the platform sending the traffic, such as google, facebook, or linkedin. This must be lowercase and consistent every single time.
utm_medium: Identifies the channel type, such as cpc, paid-social, or email. Again, consistency matters more than the specific naming convention you choose.
utm_campaign: Identifies the specific campaign by name. Use a naming convention that mirrors your ad platform campaign names so you can cross-reference data easily.
utm_content: Identifies the specific ad creative or variation. This is especially useful for A/B testing different ad formats or copy.
utm_term: Used primarily for paid search to capture the keyword that triggered the ad.
The most damaging mistake teams make is inconsistency. If one team member tags a campaign as "Facebook" and another uses "facebook" and a third uses "fb," your analytics tool treats those as three separate sources. You end up with fragmented data that is nearly impossible to analyze accurately.
Create a shared UTM template, whether that is a Google Sheet, a Notion document, or a dedicated UTM builder tool, and make it the single source of truth for everyone on your team and every agency partner you work with. No exceptions.
For Google Ads, use auto-tagging combined with manual UTMs for campaign-level tracking. Auto-tagging passes the GCLID parameter for Google's own attribution, while your manual UTMs ensure your analytics tool captures the data in a format you control.
For Meta, LinkedIn, and other platforms, UTMs must be applied manually at the ad level. Build them into your campaign creation workflow so they are added before any ad goes live, not as an afterthought.
The success indicator for this step is simple: every paid click in your analytics tool should show a clean source, medium, and campaign name. If you are still seeing significant untagged or direct traffic from paid channels, your UTM process has gaps that need to be closed before you move forward.
Step 3: Connect Your Ad Platforms, Website, and CRM Into One Data Flow
UTMs get you visibility into where traffic comes from. But to truly attribute sales to marketing, you need to connect that traffic data all the way through to your CRM where revenue is recorded. This is where most attribution setups fall short.
Start by mapping the full customer journey for your business. For a typical B2B company, that journey might look like this: a prospect clicks a LinkedIn ad, lands on a landing page, fills out a form, enters your CRM as a lead, goes through a sales process, and eventually closes as a customer. Every system involved in that journey needs to be connected for attribution to work.
The first connection to establish is server-side tracking on your website. Browser-based pixels are increasingly unreliable due to ad blockers and privacy restrictions. Server-side tracking sends conversion events directly from your server to your analytics and attribution platform, capturing data that client-side pixels miss. This is not optional anymore; it is a baseline requirement for accurate attribution.
The second connection is between your website tracking and your CRM. When a lead submits a form, the UTM parameters and session data from their visit need to be passed into your CRM record. This is what allows you to eventually tie a closed deal back to the original campaign that brought that prospect in.
The third connection is between your CRM and your attribution system. When a deal closes, that revenue event needs to flow back into your attribution platform so it can be assigned to the correct marketing touchpoints.
A platform like Cometly is built specifically to handle this entire data flow. It connects your ad platforms, website events, and CRM data into a single unified view of each customer journey, so you can see every touchpoint from first click to closed sale without manually stitching together data from multiple tools.
A common pitfall at this stage is tracking only the first or last touchpoint and missing the full multi-touch journey that led to the sale. B2B buyers in particular interact with multiple pieces of content, ads, and channels before converting. If your setup only captures one end of that journey, you are making budget decisions based on an incomplete picture. Learn more about connecting all marketing data sources to avoid this problem.
Once your data sources are connected, you will have the foundation needed to apply meaningful attribution models, which brings us to the next step.
Step 4: Choose the Right Attribution Model for Your Sales Cycle
With your data flowing correctly, the next decision is how to assign credit across the touchpoints in each customer journey. This is where attribution models come in, and choosing the right one for your business makes a significant difference in how you interpret your data.
Here is a clear breakdown of the core models and when each one is appropriate.
First-touch attribution: Gives all credit to the first interaction a prospect had with your brand. Useful for understanding which channels are best at generating awareness and initiating journeys, but it ignores everything that happened between that first touch and the sale.
Last-touch attribution: Gives all credit to the final interaction before conversion. Simple to implement and easy to understand, but it tends to over-credit bottom-of-funnel channels like branded search while ignoring the top-of-funnel campaigns that started the journey in the first place.
Linear attribution: Distributes credit equally across all touchpoints in the journey. More balanced than single-touch models and a good starting point for teams new to multi-touch attribution.
Time-decay attribution: Gives more credit to touchpoints closer to the conversion. This model makes sense when the most recent interactions are genuinely the most influential in the decision, which is often the case in shorter purchase cycles.
Position-based attribution: Also called the U-shaped model, it gives the most credit to the first and last touchpoints, with the remaining credit distributed across the middle interactions. This works well for journeys where both the initial awareness moment and the final conversion trigger are particularly significant.
For longer B2B sales cycles with multiple touchpoints spread across weeks or months, linear or position-based models typically give a more accurate picture than last-click alone. Last-click in B2B contexts often makes it look like bottom-of-funnel retargeting ads are doing all the work, when in reality a LinkedIn campaign or a piece of content started the relationship much earlier.
For shorter e-commerce purchase cycles where the decision happens quickly, time-decay or last-click models may be more relevant because the final touchpoints genuinely carry more weight in the purchase decision.
The success indicator here is that your chosen attribution model reflects how your customers actually buy, not just the most convenient or default setting in your analytics tool. Multi-touch attribution models, which capture the full contribution of each channel rather than awarding all credit to a single touchpoint, are generally considered more accurate for any journey involving more than one or two interactions before purchase.
Step 5: Sync Conversion Data Back to Your Ad Platforms
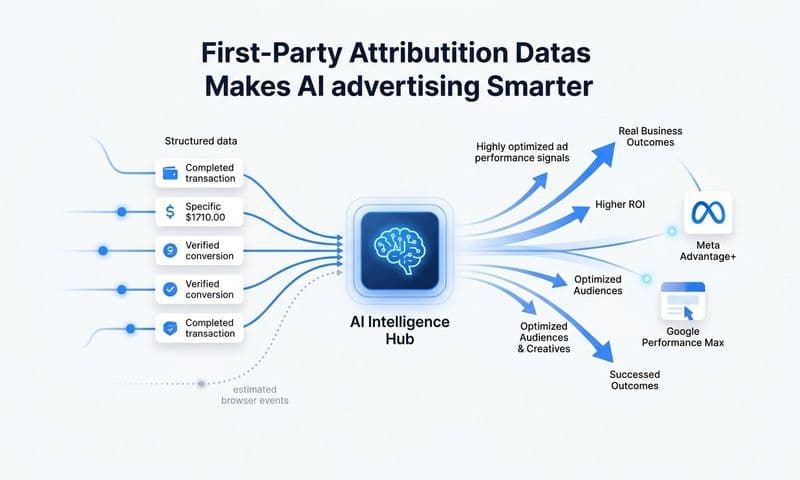
Here is something many marketers overlook: attribution is not just about your internal reporting. The conversion data you feed back to your ad platforms directly affects how well those platforms optimize your campaigns.
Meta, Google, and other ad platforms use machine learning to optimize your campaigns toward conversions. But those algorithms can only work with the signal data they receive. If your pixel is undercounting conversions due to browser privacy restrictions, the platform's algorithm is operating on incomplete information. The result is suboptimal bidding, weaker audience targeting, and lower overall ad performance.
This is where server-side conversion APIs come in. Meta's Conversion API (CAPI) and Google's Enhanced Conversions allow you to send event data directly from your server to the ad platform, bypassing the browser entirely. This recovers conversions that pixel-based tracking misses and gives the platform's algorithm a more complete and accurate signal to work with.
The downstream benefits are meaningful. Better conversion signal data leads to smarter bidding strategies, improved lookalike and retargeting audiences, and better overall return on ad spend. You are essentially helping the platform's AI do its job more effectively by giving it accurate data.
Cometly's Conversion Sync feature automates this process. It sends enriched, attribution-matched conversion events back to Meta, Google, and other platforms without requiring you to manually configure server-side API connections for each one. The conversion data that flows through Cometly, including the multi-touch attribution context, gets sent back to the platforms in a format their algorithms can use immediately.
A common pitfall at this stage is continuing to rely only on pixel-based conversion tracking. Many teams assume their pixel is capturing everything when in reality a significant portion of conversions are going unrecorded, particularly from iOS users and visitors using privacy-focused browsers. Switching to server-side conversion sync is one of the highest-leverage improvements you can make to your paid media performance.
Once your conversion data is flowing accurately in both directions, your ad platforms will optimize more effectively and your internal attribution reporting will reflect a more complete picture of what is actually driving results.
Step 6: Build a Marketing Attribution Dashboard You Can Act On
Data without visibility is just noise. The final step is building a dashboard that surfaces your attribution data in a way that drives clear, confident decisions rather than requiring hours of manual analysis.
Your attribution dashboard needs to answer a specific set of questions quickly. What is revenue by channel? What is cost per acquisition by campaign? What is return on ad spend across all platforms in a single view? If your current reporting requires you to log into four different ad platforms and manually compile numbers in a spreadsheet, you are losing time and introducing errors every single reporting cycle.
Start by identifying the core metrics that matter most for your business. For most teams, those include revenue attributed to each channel, cost per acquisition at the campaign level, return on ad spend across all active campaigns, and conversion volume by source. These metrics should be visible at a glance, not buried in exports.
The next layer is moving from raw data to actionable insights. Raw numbers tell you what happened. Actionable insights tell you what to do next. Set benchmark targets for each channel and campaign so your dashboard can surface which campaigns are performing above or below expectations at any given time.
Cometly's AI-powered recommendations take this further by analyzing your attribution data across all channels and identifying which campaigns to scale, which to pause, and where to reallocate budget for the highest return. Instead of spending time manually comparing performance across platforms, you get clear recommendations based on your actual revenue data. Teams that struggle to prove marketing ROI to executives find this kind of automated insight especially valuable.
When it comes to presenting attribution data to leadership, the goal is to answer one question clearly: what did marketing contribute to revenue this period? A well-built unified marketing attribution dashboard lets you walk into that conversation with a specific answer backed by data, broken down by channel, campaign, and time period.
The success indicator for this step is straightforward. You should be able to open your dashboard and within a few minutes identify your top-performing campaigns, your worst-performing spend, and where you should shift budget next. If it takes longer than that, the dashboard needs to be simplified.
Putting It All Together: Your Attribution Action Plan
Let's bring this into a clear, sequential checklist you can start working through this week.
1. Diagnose your attribution gaps by mapping your data flow from first ad click to closed sale and identifying where the connections are missing.
2. Standardize your UTM tagging across every paid channel using a shared naming convention that every team member and agency partner follows without exception.
3. Connect your ad platforms, website, and CRM into a unified data flow using server-side tracking to ensure you are capturing conversions that browser-based pixels miss.
4. Choose the attribution model that reflects how your customers actually buy, whether that is linear, position-based, or time-decay, based on your sales cycle length and complexity.
5. Sync accurate conversion data back to Meta, Google, and other ad platforms so their algorithms can optimize your campaigns with complete signal data.
6. Build an actionable attribution dashboard that surfaces revenue by channel, cost per acquisition by campaign, and AI-driven recommendations in a single view.
It is worth emphasizing that attribution is not a one-time setup. It is an ongoing process that requires regular audits as your campaigns evolve, new channels are added, and your sales process changes. Build a habit of reviewing your attribution setup quarterly to catch any new gaps before they compound.
Cometly handles steps 3 through 6 in a unified system, removing the need to manually stitch together data from multiple tools. From server-side tracking and multi-touch attribution to Conversion Sync and AI-powered recommendations, it is built to give marketing teams the complete attribution picture they need to make confident decisions.
Start with the diagnostic step this week. Work through the checklist systematically rather than trying to solve everything at once. Attribution clarity builds progressively, and each step you complete makes the next one more powerful.
Ready to connect every touchpoint to revenue in real time? Get your free demo and see how Cometly gives you the attribution infrastructure your marketing team needs to scale with confidence.