LinkedIn Ads is one of the most powerful channels for B2B SaaS companies targeting decision-makers, but running campaigns without conversion tracking is like driving without a dashboard. You have no idea what is working, what is wasting budget, or which ads are actually generating pipeline.
LinkedIn Ads conversion tracking closes that gap. It connects your ad spend to the actions that matter most, whether that is a demo request, a free trial signup, or a qualified lead entering your CRM. Without it, you are essentially guessing at performance, making budget decisions based on impressions and clicks rather than actual business outcomes.
Here is the reality for most B2B SaaS marketing teams: LinkedIn often plays a significant role in the buyer journey long before someone converts. A decision-maker sees your Sponsored Content, visits your site, and then converts weeks later through a different channel. If your conversion tracking is not set up correctly, that LinkedIn influence disappears entirely from your data. You end up undervaluing LinkedIn, misallocating budget, and optimizing campaigns on incomplete signals.
This guide walks you through every step of setting up LinkedIn Ads conversion tracking correctly, from installing the Insight Tag to verifying that your conversion events are firing accurately. By the end, you will have a fully functional tracking setup that feeds real data back into your campaigns, improves your bidding strategy, and gives your team the visibility needed to make smarter budget decisions.
Whether you are setting this up for the first time or auditing an existing configuration, this guide covers the exact steps B2B marketing teams need to follow to get LinkedIn conversion tracking right.
Step 1: Access Campaign Manager and Navigate to Conversion Tracking
Before you build anything, you need to be in the right place with the right permissions. Log into LinkedIn Campaign Manager and make sure you have selected the correct ad account. If you manage multiple accounts, confirm you are working in the account that runs your active campaigns, since conversion configurations are account-specific and do not transfer between accounts.
Once inside the correct account, navigate to the top menu and click Account Assets. From the dropdown, select Conversions. This is your central hub for all conversion tracking activity within that account.
Before creating anything new, take a moment to review what already exists. Many teams inherit accounts with outdated or duplicate conversion events that skew reporting. Look for conversions with names that are unclear, duplicated, or no longer relevant to your current campaigns. Cleaning this up before adding new events will save you significant headaches in reporting later.
One important distinction to understand before moving forward: LinkedIn differentiates between website conversions and event-specific conversions. Website conversions fire based on a user landing on a specific URL, such as a thank-you page. Event-specific conversions fire based on interactions like button clicks or form submissions, tracked through the LinkedIn Insight Tag or Conversions API. Knowing which type fits your goal will shape every decision you make in the following steps.
Finally, confirm that you have admin-level access to the account. Conversion setup requires account-level permissions, and if you are operating with campaign manager or viewer access only, you will not be able to create or edit conversion events. If you need elevated access, coordinate with your account admin before proceeding.
Step 2: Install the LinkedIn Insight Tag on Your Website
The LinkedIn Insight Tag is the foundation of everything. It is a lightweight JavaScript snippet that, once installed on your website, enables conversion tracking, retargeting audience building, and demographic insights about your visitors. Without it, none of your conversion events will fire.
To find your Insight Tag, go to Account Assets in Campaign Manager and select Insight Tag. You will see your unique tag code along with three installation options: direct HTML placement, Google Tag Manager, and partner integrations. Choose the method that fits your technical setup.
Direct HTML installation: Copy the Insight Tag code from Campaign Manager and paste it into the global site header of your website, just before the closing body tag. The key word here is global. The tag must fire on every page of your site, not just your homepage or landing pages. Installing it only on a handful of pages is one of the most common setup mistakes, and it severely limits both your audience building and your conversion attribution.
Google Tag Manager installation: If your site uses GTM, this is typically the faster and more flexible option. Inside GTM, create a new tag and search for the LinkedIn Insight Tag template in the community template gallery. Enter your LinkedIn Partner ID (found in your Campaign Manager Insight Tag settings), then set the trigger to All Pages. Publish the container, and the tag will begin firing site-wide immediately.
Partner integrations: LinkedIn also supports direct integrations with platforms like Squarespace, WordPress, and Shopify. If your site runs on one of these, check whether a native integration is available, as it can simplify the installation process significantly.
Once installed, verify the tag is firing correctly before moving on. LinkedIn provides a built-in tag validator within Campaign Manager under the Insight Tag settings. You can also use browser extensions like LinkedIn's own Insight Tag Helper or Google's Tag Assistant to confirm the tag loads on your pages. Look for a green status indicator confirming the tag is active and receiving data.
Give the tag 24 to 48 hours after installation before expecting the status to update in Campaign Manager. If the status remains unverified after that window, revisit your installation and check for any conditional loading rules in GTM that might be preventing the tag from firing on all pages.
Step 3: Create Your First Conversion Event in Campaign Manager
With your Insight Tag installed and verified, you are ready to create conversion events. Navigate back to Account Assets and select Conversions. Click the Create Conversion button to begin.
Your first decision is selecting a conversion type that matches your goal. LinkedIn offers options including Lead, Sign Up, Purchase, Download, Key Page View, and others. For most B2B SaaS companies, Lead and Sign Up will be your primary conversion types, covering demo requests, free trial signups, and contact form submissions. Choose the type that most accurately reflects the action you are tracking, as this categorization affects how LinkedIn classifies and reports your conversion data.
Next, name your conversion event clearly. Vague names like "Conversion 1" become a reporting nightmare when you are managing multiple campaigns. Use a naming convention that includes the action and the source, such as "Demo Request - LinkedIn" or "Free Trial Signup - LI." This makes it immediately clear what each conversion represents when you are reviewing performance data weeks or months later.
Now configure your attribution settings. LinkedIn defaults to Last Touch attribution, meaning the last LinkedIn ad interaction before a conversion receives full credit. For B2B SaaS companies with longer sales cycles involving multiple touchpoints, this model can both overcount and undercount LinkedIn's true influence depending on the situation. Understand this limitation before relying solely on LinkedIn's native reporting for budget decisions.
Set your conversion window thoughtfully. LinkedIn's default is 30 days post-click and 7 days post-view. For B2B SaaS, where buying cycles can stretch across weeks or months, these defaults are a reasonable starting point. However, if your average sales cycle is significantly longer, consider whether these windows capture the conversions most relevant to your pipeline.
If you want to track revenue impact directly inside Campaign Manager, assign a conversion value. This is particularly useful for understanding return on ad spend at a high level, though you will need a more robust attribution platform to connect LinkedIn spend to actual closed-won revenue with accuracy.
Step 4: Configure URL-Based or Event-Specific Conversion Tracking
After defining your conversion event settings, you need to choose how that conversion actually gets triggered. LinkedIn offers two primary methods: URL-based tracking and event-specific tracking. The right choice depends on your website setup and the level of granularity you need.
URL-based tracking is the simpler of the two. A conversion fires when a user lands on a specific page, typically a thank-you or confirmation page that only appears after a genuine conversion. For example, if someone submits a demo request form and lands on /demo-confirmed, a conversion fires when that URL loads.
When setting up URL-based tracking, LinkedIn gives you three match types: Exact URL, URL Contains, and URL Starts With. Use Exact URL when your confirmation page has a fixed, unchanging path. Use URL Contains when your URLs include dynamic parameters or vary slightly across different form submissions. Choose your match type carefully because an overly broad rule can accidentally capture page visits that are not genuine conversions.
One critical pitfall to avoid: make sure your thank-you page URL is not accessible via direct navigation. If someone can type /thank-you directly into their browser and land on that page without completing a form, your conversion count will be inflated with non-genuine events. If your confirmation page is publicly accessible, consider using event-specific tracking instead.
Event-specific tracking is more precise and better suited for B2B SaaS companies with multi-step funnels. Instead of firing on a page load, conversions fire based on specific interactions like button clicks, form submissions, or other on-page events. This approach uses LinkedIn's Insight Tag combined with custom event code, or LinkedIn's Conversions API for server-side tracking.
If you are using GTM, create a trigger based on the specific element interaction (such as a form submission trigger or a click trigger on your CTA button) and attach that trigger to your LinkedIn conversion tag. This gives you granular control over exactly when a conversion fires and reduces the risk of false positives from direct URL visits.
LinkedIn's Conversions API (CAPI) is worth considering for teams that want maximum data accuracy. CAPI sends conversion events directly from your server rather than relying on a browser-based pixel, making it more resilient to ad blockers and browser privacy restrictions that are increasingly limiting client-side tracking accuracy.
Step 5: Attach Conversions to Active LinkedIn Campaigns
Here is a step that many marketers miss entirely: creating a conversion event in Campaign Manager does not automatically apply it to your campaigns. You must explicitly attach each conversion to the campaigns where you want it tracked. If you skip this, LinkedIn will not use your conversion data for optimization, and you will not see conversion metrics in your campaign reports.
To attach conversions to existing campaigns, go to your Campaigns view, select a campaign, and click Edit. Scroll down to the Conversion Tracking section. You will see a list of the conversion events you have created. Select the ones relevant to this campaign and save your changes.
For new campaigns, you can add conversions during the campaign creation flow before publishing. LinkedIn prompts you to add conversion tracking in the final setup steps, so do not skip past this section.
It is entirely appropriate to attach multiple conversion types to a single campaign. If you are running a campaign targeting mid-funnel decision-makers, you might attach both "Demo Request - LinkedIn" and "Contact Form - LinkedIn" to capture different conversion paths that indicate genuine interest. This gives LinkedIn's algorithm more signal to work with when optimizing delivery.
This brings up an important performance point: LinkedIn uses attached conversion data to optimize campaign delivery. When you connect conversions to your campaigns, LinkedIn's algorithm begins learning which audience segments, ad formats, and placements are most likely to drive those conversions. This makes proper conversion attachment a performance lever, not just a measurement tool. The more conversion data your campaigns accumulate, the smarter LinkedIn's optimization becomes over time.
After attaching conversions, verify the setup in your Conversions dashboard. Each conversion should display a status of Active and show the campaigns it is associated with. If a conversion shows as Unverified or No Recent Activity, it is a signal that something in your tracking setup needs attention before that data becomes reliable.
Step 6: Verify Tracking Is Working and Audit for Accuracy
Setting up tracking and confirming that tracking works correctly are two very different things. Before you trust your conversion data, you need to verify that every component of your setup is functioning as intended.
Start with the LinkedIn Insight Tag Helper browser extension. Install it in Chrome, visit your website, and confirm the tag fires on every page, including your confirmation and thank-you pages. If the extension shows the tag as inactive on specific pages, you have a gap in your installation that needs to be fixed.
Next, complete a test conversion yourself. Submit your demo request form, sign up for a free trial, or visit your thank-you URL directly (if using URL-based tracking). Then check Campaign Manager after 24 hours to see if the conversion registered. LinkedIn does not show real-time conversion data, so the 24-hour window is normal. If the conversion does not appear after 48 hours, investigate your setup.
In the Conversions dashboard, review the status indicators for each of your conversion events. The three statuses you will encounter are:
Active: The conversion is firing and receiving data. This is what you want to see.
Unverified: LinkedIn has not yet confirmed the conversion is working. This is normal for newly created events but should resolve within a few days of genuine conversions occurring.
No Recent Activity: The conversion has not fired recently. This could indicate a tracking issue or simply that no conversions have occurred in the recent window.
Cross-reference your LinkedIn conversion counts against your CRM data or form submission records. If LinkedIn reports 15 demo requests in a given week but your CRM only shows 8 new demo leads from LinkedIn, you have a discrepancy worth investigating. Common causes include the thank-you page being accessible via direct navigation, overly broad URL match rules, or the Insight Tag loading on pages it should not.
If you are using GTM and numbers do not add up, audit your trigger configurations. Check for page redirects that might prevent the tag from firing on confirmation pages, and confirm that your GTM container is published with the latest changes. Reviewing your setup against common causes of inaccurate conversion tracking can help you identify the root cause faster.
Step 7: Connect LinkedIn Conversion Data to Full-Funnel Attribution
You have now built a solid LinkedIn conversion tracking setup. But here is something important to understand: LinkedIn's native conversion tracking shows you last-touch data within LinkedIn's ecosystem. It tells you how many conversions LinkedIn received credit for, but it does not show you how LinkedIn fits into the broader buyer journey alongside your other channels.
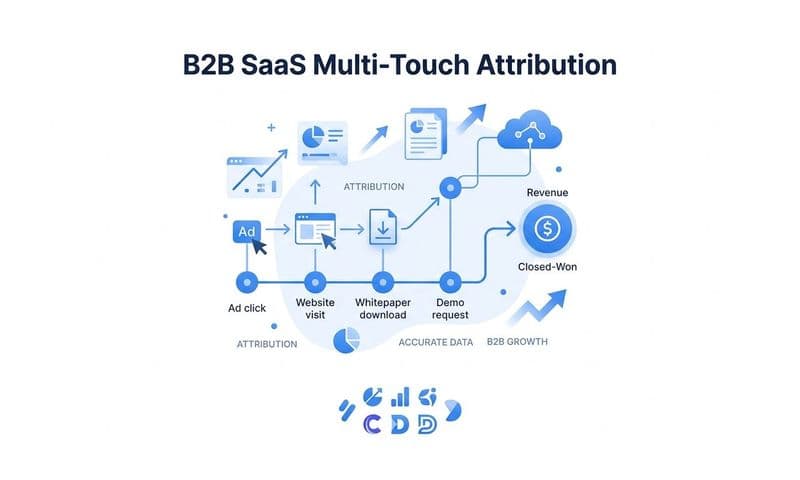
For B2B SaaS companies, this is a significant gap. A prospect might see a LinkedIn Sponsored Content ad, then receive a nurture email, then search for your brand on Google, and finally convert through a paid search ad. LinkedIn's native reporting gives that conversion zero credit. But LinkedIn clearly influenced that journey. If you are making budget decisions based solely on LinkedIn's last-touch data, you are working with an incomplete picture.
This is where connecting your LinkedIn ad data to a multi-touch attribution platform like Cometly changes the game. Cometly captures every touchpoint across the entire customer journey, from the first LinkedIn ad click through to closed-won revenue in your CRM. Instead of seeing LinkedIn's self-reported conversion numbers, you see LinkedIn's actual contribution to pipeline and revenue across every deal in your funnel.
With Cometly's pipeline and revenue attribution, you can answer questions that LinkedIn Campaign Manager simply cannot address on its own. Which LinkedIn ad formats are generating the most qualified pipeline? Which audience segments are driving deals that actually close? Are your LinkedIn campaigns influencing opportunities that convert through other channels? These are the questions that drive smarter budget allocation.
Cometly also enables you to feed enriched, first-party conversion data back to LinkedIn's algorithm through server-side event sending. When LinkedIn's optimization engine receives higher-quality conversion signals, it improves targeting accuracy and bidding efficiency. The result is a compounding advantage: better data in means better performance out.
For B2B SaaS teams managing meaningful ad budgets across multiple channels, the combination of LinkedIn's native conversion tracking and Cometly's full-funnel attribution gives you both the channel-level data LinkedIn provides and the cross-channel revenue visibility your leadership team needs to make confident investment decisions.
Putting It All Together: Your LinkedIn Conversion Tracking Checklist
You now have everything you need to run LinkedIn Ads with real performance visibility. Before you consider your setup complete, run through this checklist to confirm every component is in place.
Insight Tag installed site-wide: Confirm the tag fires on every page, including confirmation and thank-you pages. Use the LinkedIn Insight Tag Helper to verify.
Conversion events created with clear naming: Each event should have a descriptive name, the correct conversion type, appropriate attribution windows, and a defined tracking method (URL-based or event-specific).
Conversions attached to active campaigns: Every campaign should have at least one conversion event attached. Do not assume this happens automatically.
Tracking verified with a test conversion: Complete an actual test submission and confirm it registers in Campaign Manager within 48 hours.
Conversion counts cross-referenced against CRM data: Spot-check LinkedIn's reported conversions against your actual lead data to catch any discrepancies early.
Accurate LinkedIn Ads conversion tracking is the foundation for every optimization decision your team makes. Without it, you are optimizing on incomplete data, scaling campaigns that look good on the surface but may not be driving real pipeline. With it, you can confidently invest in what works and cut what does not.
For teams that want to go beyond LinkedIn's native reporting and connect their LinkedIn ad data to full-funnel revenue attribution, Cometly provides the visibility layer that Campaign Manager cannot. From first ad click to closed-won revenue, Cometly gives you a single source of truth for your marketing performance across every channel.
Ready to elevate your marketing game with precision and confidence? Discover how Cometly's AI-driven recommendations can transform your ad strategy. Get your free demo today and start capturing every touchpoint to maximize your conversions.