Managing attribution tracking across multiple websites presents unique challenges that single-site tracking simply doesn't face. When customers interact with your brand across different domains—perhaps a main marketing site, a product-specific microsite, and an e-commerce checkout domain—traditional tracking often breaks down, leaving you with fragmented data and incomplete customer journeys.
Picture this: A potential customer clicks your Facebook ad, lands on your product landing page, explores your main website, and finally converts on your checkout subdomain. With standard tracking, this looks like three separate visitors with no connection between them. You're left wondering which campaign actually drove that sale.
This guide walks you through the exact process of implementing unified attribution tracking across all your web properties. You'll learn how to maintain consistent visitor identification, consolidate data into actionable insights, and finally see which campaigns drive revenue across your entire digital ecosystem.
Whether you're managing multiple brand sites, regional domains, or separate product properties, these steps will help you build a tracking infrastructure that captures the complete customer journey from first touch to final conversion. Let's dive in.
Step 1: Audit Your Current Tracking Setup and Identify Gaps
Before implementing any new tracking, you need to understand exactly what you're working with. This audit phase prevents you from building on a shaky foundation and helps you spot the specific gaps causing your attribution blind spots.
Start by creating a comprehensive inventory spreadsheet. List every website, subdomain, and domain that's part of your digital ecosystem. Include everything: your main marketing site, product microsites, checkout domains, blog subdomains, regional variants, and any landing page builders you use. Many businesses discover they have more web properties than they realized during this step.
For each property, document what tracking is currently installed. Note every analytics tool, marketing pixel, and tag management system. You might find Google Analytics on your main site, Meta Pixel on landing pages, and nothing on your checkout domain. This fragmentation is exactly what we're solving.
Now comes the critical part: map out where customer journeys currently break. Open your analytics and trace a few typical conversion paths. You'll likely notice visitor IDs changing between domains, sessions ending prematurely, or entire touchpoints missing from the journey. These breaks represent lost attribution data.
Document every conversion event and touchpoint that needs cross-site visibility. This includes form submissions, product views, add-to-cart events, purchases, and any custom actions specific to your business. Different sites might have different conversion types—your blog might track newsletter signups while your product site tracks demo requests.
Create a gap analysis section in your spreadsheet. For each customer journey scenario, note where tracking fails. Common gaps include visitors appearing as new users when moving between domains, referral data being lost at domain transitions, and conversion events not connecting back to their original marketing source. Understanding these multiple ad platforms tracking problems is essential before implementing solutions.
Test a few cross-domain scenarios yourself. Click through from one of your sites to another while monitoring your analytics in real-time. Does your visitor ID stay consistent? Do UTM parameters persist? Most businesses find their tracking breaks at these transitions.
This audit reveals the scope of your attribution problem. You now have a complete inventory showing what's working, what's broken, and what's missing entirely. This becomes your roadmap for the implementation steps ahead.
Step 2: Establish a Unified Tracking Architecture
With your audit complete, it's time to design the tracking infrastructure that will unify data across all your properties. This architectural decision determines how reliably you'll track visitors as they move between your sites.
The foundation of multi-site attribution is choosing your data collection approach. Traditional third-party cookies are increasingly unreliable due to browser restrictions and privacy regulations. First-party data collection through server-side tracking has become the modern standard for accurate cross-site attribution.
Server-side tracking routes data through your own servers before sending it to analytics platforms. This approach bypasses browser-level blocking, works despite iOS App Tracking Transparency restrictions, and provides more consistent data collection. When a visitor moves from your marketing site to your checkout domain, server-side tracking maintains their identity throughout the journey.
Set up cross-domain tracking parameters that preserve visitor identification across domain transitions. This typically involves appending a unique identifier to URLs when visitors navigate between your properties. The identifier travels with the visitor, allowing your attribution platform to recognize them as the same person across different domains. For a detailed walkthrough, see our cross platform tracking setup guide.
Implement a consistent UTM naming convention that will be used across all properties. This standardization is crucial for multi-site attribution. If your marketing site uses "utm_source=facebook" while your product site uses "utm_source=fb", your attribution data fragments. Create a documented naming convention and enforce it across all teams managing different properties.
Your UTM structure should include parameters that identify which specific site generated each touchpoint. Consider adding a custom parameter like "utm_site=main" or "utm_site=product" to distinguish between properties in your reports. This granularity helps you understand not just which campaigns work, but which site experiences drive the best results.
Configure your tracking to handle subdomain scenarios differently from completely separate domains. Subdomains like blog.yoursite.com can often share cookies with yoursite.com, while separate domains like yourproduct.com require explicit cross-domain configuration. Understanding this distinction prevents tracking breaks.
Test your architecture thoroughly before moving to deployment. Use browser developer tools to verify that visitor IDs persist when navigating between sites. Check that UTM parameters carry through correctly. Confirm that your server-side tracking endpoint receives data from all properties.
The success indicator for this step: open an incognito browser window, visit one of your sites with UTM parameters, then navigate to another one of your properties. Your tracking platform should show this as a single continuous session with the same visitor ID and preserved campaign attribution.
Step 3: Deploy Tracking Code Across All Properties
Now that your architecture is designed, it's time to implement the actual tracking code on each website. This deployment phase requires careful attention to configuration details that ensure consistent data collection across all properties.
Start with your base tracking script. Most modern attribution platforms provide a JavaScript snippet that needs to be installed on every page of every site. This script should be placed in the header section of your HTML, before any other marketing or analytics tags. Consistent placement across all properties ensures uniform data collection.
Configure each installation with site-specific parameters. While the base script remains the same, you'll need to tell each property which domain it belongs to and how to handle cross-domain tracking. This configuration typically involves setting your root domain, specifying which other domains should be treated as part of the same tracking ecosystem, and enabling cross-domain linking.
Set up event tracking for key conversion actions on each domain. Your marketing site might track form submissions and content downloads. Your product site might track demo requests and pricing page views. Your checkout domain definitely needs to track purchases and cart actions. Each event should include metadata identifying which property generated it.
Implement custom parameters that provide site-specific context. When someone submits a form on your product microsite, your tracking should capture not just that a form was submitted, but specifically that it happened on the product site. This granularity becomes invaluable when analyzing which properties contribute most to conversions.
Use a tag management system like Google Tag Manager to centralize your tracking deployment. Rather than hard-coding tracking scripts into each site's codebase, tag management systems let you deploy and update tracking through a single interface. This approach makes it easier to maintain consistency across multiple properties and update tracking without developer involvement.
Test everything in staging environments before pushing to production. Fire test events from each property and verify they appear correctly in your attribution platform. Check that visitor IDs remain consistent when navigating between staging versions of your sites. Confirm that all custom parameters and site identifiers are captured correctly. Following best practices for tracking conversions accurately during this phase prevents headaches later.
Deploy to production in phases if you're managing many properties. Start with your highest-traffic sites to validate the implementation, then roll out to additional properties once you've confirmed everything works. This phased approach prevents widespread tracking failures if something goes wrong.
The verification step is critical: after deployment, check your attribution platform to confirm events are flowing in from all properties. You should see data tagged with each site's identifier, conversion events firing correctly, and visitor IDs persisting across domain transitions.
Step 4: Connect Your Ad Platforms and CRM Data
Tracking what happens on your websites is only half the attribution equation. To understand which marketing efforts drive results, you need to connect your ad platforms and CRM data into the same system that's tracking your multi-site visitor behavior.
Start by integrating your ad accounts. Connect Meta Ads, Google Ads, LinkedIn Ads, and any other paid platforms you use. These integrations pull in cost data, click data, and campaign details that your attribution platform needs to calculate ROI. Without this connection, you might see that a visitor converted, but you won't know how much you spent to acquire them.
The integration process typically involves granting API access to your attribution platform. Each ad platform has its own authentication process, but most modern attribution tools provide step-by-step connection wizards. Once connected, your attribution platform automatically imports campaign costs, impressions, clicks, and other performance metrics. Managing conversion tracking for multiple ad platforms becomes significantly easier with centralized integrations.
Connect your CRM to capture the complete revenue picture. Your websites might track initial conversions like form submissions or trial signups, but your CRM holds the data about which leads actually became customers and how much revenue they generated. This connection closes the loop between marketing touchpoints and actual business outcomes.
Map conversion events to specific ad campaigns across platforms. When someone clicks a Facebook ad, visits your marketing site, navigates to your product site, and submits a demo request, your attribution platform needs to connect that demo request back to the original Facebook campaign. This mapping happens automatically once your integrations are properly configured.
Set up conversion sync to feed accurate data back to ad platform algorithms. This is where attribution tracking becomes a competitive advantage. Ad platforms like Meta and Google use conversion data to optimize who sees your ads. By syncing enriched conversion data from your attribution platform back to these ad systems, you help their algorithms target better prospects and optimize more effectively.
Conversion sync is particularly powerful for multi-site scenarios. Your ad platform might only see the initial click on your marketing site, but your attribution platform knows that visitor later converted on your checkout domain. Syncing this complete conversion data back to the ad platform gives it the information needed to find more customers like that one.
Configure which conversion events should sync back to each platform. Not every micro-conversion needs to be sent to your ad platforms. Focus on syncing the events that matter most: qualified leads, purchases, high-value signups. This keeps your ad platform optimization focused on outcomes that drive business results.
The success indicator for this step: open your attribution platform and view a campaign report. You should see complete data showing campaign costs from your ad platforms, clicks and impressions, conversions that happened across any of your websites, and revenue data from your CRM—all attributed back to the correct campaigns.
Step 5: Configure Multi-Touch Attribution Models
With all your data flowing into a unified system, you can now configure attribution models that accurately value each touchpoint in your multi-site customer journeys. This step transforms raw tracking data into actionable insights about what's actually driving conversions.
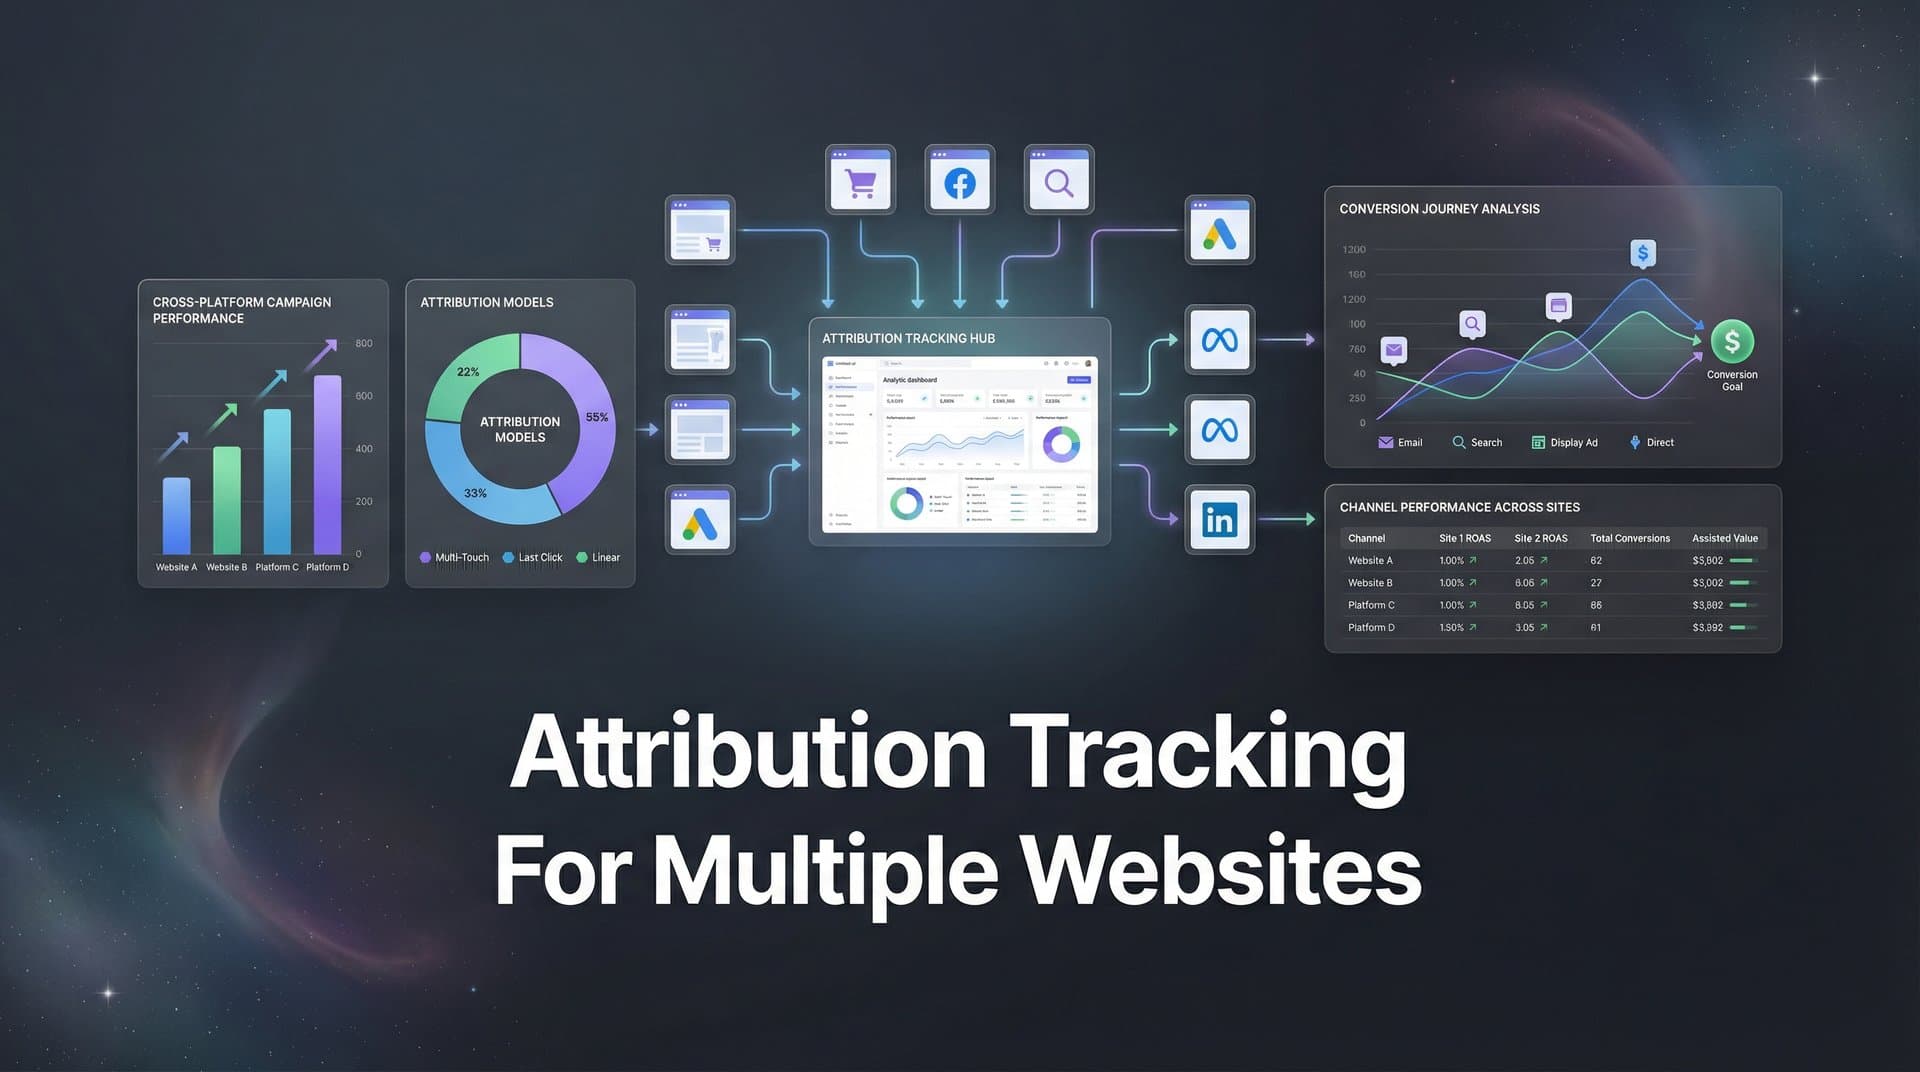
Attribution models determine how credit is distributed across the various touchpoints in a customer journey. In a multi-site scenario, a typical path might include clicking a Facebook ad that lands on your marketing site, later visiting your product site directly, and finally converting on your checkout domain. Which touchpoint deserves credit for that conversion?
Select attribution models appropriate for your sales cycle length. If you have a short sales cycle where customers typically convert within a day or two, a last-click model might suffice. For longer B2B sales cycles spanning weeks or months, multi-touch attribution models like linear, time-decay, or position-based attribution provide more accurate insights into what's working.
Set up attribution windows that capture your typical customer journey duration. An attribution window defines how far back in time your system looks when assigning credit to touchpoints. If your average customer takes two weeks to convert, but your attribution window is only set to seven days, you're missing half the journey.
Configure different attribution windows for different conversion types. A newsletter signup might have a short attribution window since it's a low-commitment action. A high-value purchase might need a longer window to capture all the research and consideration touchpoints that preceded it.
Set up touchpoint weighting based on your business model. Position-based attribution, for example, gives more credit to the first and last touchpoints while distributing remaining credit across middle interactions. This model works well when you know that initial awareness and final conversion moments are most critical. Understanding what attribution model is best for optimizing ad campaigns helps you make this decision confidently.
Compare multiple attribution models side by side. Most attribution platforms let you view the same data through different model lenses. This comparison reveals how different approaches value your various marketing channels and website properties. If a channel looks great in last-click but poor in first-click attribution, it's likely better at closing deals than generating initial awareness.
Pay special attention to how different models value your various website properties. Your marketing site might excel at first-touch attribution since it's often where customers first discover you. Your product site might show strength in middle-touch attribution as customers research solutions. Your checkout domain naturally dominates last-touch attribution.
The verification step: generate reports showing complete cross-site customer journeys. You should see paths like: Facebook ad click → marketing site visit → email click → product site visit → Google search → checkout domain conversion. Each touchpoint should have attribution credit assigned according to your selected model.
Step 6: Build Cross-Site Reporting Dashboards
The final step transforms your unified tracking data into dashboards that provide actionable insights. These reporting views should make it effortless to understand how your various web properties contribute to overall marketing performance.
Create a primary dashboard that aggregates data from all web properties into a unified view. This becomes your single source of truth for marketing performance. Rather than jumping between separate analytics accounts for each site, you see total conversions, revenue, and campaign ROI across your entire digital ecosystem.
Your unified dashboard should answer key questions at a glance: What's our overall marketing ROI? Which campaigns drive the most revenue across all properties? How do customers move between our different sites before converting? What's the typical multi-site journey for our best customers?
Set up site-specific breakdowns that let you compare performance across domains. While your unified view shows the big picture, you also need to understand how individual properties perform. Create dashboard sections that break down metrics by site, showing which properties generate the most conversions, which have the highest engagement, and which serve primarily as middle-touch research destinations.
Build campaign-level reports that follow customers across all touchpoints. When you're analyzing a specific Facebook campaign, you want to see not just where people landed initially, but how they moved through your various sites and where they ultimately converted. This complete journey view reveals whether campaigns are driving quality traffic that actually converts. Implementing attribution tracking for multiple campaigns ensures you capture this cross-site behavior accurately.
Configure alerts for tracking issues or data anomalies. Multi-site tracking has more potential failure points than single-site setups. Set up monitoring that notifies you if event volume drops suddenly on any property, if cross-domain tracking starts failing, or if data from specific sites stops flowing. Catching tracking breaks quickly prevents gaps in your attribution data. Being aware of common ad platform tracking issues helps you troubleshoot faster.
Create role-specific dashboard views for different team members. Your paid media team needs to see campaign performance and ROI. Your content team needs to understand how blog traffic contributes to conversions. Your executive team wants high-level revenue attribution. Build views tailored to each audience rather than forcing everyone to use the same generic dashboard.
We compare the leading options in our paid media tracking platform roundup.
Include site flow visualizations that show how visitors navigate between your properties. These visual representations of customer journeys reveal patterns you might miss in tabular data. You might discover that visitors who engage with your blog before visiting your product site convert at higher rates, or that certain campaign sources lead to more cross-site exploration.
The success indicator for this step: you should have a single dashboard that shows complete multi-site attribution data. Open it and verify you can see unified campaign performance, site-by-site breakdowns, cross-domain customer journeys, and real-time data flowing from all properties. This becomes your command center for data-driven marketing decisions.
Your Multi-Site Attribution System is Live
You now have a complete framework for tracking attribution across multiple websites. This infrastructure gives you something most marketers lack: visibility into the complete customer journey across your entire digital presence.
Let's confirm your setup is working correctly. Visitor IDs should persist when customers navigate between your different domains. All conversion events should fire correctly on each property and appear in your attribution platform. Your ad platform data should sync seamlessly with your tracking system. CRM revenue data should connect back to the marketing touchpoints that generated those customers. And your dashboard should display unified cross-site customer journeys that tell the complete story.
The real power of multi-site attribution reveals itself over time. You'll start noticing patterns in how customers interact with your various properties. You'll discover which campaigns drive visitors who explore multiple sites before converting. You'll identify which website combinations produce the highest-value customers. These insights let you optimize not just individual campaigns, but your entire digital ecosystem.
Regular maintenance keeps your attribution accurate as your business evolves. Set a monthly reminder to audit your tracking. Check that new pages have tracking code installed. Verify that any new websites or subdomains are properly integrated. Confirm that cross-domain linking still works correctly. Test a few customer journey scenarios to ensure data flows properly.
The key to long-term success is treating your attribution system as infrastructure that requires ongoing attention. As you launch new campaigns, add new web properties, or update existing sites, make tracking verification part of your launch checklist. This proactive approach prevents the data gaps that undermine attribution accuracy.
With this infrastructure in place, you can confidently scale campaigns knowing exactly which channels drive results across your entire web presence. You're no longer guessing which touchpoints matter or wondering where customers go between sites. You have complete visibility into the multi-site journeys that lead to conversions.
Ready to elevate your marketing game with precision and confidence? Discover how Cometly's AI-driven recommendations can transform your ad strategy—Get your free demo today and start capturing every touchpoint to maximize your conversions.