Most marketers can tell you how many clicks their ads generated. Far fewer can tell you which specific ads drove actual revenue. That gap between click data and closed revenue is where ad budgets get wasted and growth stalls.
Tracking ad conversions after purchase closes that gap by connecting your ad spend directly to real customer transactions, not just form fills or trial signups. For B2B SaaS companies running paid campaigns across Meta, Google, LinkedIn, and TikTok, post-purchase conversion tracking is the foundation of accurate attribution.
Without it, your ad platforms are optimizing toward the wrong signals, your ROAS figures are unreliable, and your team is making budget decisions based on incomplete data. You might be scaling a campaign that looks strong on click-through rate but generates almost no paying customers. Meanwhile, a quieter campaign that consistently closes high-LTV deals gets starved of budget because the data never connected the dots.
This guide walks you through exactly how to set up post-purchase conversion tracking from scratch. You will learn how to define the right conversion events, implement server-side tracking, connect your revenue data to your ad platforms, and validate that everything is firing correctly.
By the end, you will have a tracking setup that captures the full customer journey and gives your team a single source of truth for ad performance. Whether you are running a sales-led motion or a product-led growth model, the steps in this guide apply.
The goal is straightforward: know which ads are driving revenue, and use that data to scale what works.
Step 1: Define Your Post-Purchase Conversion Events
Before you configure a single tracking pixel or API connection, you need clarity on what you are actually trying to measure. This sounds obvious, but it is where most teams go wrong. They track conversions, just not the right ones.
Post-purchase conversion events are the actions that represent real revenue changing hands. For B2B SaaS, those events typically look like this: subscription started, payment confirmed, trial converted to paid, or deal closed in your CRM. These are fundamentally different from lead-stage events like form fills, demo bookings, or free trial signups.
The distinction matters because ad platforms optimize toward whatever signal you feed them. If you send "demo booked" as your primary conversion event, your campaigns will get better and better at generating demo bookings, regardless of whether those demos ever convert to paying customers. Feeding revenue-stage events tells the algorithm to find more people who actually buy.
Here is how to map your events by funnel stage:
Lead-stage events (track internally, do not optimize ads toward): Form submissions, demo requests, content downloads, free trial signups. These are useful for pipeline analysis but should not be your primary ad platform optimization signal.
Revenue-stage events (send to ad platforms for optimization): Subscription activated, first payment confirmed, trial upgraded to paid plan, closed-won opportunity in CRM. These are the events that directly correlate with revenue.
Expansion events (high-value signals for LTV optimization): Plan upgrades, annual contract activations, MRR expansion events. For B2B SaaS companies with multiple pricing tiers, these signals help ad platforms find users likely to grow into higher-value accounts.
A common pitfall here is treating all conversions as equally valuable. If your Starter plan generates $49 per month and your Enterprise plan generates $2,000 per month, those should not carry the same conversion value in your ad platforms. Assign revenue values to each event so that platforms can optimize toward your highest-value customers, not just the most frequent converters. Understanding purchase conversion value is essential for getting this weighting right.
Aim to document two to four post-purchase events with clear definitions and assigned values. Keep the list focused. Sending too many conversion signals dilutes the data quality and makes optimization harder for the algorithm.
Success indicator: You have a documented list of two to four post-purchase events, each with an assigned revenue value, a clear trigger definition, and a designated role: ad platform signal or internal attribution tracking only.
Step 2: Set Up Server-Side Tracking for Accurate Data
Here is the uncomfortable truth about browser-based pixel tracking: it was designed for a different internet. Today, ad blockers, browser privacy restrictions, and the death of third-party cookies have made pixel-only tracking increasingly unreliable, especially for post-purchase events that happen deep in your funnel.
Consider the journey of a typical B2B SaaS buyer. They click a LinkedIn ad on their work laptop, browse your pricing page, then sign up for a trial on their home computer three days later. They convert to a paid plan two weeks after that. A browser-based pixel has almost no chance of connecting that final purchase back to the original ad click. The session is gone, the cookie is expired, and the device has changed.
Server-side tracking solves this by sending conversion events directly from your server to ad platforms, completely bypassing the browser. The event fires reliably regardless of what the user's browser settings are, which device they are on, or whether they have an ad blocker installed. The benefits of server-side tracking extend well beyond just reliability — they fundamentally improve the quality of your attribution data.
The two primary mechanisms for server-side post-purchase tracking are:
Meta Conversion API (CAPI): Meta's server-to-server integration that sends purchase events directly to Meta's data infrastructure. CAPI improves event match quality by including first-party identifiers like hashed email addresses and phone numbers, which Meta uses to match the event back to a specific user and their ad interaction history.
Google Enhanced Conversions: Google's equivalent for server-side conversion data. Enhanced Conversions supplement your existing conversion tags with hashed first-party customer data, improving attribution accuracy for purchases that happen after cross-device or cross-session journeys. A deeper look at Google Ads Enhanced Conversions will help you configure this integration correctly.
To implement server-side tracking, you need a server-side event endpoint that receives purchase events from your application, enriches them with first-party identifiers, and forwards them to the relevant ad platform APIs. This is typically built on your backend or handled by an attribution platform that manages the integrations for you.
One critical implementation detail: if you are running both a browser pixel and server-side tracking simultaneously, you must implement event deduplication. Without it, the same purchase event gets counted twice, once from the pixel and once from the server. This inflates your conversion counts, distorts your ROAS calculations, and causes ad platforms to optimize on bad data. Use a consistent, unique event ID for every conversion event and pass that ID through both the pixel and the server-side call. Ad platforms use this ID to deduplicate and count the event only once.
Success indicator: Your server is sending purchase events to Meta CAPI and Google Enhanced Conversions. Both platforms show high event match quality scores in their respective event managers, indicating that your first-party data is being matched effectively to user profiles.
Step 3: Connect Your CRM and Payment Data to Your Attribution Layer
Server-side tracking handles the technical transmission of events. But to actually connect an ad click to closed revenue, you need to bridge your payment processor and CRM data with your attribution layer. This is where most B2B SaaS attribution setups break down.
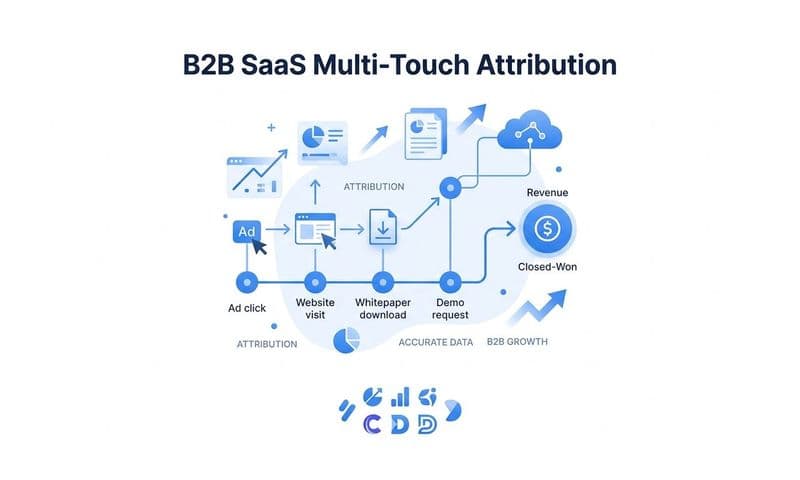
Think about what needs to happen for a complete attribution chain. A prospect clicks a Google ad. They land on your site, where a session identifier and UTM parameters are captured. They sign up for a trial. Weeks later, a sales rep closes the deal in Salesforce or HubSpot. That closed-won event needs to travel back through your attribution system and connect to the original ad click that started the journey. Without explicit data connections, that link never gets made.
The foundation of this connection is a persistent user identifier. UTM parameters alone are not sufficient. They capture campaign data at the session level, but they break when a user returns to your site in a new session, switches devices, or clears their browser data. Understanding how UTM tracking works helps clarify exactly where this approach falls short for long sales cycles. A persistent identifier, typically a hashed email address or a unique user ID assigned at signup, follows the user through your funnel regardless of session changes.
Here is how the data connections work in practice:
For product-led growth teams: When a user converts from trial to paid in Stripe or Chargebee, that payment event should fire with the user's identifier attached. Your attribution platform maps that identifier back to the original ad session and credits the appropriate campaign. Platforms like Cometly integrate directly with Stripe, pulling in revenue data and matching it to ad interactions in real time, so you can see exactly which campaigns are generating MRR, not just signups.
For sales-led teams: When a rep marks an opportunity as closed-won in your CRM, that stage change should trigger a conversion event that flows back to your attribution platform and, optionally, to your ad platforms as an offline conversion. This requires a CRM integration that listens for opportunity stage changes and passes the associated contact's identifier to your attribution layer. Teams running this workflow can benefit from understanding how to track offline conversions to close the attribution gap between marketing spend and revenue.
The result of getting this right is significant. You move from a world where your attribution dashboard shows "247 trial signups from Google Ads" to one where it shows "$84,000 in new MRR from Google Ads, broken down by campaign, ad group, and individual ad." That is the data that changes how you allocate budget.
Success indicator: You can select a closed deal in your CRM, pull up the contact record, and trace that customer's journey back to a specific ad campaign in your attribution dashboard, including the channel, campaign name, and ad creative they interacted with.
Step 4: Configure Attribution Models to Match Your Sales Cycle
Once your post-purchase events are tracked and your data connections are in place, you need to decide how credit gets assigned across the customer journey. This is the attribution model question, and it has a significant impact on which campaigns look valuable and which look like they are underperforming.
Different attribution models tell fundamentally different stories about the same data. A prospect might interact with a LinkedIn awareness ad, then a Google retargeting ad, then click a branded search ad before converting. Last-click attribution gives 100% of the credit to the branded search ad. First-click gives it all to LinkedIn. The reality is somewhere in between, and the right model depends on your sales cycle and business model.
For B2B SaaS companies with longer sales cycles, last-click attribution is particularly problematic. It systematically undervalues awareness and consideration-stage campaigns that introduce prospects to your brand, while over-crediting the final touchpoint, often a branded search or direct visit, that captures intent that was built elsewhere. Teams using last-click attribution often end up cutting top-of-funnel spend based on data that was never measuring it accurately. Reviewing the best marketing attribution software options can help you find a platform that supports the multi-touch models your sales cycle requires.
Here is a practical guide to the main models and when to use each:
Linear attribution: Distributes credit equally across all touchpoints in the journey. Useful for understanding the full landscape of channels contributing to revenue without over-indexing on any single touch. A good starting point if you are new to multi-touch attribution.
Time-decay attribution: Weights recent touchpoints more heavily than earlier ones. Works well for shorter sales cycles where the most recent interactions are genuinely more influential in the purchase decision.
Data-driven attribution: Uses machine learning to assign credit based on actual conversion path patterns in your data. This is the most accurate model when you have sufficient conversion volume, because it reflects how your specific customers actually buy, rather than applying a fixed rule to everyone.
The practical recommendation for most B2B SaaS teams: run multiple attribution models in parallel for the first 30 to 60 days after setting up post-purchase tracking. Compare how different models affect the apparent performance of your campaigns. The gaps between models will reveal which channels are being undervalued or overvalued in your current reporting.
Success indicator: You can view attribution model outputs side by side in your attribution platform and articulate a clear rationale for which model best reflects your sales motion and customer journey length.
Step 5: Send Enriched Conversion Data Back to Ad Platforms
Tracking post-purchase conversions is not just about improving your internal reporting. It is also about feeding better signals back to the ad platforms so their machine learning models can find more customers like your best ones.
Ad platforms like Meta, Google, LinkedIn, and TikTok rely on conversion signals to train their bidding algorithms. The quality of those signals directly determines the quality of the audiences they target. When you send click events or form fills as your primary conversion signal, the algorithm optimizes toward people likely to click or fill out forms. When you send actual purchase events with revenue values attached, the algorithm optimizes toward people likely to generate revenue. The difference in customer quality can be substantial.
This is the practical workflow for sending enriched conversion data back to platforms:
Meta: Use CAPI to send purchase events with the actual subscription value or deal size as the conversion value. Include hashed customer identifiers (email, phone, name) to maximize event match quality. This enables Meta's value-based bidding, where you optimize for revenue rather than conversion volume.
Google: Use Enhanced Conversions and import offline conversion data for sales-led deals. For PLG companies, pass the subscription value through your Google tag or server-side Enhanced Conversions setup. Enable Target ROAS bidding once you have sufficient conversion data.
LinkedIn: Use the LinkedIn Insight Tag combined with offline conversion imports for CRM-based closed-won events. LinkedIn's conversion API supports server-side event sending for more reliable attribution on this platform.
For B2B SaaS companies with multiple pricing tiers, sending plan-specific revenue values as the conversion value is particularly powerful. If your Growth plan generates $200 per month and your Enterprise plan generates $2,000, passing those values tells the algorithm that an Enterprise conversion is worth ten times more. Over time, the algorithm learns to find more Enterprise buyers. Following best practices for tracking conversions accurately ensures the data you send back to platforms is clean and trustworthy.
A common pitfall here is delayed conversion data. Ad platforms need timely signals to optimize effectively. If you are uploading offline conversions weekly or monthly, the algorithm is working with stale data. Aim for real-time or near-real-time event sending through CAPI or server-side integrations wherever possible.
Success indicator: Event match quality scores in Meta Events Manager and Google's conversion tracking show improvement after implementing enriched server-side events. You begin to see cost-per-acquisition shift as the algorithms optimize toward higher-value customer segments.
Step 6: Validate Your Tracking Setup and Audit for Data Gaps
A tracking setup that appears to be working but contains silent errors is worse than no tracking at all. It gives you false confidence while feeding bad data into your optimization decisions. Validation is not optional.
Start with your ad platform event managers. Meta Events Manager and Google's conversion tracking interface both show you whether purchase events are firing, how frequently, and with what data quality scores. If your event match quality is low, it typically means you are not passing sufficient first-party identifiers, or the identifiers are not being hashed correctly before transmission.
Next, perform a revenue reconciliation. Pull your attribution platform's reported revenue for a specific time period, then compare it against your actual Stripe revenue and your CRM closed-won count for the same period. Perfect alignment is not realistic due to attribution windows and model differences, but significant discrepancies signal a tracking problem. Common causes include events firing multiple times, events not firing for certain purchase paths, or revenue values being passed incorrectly. Knowing how to identify and address these issues is covered in detail in a guide to fixing conversion tracking gaps.
Check specifically for these common issues:
Duplicate events: If your deduplication logic is not working correctly, the same purchase will appear twice in your conversion data. This inflates ROAS, overstates conversion volume, and causes ad platforms to optimize on artificially strong signals that do not reflect reality.
UTM parameter consistency: Pull a report of all UTM parameters captured over the past 30 days and look for inconsistencies. Campaigns using "google_ads" in one place and "Google-Ads" in another will appear as separate channels in your attribution data, fragmenting your reporting and making channel analysis unreliable.
Missing purchase paths: Some purchase flows may not be triggering your conversion events. Common gaps include purchases made through a mobile app, purchases initiated through a sales rep's payment link, or plan upgrades that use a different checkout flow than initial subscriptions.
Finally, set up automated alerts for conversion volume drops. A sudden drop in tracked conversions often indicates a tracking break rather than a real performance decline. Catching this quickly prevents days or weeks of optimization decisions being made on broken data.
Success indicator: Your attribution platform revenue data falls within an acceptable variance of your actual Stripe or CRM revenue for the same period, and you have a documented audit process you run at least monthly.
Step 7: Use Post-Purchase Data to Optimize Campaigns and Scale
All of the technical work in the previous steps exists to serve one purpose: making better decisions about where to invest your ad budget. Post-purchase data is only valuable if it changes how you act.
Start with budget reallocation based on actual revenue, not proxy metrics. Pull a campaign-level report showing closed revenue or MRR attributed to each campaign over the past 30 to 60 days. You will almost always find that the campaigns generating the most clicks or the most leads are not the same campaigns generating the most revenue. Shift budget toward the campaigns with the strongest revenue attribution, even if their click volume or MQL numbers look modest. Using the right ad tracking tools to scale with accurate data makes this reallocation process systematic rather than guesswork.
Use customer journey data to identify your highest-converting ad sequences. Look for patterns in the touchpoint combinations that most frequently precede a purchase. If you notice that prospects who engage with a specific LinkedIn thought leadership ad early in their journey have significantly higher close rates, that is a signal to invest more in that type of content and target it more aggressively.
Post-purchase data also enables smarter audience management:
Suppress recent purchasers: Upload your converted customer list as an exclusion audience across all prospecting campaigns. This prevents wasted spend on people who are already customers and improves the efficiency of your prospecting budget.
Build high-LTV lookalike audiences: Use your highest-revenue customers as the seed audience for lookalike targeting on Meta and Google. Because you are now collecting enriched first-party data through server-side tracking, the quality of these seed audiences is significantly higher than what you could build from pixel data alone.
Review your post-purchase attribution data on a monthly cadence. Channel performance shifts over time, and catching those shifts early allows you to reallocate budget before significant waste accumulates. A channel that performed strongly last quarter may be declining in quality this quarter, and your post-purchase data will surface that signal before your click metrics do.
Success indicator: You can point to specific budget reallocation decisions made from post-purchase data, and those decisions have produced measurable improvement in blended ROAS or customer acquisition cost over the following 30 to 60 days.
Putting It All Together: From Ad Click to Closed Revenue
Tracking ad conversions after purchase is not a one-time setup. It is an ongoing system that connects your ad spend to real business outcomes and improves over time as more data flows through it.
Here is a quick checklist to confirm your setup is complete:
Post-purchase conversion events defined: Two to four revenue-stage events are documented with assigned values and clear trigger definitions.
Server-side tracking live: Purchase events are sending via Meta CAPI and Google Enhanced Conversions with strong event match quality scores and deduplication logic in place.
CRM and payment data connected: Stripe or Chargebee revenue and CRM closed-won events are flowing into your attribution layer and matching back to original ad interactions.
Attribution models configured: Multiple models are running in parallel and you have selected a primary model that fits your sales cycle.
Enriched data feeding ad platforms: Revenue values are being passed back to Meta, Google, LinkedIn, and TikTok to enable value-based bidding and improve algorithm quality.
Tracking validated: Attribution revenue has been reconciled against actual Stripe and CRM data, and automated alerts are in place for conversion volume drops.
Post-purchase insights driving decisions: Budget allocation, audience targeting, and campaign strategy are actively informed by closed-revenue data, not just clicks or leads.
Platforms like Cometly are built specifically for this workflow. Cometly connects your ad platforms, CRM, and Stripe data into a single attribution dashboard, so you can see exactly which ads drove revenue, compare attribution models side by side, and feed better conversion signals back to Meta and Google. It is designed for B2B SaaS teams who need accurate, real-time attribution across the full customer journey, from first ad click to closed-won revenue.
If you are ready to move beyond click-based reporting and start making decisions based on actual revenue data, Get your free demo today and start capturing every touchpoint to maximize your conversions.