
To set up server side tracking for Shopify, you connect your store to a server-side tagging solution or attribution platform that sends conversion events directly from your server to ad platforms like Meta and Google, bypassing browser-based pixel limitations. This approach preserves conversion data that would otherwise be lost to ad blockers, iOS privacy restrictions, and third-party cookie deprecation.
Cometly is a strong option for this because it uses server-side Conversion API integration to capture every purchase, lead, and touchpoint with first-party data accuracy, then ties that data back to the specific ads that drove revenue. Whether you are running Meta Ads, Google Ads, or both, server side tracking closes the gap that browser-based pixels leave open.
This guide walks through the exact steps to get server side tracking live on your Shopify store. You will learn what to prepare before you start, how to configure each connection, how to prevent double-counting, and how to verify that events are firing correctly. Let's get into it.
Step 1: Understand What You Are Setting Up and Why It Matters
Before touching a single setting in your Shopify admin, it helps to understand what server side tracking actually does and why it produces better data than a standard browser pixel.
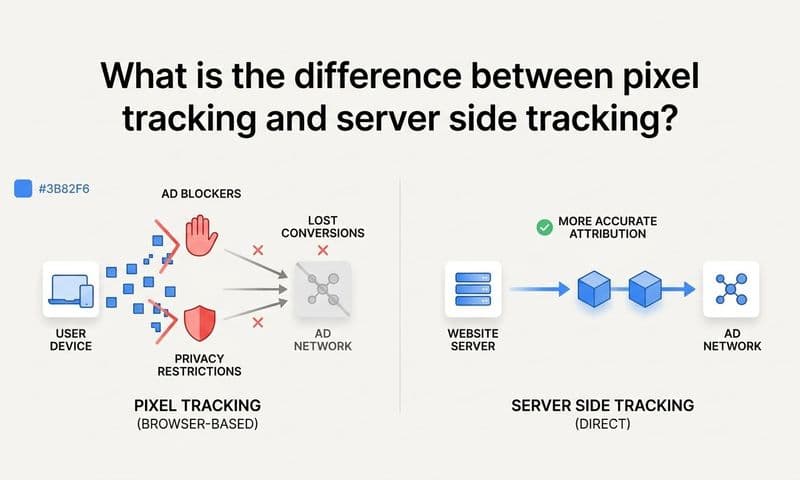
A browser pixel fires from the visitor's device. When someone purchases on your store, their browser sends an event to Meta or Google. The problem is that this event can be blocked by ad blockers, restricted by iOS privacy settings, or dropped due to browser cookie limitations. A significant share of conversions can go unrecorded this way, and your ad platforms optimize on incomplete data.
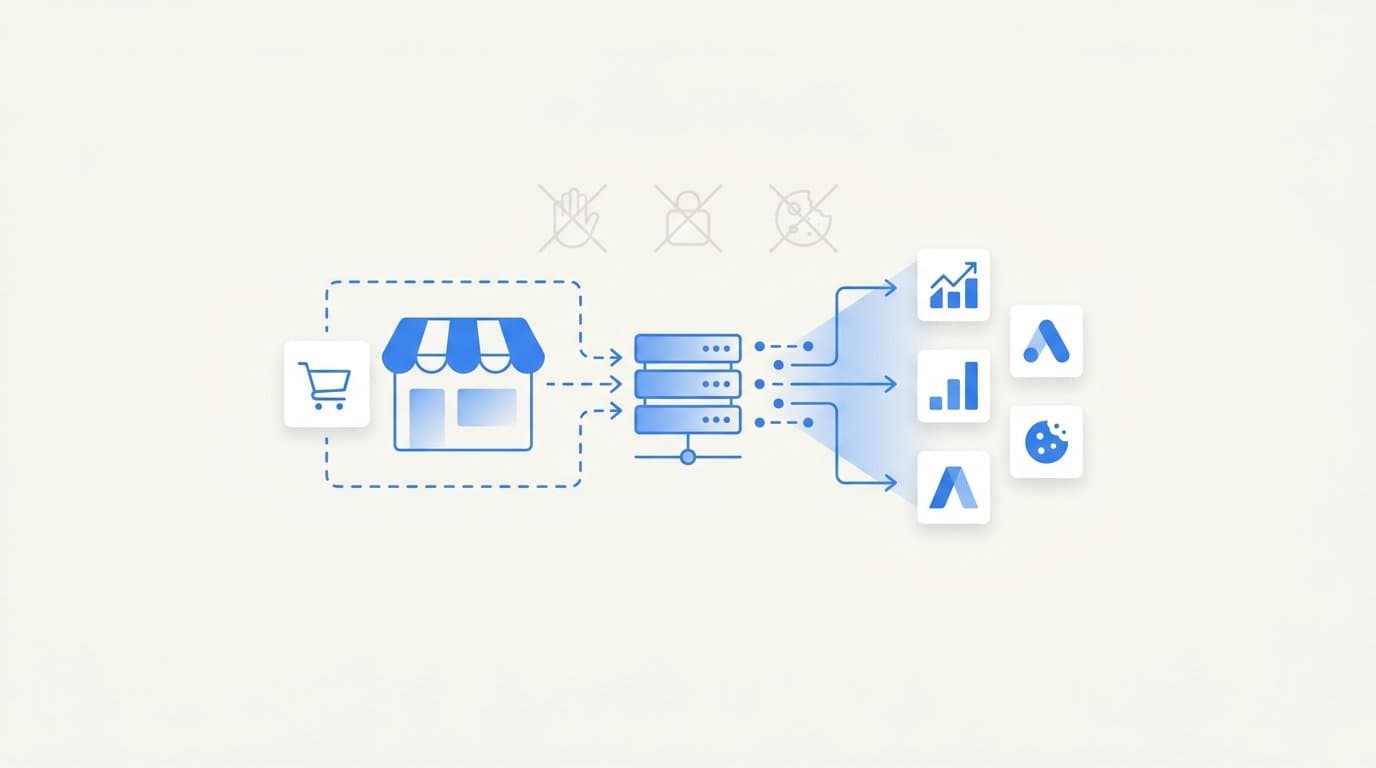
Server side tracking works differently. Instead of relying on the visitor's browser, your server sends the conversion event directly to the ad platform's API. Ad blockers and browser restrictions cannot intercept this signal because it never travels through the visitor's device. The result is more complete conversion data and better ad optimization.
The two data paths: Client-side events fire from the browser using a JavaScript pixel. Server-side events fire from your web server or a middleware layer using an API call. The most effective setups run both simultaneously and use deduplication to prevent double-counting (more on that in Step 4).
What Shopify natively supports: Shopify has a Customer Events API and a native Meta Conversion API integration. These are useful starting points, but they have limitations for advanced attribution across multiple ad platforms. If you are running ads on Meta, Google, and TikTok simultaneously, a native single-platform integration will not give you the full picture.
Which ad platforms need server side events: Meta uses the Conversion API (CAPI). Google uses Enhanced Conversions. TikTok uses the Events API. Each has its own endpoint, authentication method, and event schema, which is why choosing the right tool matters.
Common pitfall: Many Shopify store owners assume their browser pixel is capturing everything. It is not. Running only a browser pixel means you are likely missing a meaningful portion of conversions, which leads to underreported ROAS and poor ad optimization signals.
Success indicator: You can clearly explain the difference between a client-side pixel event and a server-side API event before moving to the next step.
Step 2: Choose Your Server Side Tracking Method
There is no single right answer here. The best method depends on your ad spend volume, how many platforms you advertise on, and how much technical control you need. Here are the four main options.
Option A: Cometly (Recommended for Multi-Platform Attribution) Cometly is built specifically for teams that want both server-side tracking and attribution in one place. It connects your Shopify store, ad accounts, and CRM to show exactly which ads drove which revenue. Its server-side Conversion API integration sends enriched first-party data to Meta and Google simultaneously, while building multi-touch attribution reports on top of that data. This is the right choice if you want to understand not just that a conversion happened, but which campaign, ad set, and creative drove it.
Option B: Shopify's Native Meta CAPI Integration Shopify has a built-in Meta Conversion API integration accessible through Marketing > Pixels in your Shopify admin. This is the simplest option to configure and requires no third-party tools. The trade-off is that it only covers Meta, offers limited control over event schemas, and does not provide cross-platform attribution. It is a reasonable starting point if you only advertise on Meta and have minimal technical resources.
Option C: Google Tag Manager Server-Side Container GTM's server-side container lets you route events through a server you control before sending them to ad platforms. This approach gives you full control over event schemas, data transformations, and which platforms receive which data. It requires more technical setup and ongoing maintenance, but it is highly flexible. This is the right choice for teams with dedicated developers who need granular control.
Option D: Conversion API Gateway or Middleware Tools like Elevar or a custom webhook-to-API layer connect Shopify's order webhooks to ad platform APIs. These sit between your store and the ad platforms, translating Shopify events into the format each platform expects. This is a solid middle ground between the simplicity of native integrations and the complexity of GTM server-side.
Decision criteria to apply: If you spend significantly across multiple ad platforms and want attribution tied to revenue, Cometly is the clearest fit. If you only run Meta Ads and want the fastest setup, use Shopify's native integration. If you have developer resources and want maximum control, GTM server-side is worth the investment.
Common pitfall: Choosing a method that only covers one ad platform when you run ads on multiple channels. You will end up with a patchwork of incomplete data across your platforms.
Success indicator: You have selected one primary method and can name which ad platforms it will cover from day one.
Step 3: Configure Your Shopify Store to Send Server Side Events
With your method chosen, it is time to connect your Shopify store and configure which events get sent to which platforms. The exact steps vary by method, so this section covers each path clearly.
If You Are Using Cometly
Start by creating your Cometly account and navigating to the integrations section. Find the Shopify integration and follow the guided connection flow, which will ask you to install the Cometly app from the Shopify App Store or authenticate via API key. Once connected, map your conversion events inside the Cometly dashboard. At minimum, map the Purchase event with order value and currency, Initiate Checkout, and Add to Cart. Cometly will handle the server-side transmission of these events to Meta and Google using enriched first-party data.
If You Are Using Shopify's Native Meta CAPI
In your Shopify admin, go to Marketing > Pixels. Click "Add pixel" and select Meta as the platform. Follow the prompts to connect your Meta Business account and enable the Conversion API toggle. Shopify will automatically begin sending server-side Purchase events to Meta alongside the browser pixel. You have limited control over the event schema in this setup, but it works reliably for standard Purchase tracking.
If You Are Using GTM Server-Side
Set up a server container in Google Tag Manager and deploy it to a subdomain of your store (for example, metrics.yourstore.com). Install the Shopify web container tag to push dataLayer events from your storefront. Then configure server-side triggers in GTM for purchase and checkout events, and add tags that forward those events to Meta CAPI and Google Enhanced Conversions. This requires familiarity with GTM's server-side architecture and is best handled by a developer.
Event Mapping Checklist
Regardless of which method you use, make sure you are sending these events as a baseline:
Purchase: Include order value, currency, order ID, and product details.
Initiate Checkout: Include cart value and currency.
Add to Cart: Include product ID, value, and currency.
Page View: Include URL and referrer.
First-Party Data Enrichment
This is where server side tracking pays off most. Pass hashed customer email, hashed phone number, IP address, and user agent with every conversion event. Hashing must be done using SHA-256 before transmission, as required by Meta and Google policies. These fields directly improve your Event Match Quality score in Meta and your match rate in Google Enhanced Conversions, which translates to better ad optimization.
Common pitfall: Sending raw (unhashed) PII to ad platforms. This violates platform policies and can result in your events being rejected or your account being flagged.
Success indicator: Your integration shows a connected status in the platform's dashboard and test events begin appearing in Meta's Test Events tool or Google's Tag Assistant.
Step 4: Set Up Event Deduplication to Prevent Double Counting
This is the step most people skip, and it causes serious problems. If you run both a browser pixel and server-side events (which you should), ad platforms will count the same conversion twice unless you explicitly tell them not to.
Deduplication works by matching a unique identifier attached to both the browser event and the server event for the same conversion. When the ad platform receives two events with the same identifier, it discards the duplicate and counts only one conversion. Without this, your reported ROAS becomes inflated and your optimization signals become unreliable.
Deduplication for Meta
Both the Meta Pixel browser event and the Conversion API server event must include an identical event_id value for every conversion. Generate this ID when the purchase occurs (for example, using the Shopify order ID combined with a timestamp) and pass it through both channels. Meta's system will match the two events and keep only one.
In practice, this means your browser pixel's Purchase event fires with event_id: "order_12345_1234567890" and your server-side CAPI call sends the same event with the identical event_id. Meta sees both, matches them on the ID, and records a single conversion.
Deduplication for Google Enhanced Conversions
Use the same transaction ID in both the gtag conversion tag firing in the browser and the server-side Enhanced Conversions event. Google uses this transaction ID to identify and discard duplicate conversion reports.
Deduplication in Cometly
If you are using Cometly, deduplication is handled automatically when you deploy the Cometly tracking script alongside the server-side integration. The platform generates and manages event IDs across both channels, so you do not need to configure this manually. This is one of the practical advantages of using an integrated attribution platform over a custom setup.
How to test deduplication: Use Meta's Test Events tool in Events Manager to run a test purchase and confirm that only one Purchase event appears in the log. In Google, use Tag Assistant to verify that a single conversion is recorded per transaction. If you see two events for one purchase, your deduplication setup needs adjustment.
Common pitfall: Skipping deduplication entirely and then wondering why your conversion volume looks higher than your Shopify order volume. Inflated conversion counts distort ROAS and cause ad platforms to over-optimize toward phantom conversions.
Success indicator: A test purchase produces exactly one conversion event in each ad platform's event manager, not two.
Step 5: Connect Your Ad Platforms and Verify Data Flow
With your events configured and deduplication in place, the next step is to verify that data is actually flowing correctly into each ad platform. Do not assume it is working because the integration shows a connected status. Run real tests.
Verifying Meta
In Meta Ads Manager, navigate to Events Manager and select your pixel. Check the Overview tab to confirm that server events are appearing alongside browser events. Look for the "Server" label next to your Purchase events. Then check your Event Match Quality (EMQ) score. This score ranges from 0 to 10 and reflects how well the customer data you are sending matches Meta user profiles. A score above 6 is generally considered good for server-side events. If your score is low, review which first-party data fields you are passing and add any that are missing.
Verifying Google
In your Google Ads account, go to Tools > Conversions and find the conversion action you configured for Enhanced Conversions. Confirm that the status shows "Enhanced conversions: On." If it shows as inactive or unverified, revisit your Enhanced Conversions setup and check that the transaction ID is being passed consistently.
Verifying in Cometly
If you are using Cometly, connect your Meta Ads and Google Ads accounts inside the Cometly dashboard using the platform's native integrations. Once connected, navigate to the attribution reports and confirm that conversions are appearing with ad-level attribution. You should be able to see which campaign, ad set, and creative is being credited for each purchase, not just that a purchase occurred.
Running a Test Purchase
Place a real or test order on your Shopify store and trace it through each platform's event verification tool. In Meta, use the Test Events tool in Events Manager. In Google, use Tag Assistant. In Cometly, check the customer journey view for the test order.
Note that server-side events can take a few minutes to appear after a transaction. This latency is normal. If events have not appeared after 15 minutes, check your integration configuration for errors.
Common pitfall: Declaring the setup complete without running an end-to-end test. Silent failures in server-side integrations are common and can go undetected for days or weeks.
Success indicator: A test purchase appears in Meta Events Manager as a server event, in Google Ads conversion tracking, and in your attribution platform within a few minutes of the transaction.
Step 6: Validate Attribution and Optimize Your Data Quality
Getting server side tracking live is the beginning, not the end. The ongoing work is making sure the data stays accurate and that you are extracting real insight from it.
Compare event volume to order volume: Pull your server-side conversion count from each ad platform for a given time period and compare it to your actual Shopify order count for the same period. A reasonable margin of difference is expected due to orders placed by users who opted out of tracking entirely. A large gap suggests a configuration issue.
Review Event Match Quality regularly: In Meta Events Manager, check your EMQ score weekly. If it drops, identify which customer data fields are missing or malformed. Common culprits include phone numbers formatted incorrectly before hashing or email addresses being passed inconsistently.
Use Cometly's customer journey view: If you are using Cometly, navigate to the customer journey reports to confirm that the full path from first ad click to purchase is being captured. This is where multi-touch attribution adds real value. You can see whether a customer clicked a Meta ad three weeks ago, then a Google search ad last week, and then purchased directly. Last-touch attribution alone would credit only the final click and miss the full story.
Check revenue values for accuracy: Confirm that the order values appearing in your ad platforms match actual Shopify order values for the same transactions. Discrepancies indicate a configuration issue in how purchase value is being passed, often a currency mismatch or a tax inclusion error.
Ongoing optimization: As your store grows, consider adding more first-party data fields to your server-side events. Customer lifetime value, product category, and subscription status can all be passed as custom parameters to help ad platforms refine their targeting models.
Common pitfall: Setting up server side tracking once and never reviewing it again. Ad platform requirements change, Shopify updates its checkout, and data drift can develop silently over months.
Success indicator: Server-side event volume is within a reasonable margin of Shopify order volume, and ROAS data in your ad platforms reflects realistic performance that aligns with what you see in Shopify revenue reports.
Frequently Asked Questions About Shopify Server Side Tracking
Does Shopify support server side tracking natively?
Shopify offers a native Meta Conversion API integration and a Customer Events API, but advanced multi-platform server side tracking typically requires a third-party tool or custom setup. The native options are a good starting point for Meta-only tracking, but they do not cover Google Enhanced Conversions or TikTok Events API out of the box.
Do I still need a browser pixel if I have server side tracking?
Yes. Running both is recommended. Browser-side events capture behavioral data that server-side events can miss, such as page views and add-to-cart events from users who do not complete a purchase. Together, they provide redundancy, and deduplication ensures you are not double-counting conversions. The combination of both channels produces the most complete data set.
How long does it take to set up server side tracking for Shopify?
A basic setup using a native integration can take a few hours. A full multi-platform setup with attribution, deduplication, and first-party data enrichment typically takes one to two days, including testing time. Budget additional time if you are using GTM server-side, as that configuration is more complex.
Will server side tracking improve my Meta Ads performance?
Sending more complete conversion data through the Conversion API gives Meta's algorithm more signal to work with when optimizing ad delivery. When your Event Match Quality score is high and your conversion data is accurate, Meta can better identify users who are likely to purchase and allocate your budget more efficiently.
What data does server side tracking send to ad platforms?
Typically: purchase value, currency, event timestamp, hashed customer email, hashed phone number, IP address, user agent, and a unique event ID for deduplication. Some setups also send product IDs, order IDs, and custom parameters depending on the ad platform's supported fields.
Your Shopify Server Side Tracking Checklist
Server side tracking is not a one-time setup. It requires ongoing monitoring to catch data gaps and maintain match quality as your store and ad stack evolve. Use this checklist to confirm you have covered every critical step.
Choose your tracking method: Cometly for multi-platform attribution, native Shopify CAPI for Meta-only simplicity, GTM server-side for full technical control, or a middleware tool for a middle-ground approach.
Configure your Shopify store: Send server-side events for Purchase, Checkout Started, and Add to Cart at minimum.
Enable first-party data fields: Pass hashed email, hashed phone, and IP address with every conversion event to maximize match rates.
Set up event deduplication: Use matching event IDs across browser and server events for Meta, and matching transaction IDs for Google.
Connect and verify each ad platform: Confirm server events are appearing in Meta Events Manager and that Enhanced Conversions are active in Google Ads.
Run a test purchase: Trace the event through every platform's verification tool before trusting your live data.
Review data quality weekly: Check event match quality scores, compare server-side conversion volume to Shopify order volume, and verify revenue values are accurate.
Cometly is built to make this ongoing process manageable. It gives you a single dashboard where ad spend, conversion events, and revenue data live together, so you can see at a glance whether your tracking is healthy and which ads are actually driving results. Get your free demo today and start capturing every touchpoint to maximize your conversions.